
Example: Providing OpenID Connect SSO to a Salesforce.com Auth Provider
This example will guide you through the steps required to configure single sign-on for Salesforce.com using OpenID Connect.
To configure single sign-on for Salesforce using OpenID Connect
-
Log in to the Administration Console using the desktop shortcut Cloud Access Manager Application Portal, then select Add New from the Applications section on the home page.
Cloud Access Manager provides a set of application templates to automatically configure common applications. This example describes how to configure an application manually, rather than using a template.
- Click Configure Manually.
- Select Using OpenID Connect / OAuth 2.0, then click Next.
- Create a new Auth. Provider in Salesforce of type Open ID Connect and enter the endpoint, issuer and client information displayed on the Cloud Access Manager OpenID Connect / OAuth 2.0 Settings page, see Step 3.
- After creating the Auth Provider in Salesforce, copy the Callback URL into the Redirect URI text box on the Cloud Access Manager Using OpenID Connect / OAuth 2.0 Settings page.
- Select Confidential as the Client Type.
- Select Sign token with shared secret as the Token Signing method.
- Click Next to continue.
- Select Do not proxy this application, then click Next.
- You will now see the Permissions page which enables you to control the users who can access the application. By default, all Cloud Access Manager users have access to the application. You can restrict access to the application to users who belong to a specific Cloud Access Manager role, but for this demonstration deployment, simply click Next to allow all Cloud Access Manager users to access the application.
- Enter an Application Name, for example, Salesforce, then click Next.
- Enter the URL that you want your users to be initially logged into, for example, https://login.salesforce.com/services/auth/sso/<provider_id>/CAM
- Enter can now configure how the application is displayed on the Cloud Access Manager Portal. Enter the Title and Description you want to display on the Cloud Access Manager Portal.
-
Click Fetch icon from application to locate and display the application icon.
NOTE: In addition the Add application to application portal home and Allow user to remove application from application portal home options allow you to specify whether the application should automatically appear on each user’s portal page and how the user can manage the application from the application portal.
Table 4: Application portal options Add application to application portal home Allow user to remove application from application portal home Functionality application is added to the portal and it cannot be removed by the user through the application catalog. application is added to the portal and it can be removed by the user through the application catalog application is not automatically added to the portal. The user can add or remove the application to/from the portal through the application catalog. To access the application catalog from the application portal, the user simply needs to click their username, then select Application Catalog.
Depending on the settings in the Add application to application portal home and Allow user to remove application from application portal home options, the user can add or remove applications to/from the application portal.
-
Click Finish to complete the configuration of the application.
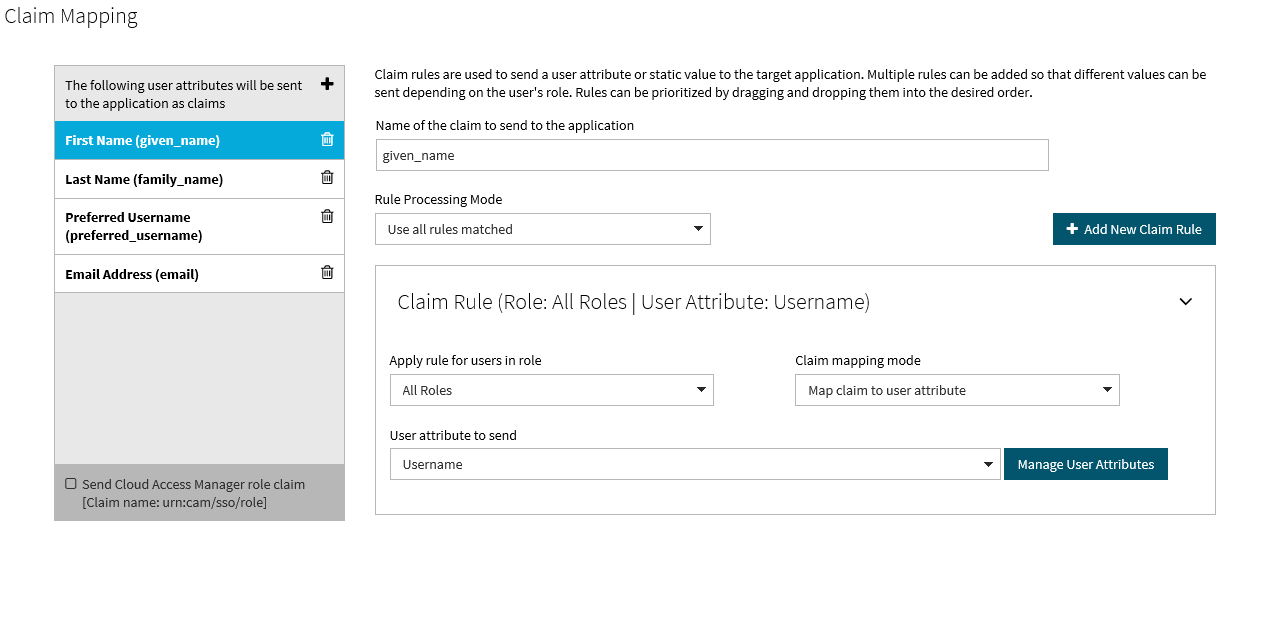
NOTE: Some claims need to be set up manually. To do this, edit the application and select the Claim Mapping tab. Add claims for given_name, family_name, preferred_username and email.


To configure your Salesforce account to authenticate your users with Cloud Access Manager OpenID Connect
- Login to Salesforce with administration rights.
- Go to Setup.
-
Go to Security | Auth Provider.
- Click New.
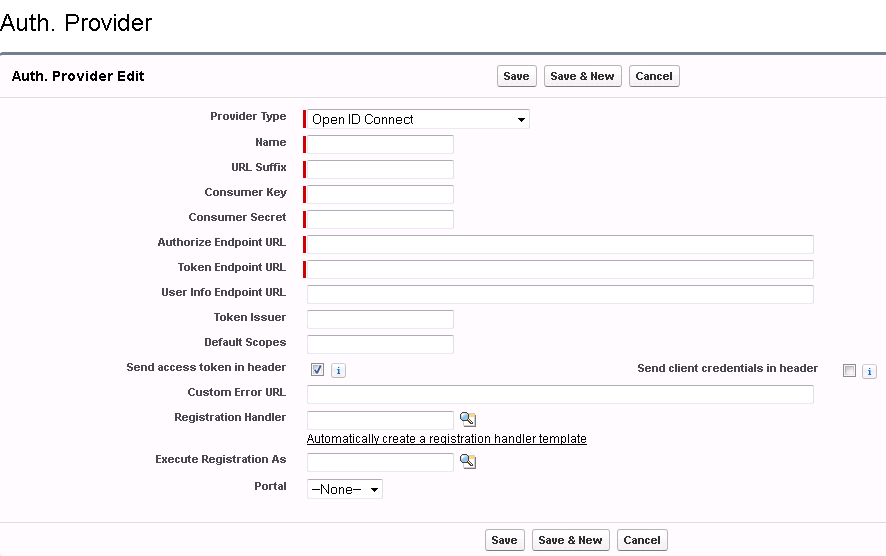
- In Provider Type select Open ID Connect from the list.
- Enter a Name for the provider.
-
Copy the corresponding values from your Cloud Access Manager OpenID Connect / OAuth 2.0 Settings into the appropriate fields, Consumer Key, Consumer Secret, Authorize Endpoint URL, Token Endpoint URL, User Info Endpoint URL, Token Issuer.
NOTE: You should verify that your Cloud Access Manager sends a full certificate chain with its SSL certificate or the Salesforce server may return an error and refuse to connect to the required Endpoints; the error returned is not explanatory.
- Click Automatically create a registration handler template.
-
Select a privileged user for Execute Registration As.
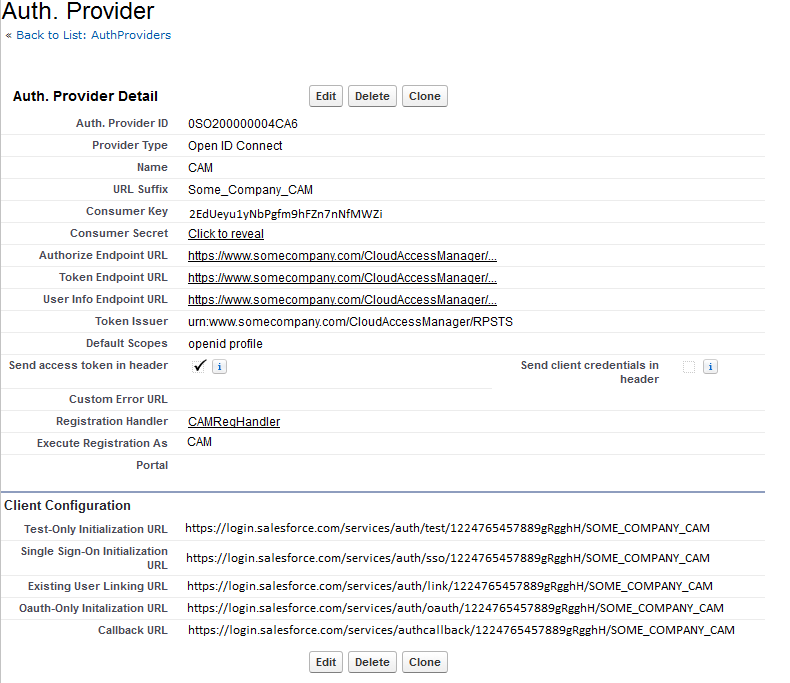
- Click Save.
-
Copy the Callback URL into Cloud Access Manager for the Redirect URI.
Single Sign-On Initialization URL — This is used to SSO into Salesforce using the Registration Handler. The default handler created above will require the Salesforce account to be already linked to a Cloud Access Manager account. However, it is possible to write your own handler which would automatically provision a user and link it to a Cloud Access Manager account.
Existing User Linking URL — This is used to link Cloud Access Manager accounts to existing Salesforce accounts. The user is prompted to log into Cloud Access Manager and to then select the Salesforce account to link to.
Configuration of Salesforce for OpenID Connect/OAuth 2.0 is now complete.
The following example will guide you through the steps required to configure single sign-on for a thick client or mobile application.
To configure single sign-on for an application using OpenID Connect
-
Log in to the Administration Console using the desktop shortcut Cloud Access Manager Application Portal, then select Add New from the Applications section on the home page.
Cloud Access Manager provides a set of application templates to automatically configure common applications. This example describes how to configure an application manually, rather than using a template.
- Click Configure Manually.
- Select Using OpenID Connect / OAuth 2.0, then click Next.
- Configure the application with the endpoint, issuer and client information displayed on the Cloud Access Manager OpenID Connect / Oauth 2.0 Settings page displayed in Step 3.
-
Enter the Redirect URI on the Cloud Access Manager OpenID Connect / Oauth 2.0 Settings page.
NOTE: Some applications require the authorization code to be returned in the web page title, if this is the case, use urn:InstalledApplication as the Redirect URI.
- Select Public as the Client Type.
- Select the Token Signing method as appropriate. Click Next to continue.
- Select Do not proxy this application, then click Next.
- You will now see the Permissions page, which enables you to control which users can access the application. By default, all Cloud Access Manager users have access to the application. You can restrict access to the application to users who belong to a specific role, but for this example, simply click Next to allow all users to access the application.
-
Enter an Application Name, then click Next.
NOTE: It is not possible to launch this type of application from the Application Portal, therefore no portal settings are required.
-
Click Finish to complete the configuration of the application.
NOTE: If the application requires additional claims. You will need to set these up manually. To do this, edit the application and select the Claim Mapping tab.