How to configure a User Logon Name Generation policy
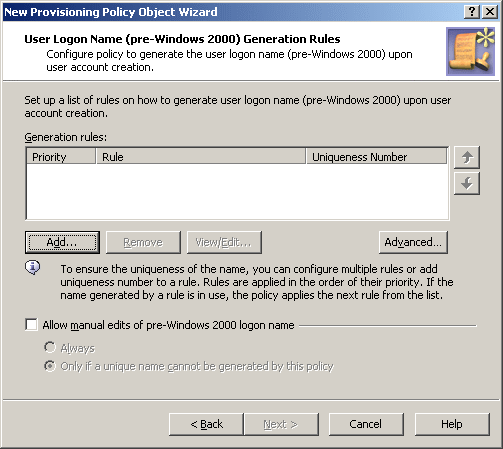
To configure a User Logon Name Generation policy, select User Logon Name Generation on the Policy to Configure page in the New Provisioning Policy Object wizard or in the Add Provisioning Policy wizard. Then, click Next to display the User Logon Name (pre-Windows 2000) Generation Rules page.
Figure 44: New Provisioning Policy Object wizard

On the User Logon Name (pre-Windows 2000) Generation Rules page, you can set up a list of generation rules. Each entry in the list includes the following information:
- Priority. The policy applies generation rules in the order of their priority, as they stand in the list: first read, first applied.
- Rule. Syntax that defines the rule.
- Uniqueness Number. Displays Yes or No, indicating whether the rule includes a uniqueness number entry.
You can use these buttons manage the list of rules:
- Add. Opens the Configure Value dialog box, discussed earlier in this chapter (see How to configure a Property Generation and Validation policy). Use that dialog box to configure a value for the ‘Logon Name (pre-Windows 2000)’ must be condition, in the same way as you do when configuring a Property Generation and Validation policy. For more information, see Configuring a logon name generation rule later in this section.
- Remove. Deletes the rules you select from the list.
- View/Edit. Opens the Configure Value dialog box for the rule you select from the list. Modify the selected rule by managing the list of entries in that dialog box.
- Up and Down. Change the order of rules in the list. Click Up or Down to move a selected rule higher or lower in the list to give the rule a higher or lower priority, respectively.
- Advanced. Set certain options that apply to all rules in the list, such as the maximum length of the generated name, whether to format the name as the uppercase or lowercase string, the scope where you want the generated name to be unique, and the characters to be excluded from the generated names.
By selecting the Allow manual edits of pre-Windows 2000 logon name check box, you authorize the operator who creates or updates the user account to make changes to the policy-generated name. If this check box is cleared, Active Roles displays the User logon name (pre-Windows 2000) field as read-only on the user creation and modification forms.
By selecting the Always option, you authorize the operator to modify the pre-Windows 2000 logon name at their discretion. With the Only if a unique name cannot be generated by this policy option, you limit manual changes to the situation where a unique name cannot be generated in accordance with the policy rules.
Configuring a logon name generation rule
Configuring a logon name generation rule
To configure a generation rule, click the Add button beneath the Generation rules list. This displays the Configure Value dialog box, prompting you to set up a value for the ‘Logon Name’ must be condition.
To start configuring a value, click Add in the Configure Value dialog box. This displays the Add Entry window.
A value is a concatenation of one or more entries. In the Add Entry window, you can select the type of the entry to add, and then configure the entry. The following table summarizes the available types of entries.
Table 19: Types of entries
|
Text |
Adds a text string to the value. |
|
Uniqueness Number |
Adds a numeric value the policy will increment in the event of a naming conflict. |
|
User Property |
Adds a selected property (or a part of a property) of the user account to which the policy will assign the logon name. |
|
Parent OU Property |
Adds a selected property (or a part of a property) of an organizational unit in the hierarchy of containers above the user account to which the policy will assign the logon name. |
|
Parent Domain Property |
Adds a selected property (or a part of a property) of the domain of the user account to which the policy will assign the logon name. |
Instructions on how to configure an entry depend on the type of the entry. You can use the instructions outlined in the How to configure a Property Generation and Validation policy section earlier in this chapter to configure an entry of any of these types:
The following subsection elaborates on the Uniqueness Number entry.
Entry type: Uniqueness Number
Entry type: Uniqueness Number
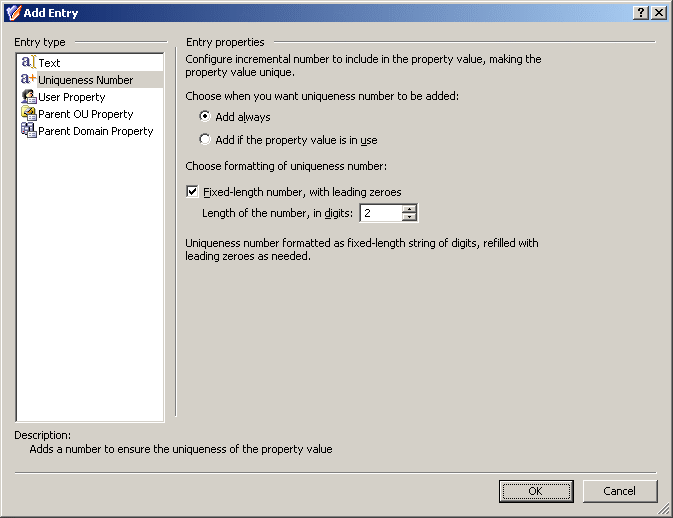
When you select Uniqueness Number under Entry type in the Add Entry window, the Entry properties area looks likr following figure.
Figure 45: Entry Type: Uniqueness Number

Using this entry type, you can add an entry that represents a number the policy will increment in the event of a naming conflict.
First, you need to choose when you want the policy to employ this entry. You have the following options:
- Add always. The value includes this entry regardless of whether or not the policy encounters a naming conflict when applying the generation rule.
- Add if the property value is in use. The policy adds this entry to the value in the event of a naming conflict; otherwise the value does not include this entry.
Next, you can specify how you want the entry to be formatted:
- To have the entry formatted as a variable-length string of digits, clear the Fixed-length number, with leading zeroes check box. In most cases, this will result in a single-digit entry.
- To have the entry formatted as a fixed-length string of digits, select the Fixed-length number, with leading zeroes check box, and then specify the number of digits you want the string to include. This will result in an entry prefixed with the appropriate number of zeroes, such as 001, 002, 003, etc.
When you are done configuring an entry, click OK to close the Add Entry window. The entry is added to the Configure Value dialog box.
Steps for configuring a User Logon Name Generation policy
To configure a User Logon Name Generation policy
- On the Policy to Configure page, select User Logon Name Generation, and then click Next.
- On the User Logon Name (pre-Windows 2000) Generation Rules page, do the following:
- Click Add, and complete the Configure Value dialog box by using the procedure outlined later in this topic, to create a name generation rule.
- Select a rule and click Remove to delete the rule.
- Select a rule and click View/Edit to modify the rule.
- Select a rule and click Up or Down to move the rule higher or lower in the list, in order to give the rule a higher or lower priority, respectively.
- Click Advanced to set some options that apply to all rules within the policy. Complete the Advanced dialog box by using the procedure outlined later in this topic.
- If you want the logon name to be allowed for manual edit, select Allow manual edits of pre-Windows 2000 logon name. Then, do one of the following:
- Click Always to authorize the operator who creates or updates the user account to modify the pre-Windows 2000 logon name.
- Click Only if a unique name cannot be generated by this policy to allow manual changes only in the situation where a policy-generated name is already assigned to a different user account.
Click Next.
- On the Enforce Policy page, you can specify objects to which this Policy Object is to be applied:
- Click Add, and use the Select Objects dialog box to locate and select the objects you want.
- Click Next, and then click Finish.
To complete the Configure Value dialog box
- Click Add.
- Configure an entry to include in the value (for instructions, see Steps for configuring entries).
- In the Configure Value dialog box, add more entries, delete or edit existing ones, and then click OK.
To complete the Advanced dialog box
- In Maximum length, in characters, set the maximum length of the generated name.
- Optionally, select Adjust the case of characters to configure case formatting:
- Click All UPPERCASE to format the name as the uppercase string.
- Click All lowercase to format the name as the lowercase string.
- Specify the scope in which you want the generated name to be unique:
- Click Domain to make the name unique within the domain.
- Click Forest to make the name unique within the forest.
- Click All managed domains to make the name unique across all managed domains.
- Optionally, in the Restricted characters area, specify the characters you want the policy to remove from the generated name.
The policy always removes the following characters: " @ * + | = \ : ; ? [ ] , < > /
To specify additional characters, type them one by one, without any separator character, in the provided text box.


