Tchater maintenant avec le support
Tchattez avec un ingénieur du support

Identity Manager 9.2.1 - Configuration Guide

About this guide One Identity Manager software architecture Customizing the One Identity Manager default configuration Customizing the One Identity Manager base configuration One Identity Manager schema basics
Overview of the One Identity Manager schema Table types and default columns in the One Identity Manager data model Notes on editing table definitions and column definitions Table definitions Column definitions Table relations Dynamic foreign key Supporting file groups
Editing the user interface
Object definitions for the user interface User interface navigation Forms for the user interface Statistics in One Identity Manager Extending the Launchpad Task definitions for the user interface Applications for configuring the user interface Icons and images for configuring the user interface Using predefined database queries
Localization in One Identity Manager Process orchestration in One Identity Manager
Mapping processes in One Identity Manager Setting up Job servers
The One Identity Manager Service functionality Tracking changes with process monitoring Conditional compilation using preprocessor conditions Scripts in One Identity Manager
Visual Basic .NET scripts usage Notes on message output Notes on using date values Tips for using PowerShell scripts Using dollar ($) notation Using base objects Calling functions Pre-scripts for use in processes and process steps Using session services Using #LD notation Script library Support for processing scripts in the Script Editor Creating and editing scripts in the Script Editor Copying scripts in the Script Editor Testing scripts in the Script Editor Testing script compilation in the Script Editor Overriding scripts Permissions for running scripts Editing and testing script code with the System Debugger Extended debugging in the Object Browser
One Identity Manager query language Reports in One Identity Manager Adding custom tables or columns to the One Identity Manager schema Web service integration One Identity Manager as SCIM 2.0 service provider Processing DBQueue tasks One Identity Manager Service configuration files

Example of a simple report with data grouping

We want to create a report that lists all identities as grouped in their respective departments.

  1. A new report is created.
    • The report is given the name CCC_Identity_by_Department. The display name defined is Identities by Department %UID%.

    • A data source (Identity by Department) is created for the report with the SQL query module. The data query should return the identities assigned to a department. The department is found with the object key (XObjectKey). This is passed as a parameter to the report. The identity‘s first name (firstname), last name (lastname) and department name (departmentname) are queried.

      Select Firstname, Lastname, Departmentname

      from person join Department

      on person.uid_Department = department.uid_Department

      where Department.XObjectKey = @UIDDepartment

    • This adds the UIDDepartment parameter to the report. It is populated with a sample value for the preview.

  2. The control elements for the database columns are arranged on the report form.

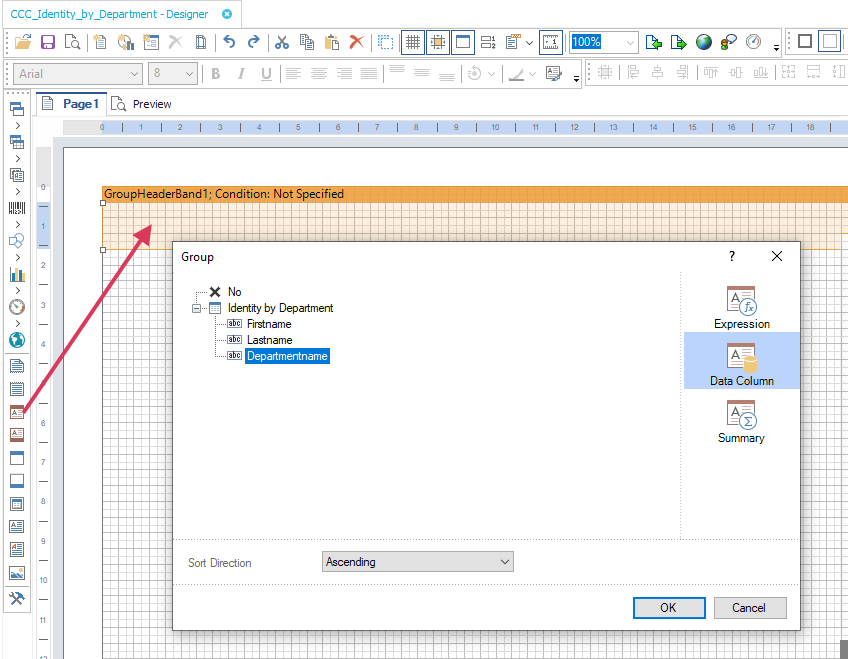
    For data grouping, add a band of the Group header type from the Report Designer’s toolbox to the report form. The column name used for grouping must be entered as a grouping condition. In the example, this is Departmentname.

    Figure 33: Specifying the grouping condition

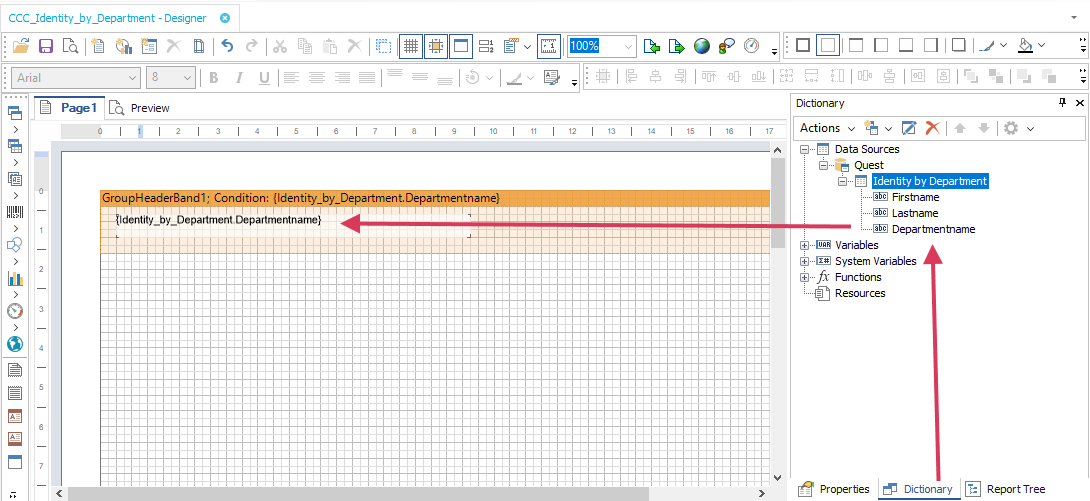
  3. Drag and drop the Departmentname column from the Report Designer‘s dictionary (Dictionary tab) into the group header.

    Figure 34: Creating a group

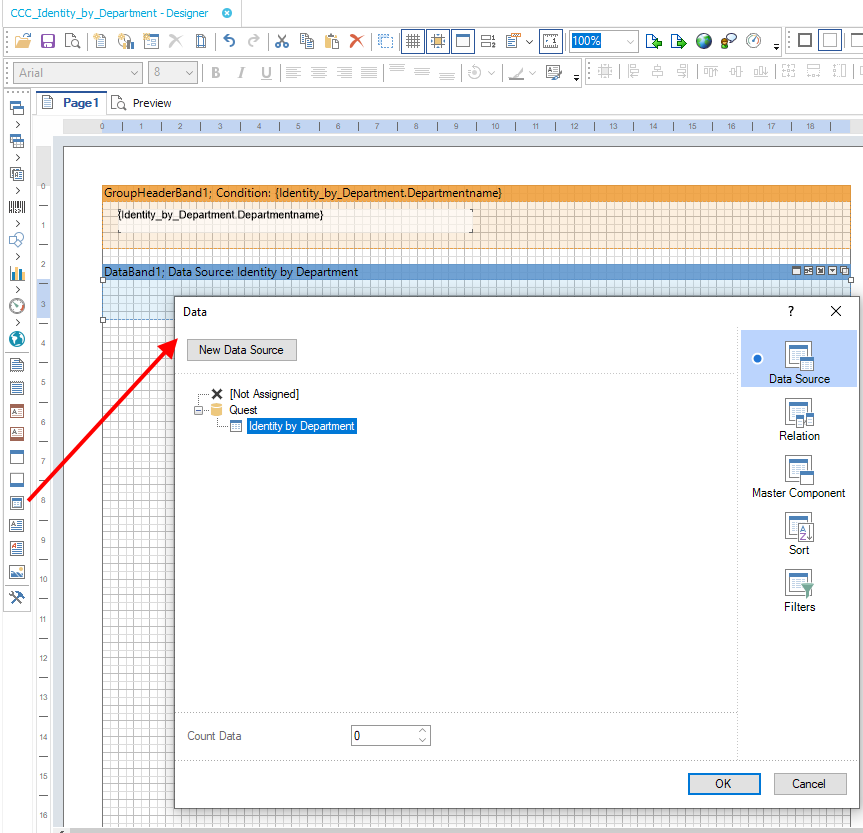
  4. To display identities, add a Data band to the report form from the Report Designer‘s toolbox. Specify the data source as Identity by Department.

    Figure 35: Specify the data source

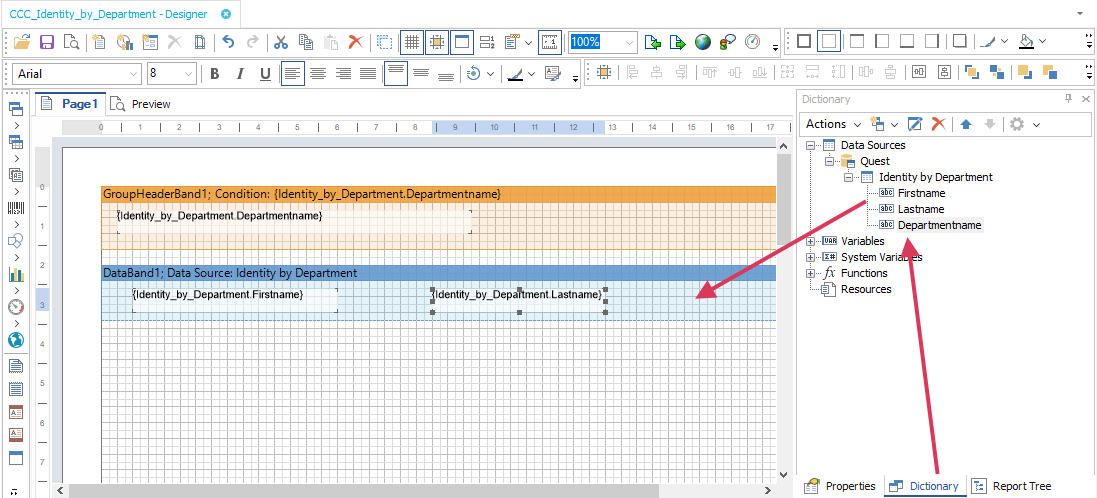
  5. Drag and drop the Lastname and Firstname columns from the Report Designer‘s dictionary (Dictionary tab) to the data band. This creates the respective control elements on the report form.

    Figure 36: Organizing control elements on a report form

  6. Other control elements such as a title (PageHeader) can be added as necessary with the Report Designer. The Report Designer Properties window allows you to customize individual control elements.

  7. The preview can be used to view the report during setup. The preview uses the sample parameter values in the parameter view of the report edit dialog to determine the data for this.

  8. To display the report in a program such as the Manager, create a custom interface form. For more information, see Embedding reports in the user interface.

Detailed information about this topic

Embedding reports in the user interface

In order to display a report in a One Identity Manager administration tool, such as Manager, you need to link in the report as a custom interface form.

In the Manager's info system, you can display reports that you create in the Report Editor as statistics. To do this, you must alter the user interface of the Manager program. The report opens when you double-click on the statistic's header.

To create a user interface form

  1. In the Designer, select the User interface > Forms > User interface forms category.

  2. Select the Edit form task.

  3. Select the Form > Insert menu item.

  4. Edit the interface form's main data.

    Take the following cases into account:

    • Use the VI_Report form definition.

      This form definition is configured to display in the graphical user interface and web applications. You only need to set up one interface form for this. Which form template will be used to display the interface form is decided dynamically, depending on usage.

    • In the form’s configuration data, enter the name of the report to be run and the report parameters in the Properties section.

      Syntax:

      <DialogSheetDefinition FormatVersion="1.0">

      <Properties>

      <Property Name="ReportName">ReportName from the DialogReport</Property> table

      <Property Name="ReportParameter.Parameter1">value1</Property>

      <Property Name="ReportParameter.Parameter1">value</Property>

      </Properties>

      </DialogSheetDefinition>

      Example:

      <DialogSheetDefinition FormatVersion="1.0">

      <Properties>

      <Property Name="ReportName">CCC_Identity_by_Department</Property>

      <Property Name="ReportParameter.UIDDepartment">%XObjectKey%</Property>

      </Properties>

      </DialogSheetDefinition>

    • To export a report by clicking on it, add the ReportInstantExport and ReportInstantExportFormat properties the form's configuration data. The export format file extensions available are XLSX, DOCX, HTML, and PDF. The default is PDF.

      Example:

      <DialogSheetDefinition FormatVersion="1.0">

      <Properties>

      <Property Name="ReportName">CCC_Identity_by_Department</Property>

      <Property Name="ReportInstantExport">True</Property>

      <Property Name="ReportInstantExportFormat">XLSX</Property>

      </Properties>

      </DialogSheetDefinition>

  5. Assign the user interface form to the applications and permissions groups.

  6. (Optional) Assign the user interface form to the object definitions.

  7. (Optional) Assign the user interface form to the menu items.

Related topics

Translating reports

A report can contain several elements that require translating in order to display the report in more than one language.

  • Database columns used in the report definition.

    Translate database columns with the Language Editor in the Designer.

  • Display name/ReportAlias.

    The report's display name used when a report is created as ReportAlias. The display name is entered in the report properties dialog. Translate the given text using the button.

  • Text elements on the report form.

    Translate the text elements directly in the Report Editor with the Globalization Editor.

NOTE: Translations of default variables that are shown in the Report Designer dictionary under Quest are overridden with values from the One Identity Manager database when reports are generated. If you require custom translations, create your own variables that are placed outside the Quest category in the Report Designer dictionary. These variables can be translated.

To translate all text elements in a report

  1. In the report, select the report list and open it with double-click or with Edit from the context menu.

    This opens the report form in the Report Designer.

  2. Start the Globalization Editor.

    • Click on the button in the Report Designer toolbar.

      - OR -

    • In the Report Designer’s properties view, select the report from the menu on the Properties tab and use Globalization Strings to open the Globalization Editor.

      NOTE: You can only start the Globalization Editor from the Report Designer’s properties view if you have selected Professional. You can change the configuration type later in the edit view using the context menu in the property view.

  3. Ensure that the Auto Localize Report on Run button is set.

    This means the report is generated in the current language.

  4. Use Add Culture to enter the language and translate each entry.

To translate single captions

  1. Select the report in the report list and open it with double-click or with Edit from the context menu.

    This opens the report form in the Report Designer.

  2. Select the caption on the report form.

  3. Open the dialog using the in the Report Designer toolbar.

  4. Translate the text and confirm the changes with OK.

Related topics

Generating and exporting reports

You can display reports in programs such as the Manager or the Web Portal and save them there. You can also send reports to specified email addresses using scheduled subscriptions. For example, Web Portal users can configure their own report subscriptions.

You can customize how reports are created and exported with further configuration.

  • In the Manager, to export a report by clicking on it, create a custom interface form for the report and add the ReportInstantExport and ReportInstantExportFormat properties to the form's configuration data. The export format file extensions available are XLSX, DOCX, HTML, and PDF. The default is PDF.

  • You can create custom processes to control the creation of reports and perform the export on a cyclical or event-controlled basis.

    • You can use the ReportComponent process component to create reports and export them to different file formats. The following formats are supported: HTML, PDF, RTF, TEXT, XLS, TIFF, XML, CSV, XPS, DOCX,and XLSX.

    • To exports reports in CSV format, you can also use the ScriptComponent process component with the CSVExport or CSVExportSingle process tasks.

    NOTE: Use the default report server as executing server in the processes.

Related topics
Documents connexes

The document was helpful.

Sélectionner une évaluation

I easily found the information I needed.

Sélectionner une évaluation