
-
Title
TPAM Setup Guide for NIS Plus (Solaris) -
Description
TPAM Setup Guide for NIS Plus (Solaris)
-
Resolution
TPAM Client Setup for NIS+ systems (Solaris)
* Introduction
* Add the Functional Account
* SSH Daemon
* Add System to TPAM
* Create and Modify DSS Key
Introduction
This section provides step by step instructions for configuring the Secure Shell Daemon (sshd) for NIS+ to be managed by TPAM. The steps involved are verification that the sshd daemon is enabled and configured, creation and modification of the functional account, and Secure Shell key installation and configuration. Administrative knowledge of NIS+ and familiarity with the vi editor are assumed.
Add the Functional Account
The functional account for NIS+ should be the root (or root equivalent) user on the NIS+ domain master. In our examples, the functional account has been created as a root equivalent account (uid=0) named tpam.
SSH Daemon
Verify that the NIS+ domain master is configured to run an SSH daemon and if necessary edit the sshd configuration file (/etc/ssh/sshd_config) to ensure that public key authentication and root logins are permitted:
PubkeyAuthentication yes
PermitRootLogin yes
If changes are made to the sshd_config file, restart sshd to re-read the configuration:
svcadm restart sshAdd System to TPAM
From the TPAM menu, select Systems, Accounts, & Collections | Systems | Add System. Provide the name for the NIS+ domain master system and Network Address (this can be either IP address or DNS name). Select NIS Plus as the Platform. If automatic password management is desired, check the option box to do so, and configure the change settings according to your deployment plan.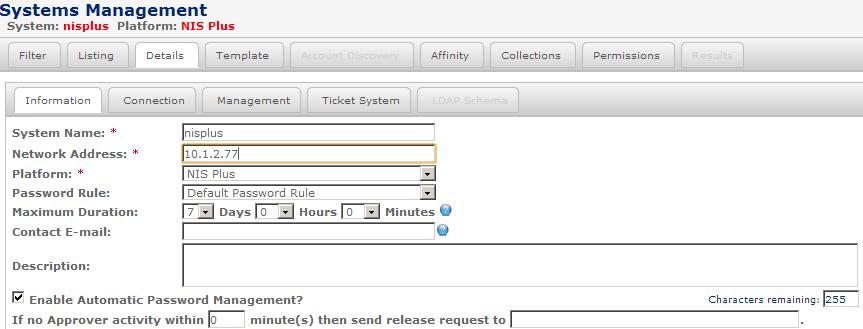
Click the Connection tab to configure the functional account properties for the system.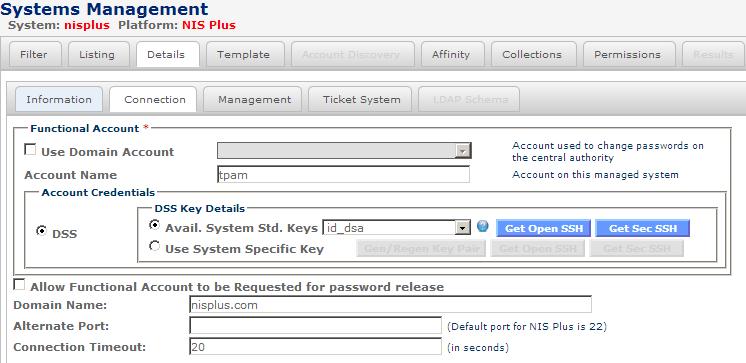
Enter the NIS+ domain name in the Domain Name field (e.g. nisplus.com).Note that the option exists to specify a TCP port other than port 22 (the default SSH port). If the system to be managed is configured to communicate on a port other than 22 for SSH, specify the port in the Alternate Port field.
To use public key authentication, you will need to copy the TPAM public key to the NIS+ master. Click the Get Open SSH button to download the TPAM Open SSH Key. Follow the steps outlined in the next section to complete the public key authentication configuration on the NIS+ master.
Create and Modify DSS Key
Log into the NIS+ domain master as the tpam user, and create a .ssh directory under the user's home directory:
mkdir .ssh
Copy the TPAM Open SSH Key (e.g. id_dsa.pub) to a temporary directory on the NIS+ system (see instructions in the previous section to download the TPAM Open SSH key). Once the key is on the NIS+ master, add it to the end of the tpam user's .ssh/authorized_keys file:
cat /tmp/id_dsa.pub >> ~tpam/.ssh/authorized_keys -
Change Request
BFER2998