-
Title
How to move old archived sessions to a new Archive Server -
Description
When utilizing the Privileged Sessions (PSM) in the Total Privileged Access Management (TPAM) appliance it is required to change the archive server currently used to store recorded PSM sessions to a new server (or a new folder on the same server).
What are the correct steps to move the old recorded sessions to the new location? -
Resolution
1. Log into the https://IP_or_DNS/TPAM Appliance interface as an Administrative user
2. Select “Management” | “Session Management” | “Archive Servers” from the menu bar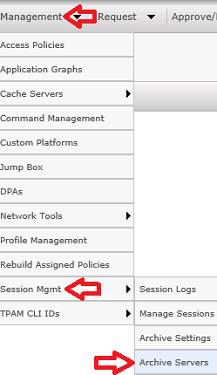
3. The “Archive Server Management” list should appear.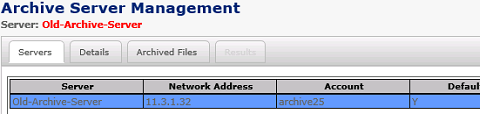
4. Click on the old (soon to be retired) archive server, and click the “Details” tab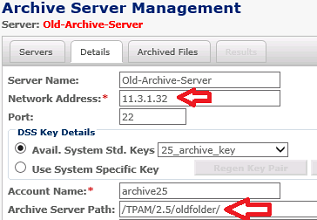
5. Document the “Network Address” and “Archive Server Path” for the old archive server.
a. This information is needed, because here are where the old recorded sessions are stored. The archived sessions will need to be moved manually (outside of TPAM) from here to the new archive server folder.
6. At the bottom of the page, click “Add Server”
7. Enter all of the information for the new Archive Server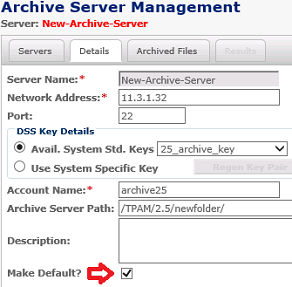
8. Ensure that the “Make Default?” button is checked.
a. Note: This is an important step and may cause issues with the next steps if not enabled.
9. Navigate back to the “Archive Server Management” listing. Now both the old and the new archive servers should be displayed.
10. Click on the “Old” archive server, and click the “Delete” button at the bottom of the page.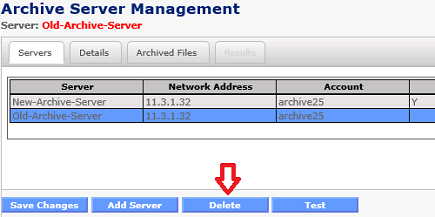
11. A message will appear with a warning. Please read this message before proceeding.
a. The full warning reads:
i. “Warning: The Archive Server you are about to delete currently has [x] session log file(s) archived to it.”
ii. “The Privileged Access and Modules (TPAM) will update its information for the archived session logs to point to the currently active archive server, which is (newusername@newserver). You are responsible for moving the files to that location. TPAM will not perform this operation. If this task is not completed correctly, TPAM will no longer be able to retrieve the files for replay or delete them based on the retention settings.”
iii. “Are you sure you want to continue with this operation? It can not be canceled or undone once started.”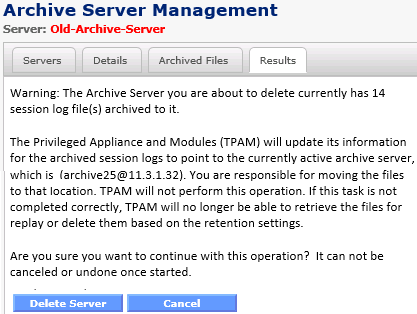
12. Once the logs have been copied to the new server (ensure the new user account has correct access to these files as well), click “Delete Server”
13. A final popup from the webpage should appear confirming that the warnings from the previous page have been read and understood.
14. Click “Ok” to continue.
15. A confirmation message should be displayed stating that the “Archive server deleted successfully”
16. The “Archive Server Management” should now only display the new archive server.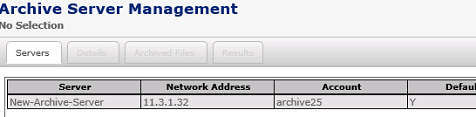
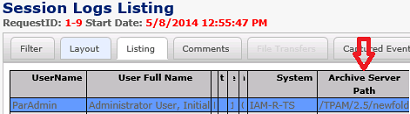
17. To confirm the archive server path has been updated for the Session Logs, click “Management” | “Session Mgmt” | “Session Logs” from the menu bar.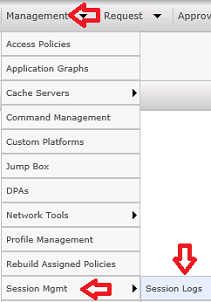
18. All sessions recorded to the old archive server should now reflect the updated archive server path under the “Archive Server Path” column.