
Configuring the front-end authentication service
When you have successfully installed the Cloud Access Manager software, the Cloud Access Manager Administration Console is displayed.

Before users and administrators can login to Cloud Access Manager, you need to configure a front-end authentication method. Typically, this would involve configuring the Microsoft Active Directory authenticator to authenticate users to your corporate domain, but equally you could configure the SAML or WS-Federated authenticator to authenticate users to a different identity management system. This example will use the Active Directory authentication method to authenticate users and administrators accessing Cloud Access Manager.
To configure the front-end authentication service
- Click Add New within the Front-end Authentication section on the home page.
- Select Microsoft Active Directory, then click Next.
- Enter the username and password of a Windows domain account, and then click Test Connection. This will test that Cloud Access Manager can connect to the domain which has read access to all user and group objects in the forest. Usually, a regular user account belonging to the Domain Users group is sufficient. When successful, click Next.
- On the Primary Authentication page, do not change any check box settings. Click Next.
- On the Two Factor Authentication page, leave the Two factor authentication mode selection as Don’t use two factor authentication. Click Next.
- In the Authenticator Name field, enter the name that will be used to identify the authenticator within Cloud Access Manager, for example enter Active Directory, then click Finish.
- You have now created the front-end authentication method. Click Edit Roles.
-
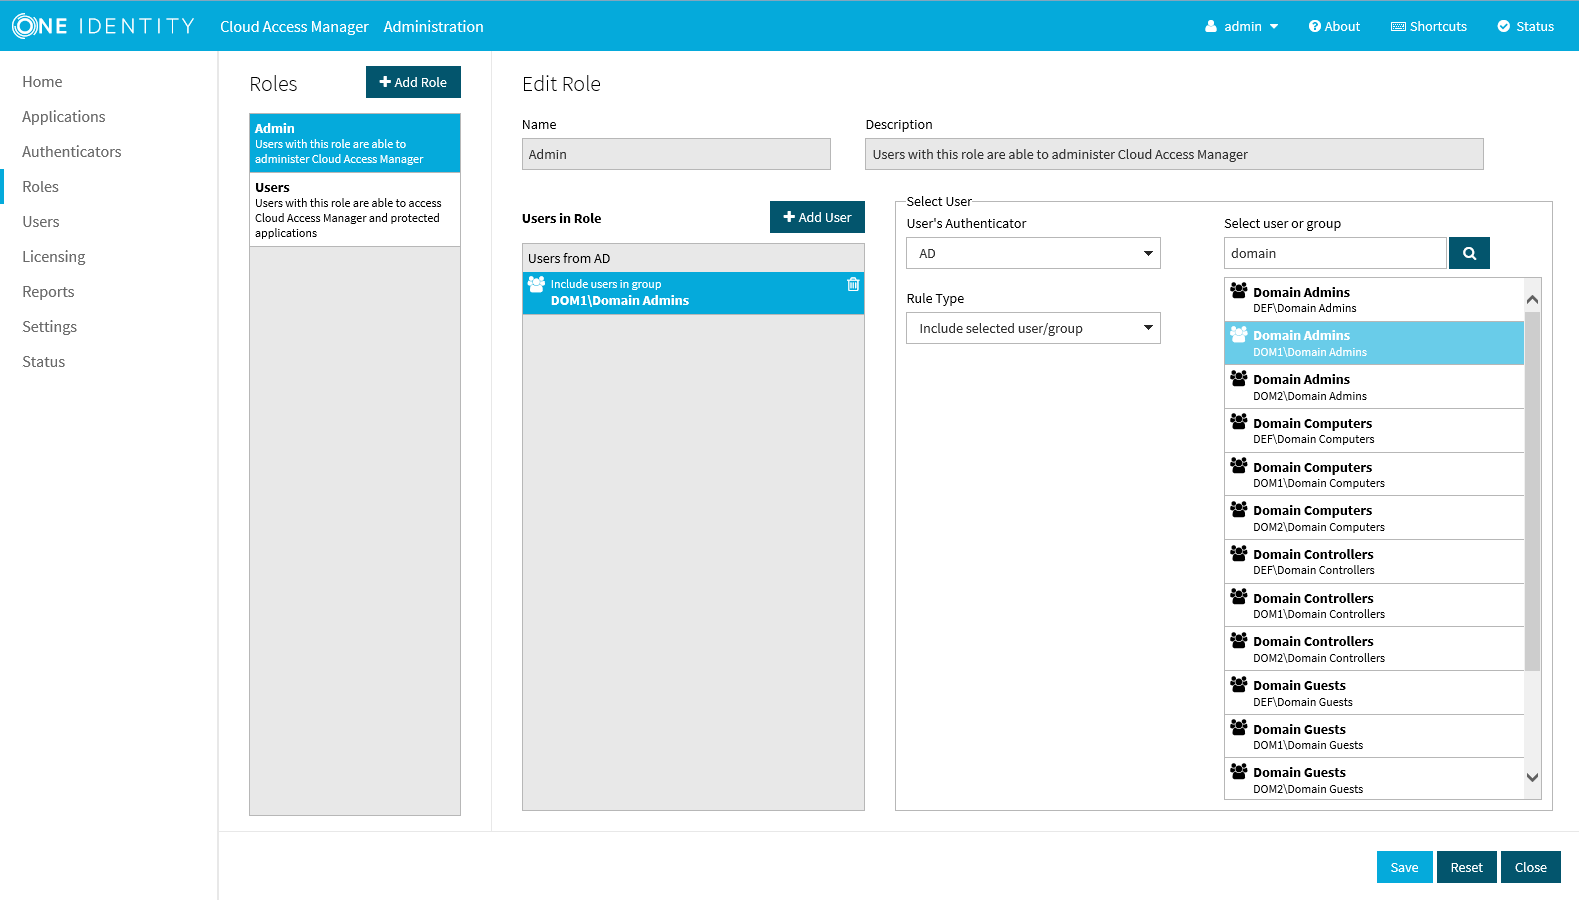
Before Cloud Access Manager administrators and users can login to Cloud Access Manager using their Active Directory credentials, you must define how the user and administrator roles are to be derived from Active Directory group membership.
- Click Admin.
- Click +Add User.
- From Rule Type select Include Selected user/Group.
- In the Select new user or group text box, type Dom, then press Enter or click the magnifying glass.
- Select the Domain Admins group from the list.
- Click Save.
- By default, all users are allowed access to Cloud Access Manager. If you want to restrict the set of users allowed access to Cloud Access Manager, click Users and follow step 15 through Step 20.
- Click Users.
- Click +Add User.
- From Rule Type select Include Selected user/Group.
- In the Select new user or group text box, enter the name of the user or group you want to add, then press Enter or click the magnifying glass.
- Select the user or group from the list.
- Click Save.
-
Click Close to return to the Cloud Access Manager Administration Console. The configuration is now complete. Cloud Access Manager administrators and users can now login to Cloud Access Manager using their Active Directory credentials.
For example, users who belong to the Active Directory Domain Admins security group can login and configure Cloud Access Manager, and Domain Users can login to the Cloud Access Manager portal using their Active Directory credentials.
Configuring an application for single sign-on
In this section we will demonstrate how to configure an Integrated Windows Authentication (IWA) application for Single Sign-On (SSO). We will use One Identity Active Roles as our example application, but the procedure is similar for any other IWA application.
To configure an IWA application for SSO
- Click Add New within the Applications section on the home page.
-
Click Configure Manually.
-
Select Using Integrated Windows Authentication, then click Next.
-
Select the protocol used by the application and enter its fully-qualified domain name. Click Next.
NOTE: You can obtain the protocol and fully-qualified domain name from the URL used to access the application. For example, if you normally access the application using https://ars.prod.local/ARServerAdmin, the protocol will be Secure HTTP (HTTPS) and ars.prod.local will be the fully-qualified domain name.
In order to perform SSO to a non-federated web application, Cloud Access Manager must proxy the HTTPS traffic between the browser and the application. When the application requests authentication credentials, the proxy automatically intercepts the request, retrieves the credentials from the user's Password Wallet and forwards them to the application.
To proxy the HTTPS traffic to the application, the user's browser must navigate to a proxy URL, which in turn maps to the real application URL. When the user clicks a link to the application on his application portal he is really clicking a link to the proxy service. Using the settings you provide, the proxy then relays incoming traffic to the correct application URL.
In a typical production scenario the proxy service is installed on a host in the perimeter network (DMZ). The application's public proxy URL is resolved to the IP address of the host on which the proxy service is installed.
When you install Cloud Access Manager in Proof of Concept mode the proxy component is automatically installed on the same computer as the other components. This means the application's proxy URL must resolve to the IP address of this Cloud Access Manager computer.
You can do this either by adding a canonical name (CNAME) entry to the Domain Name System (DNS) service your computer is using, or for testing on a single computer, you can add an entry to your computer’s hosts file.
In this case, we will add an entry to our hosts file, %WINDIR%\system32/drivers/etc/hosts as follows:
xxx.xxx.xxx.xxx ars.webapps.democorp.com
Where xxx.xxx.xxx.xxx is the IP address of the Cloud Access Manager computer.
Now save this file.
-
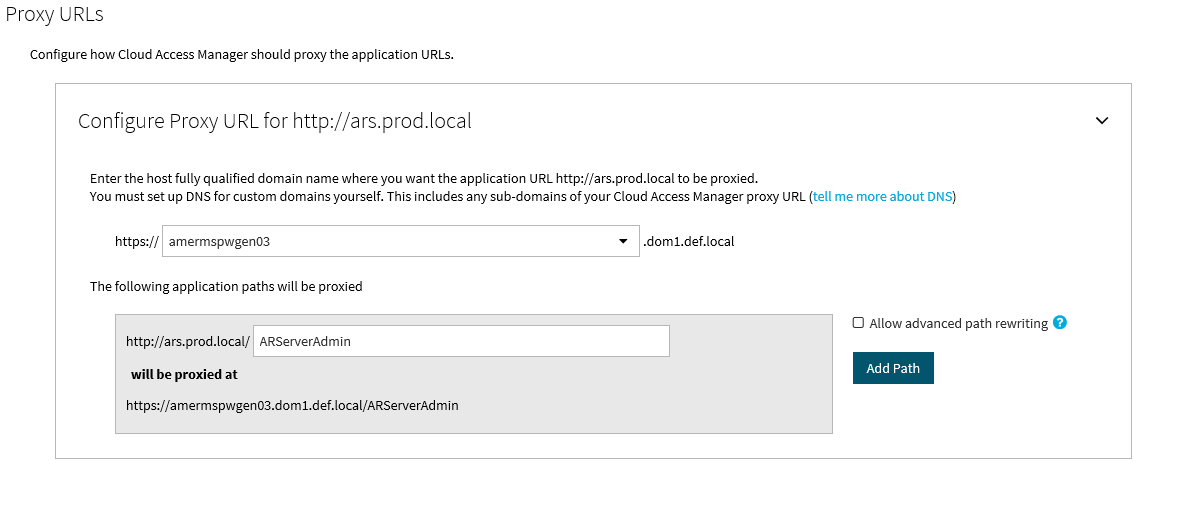
Enter the application's proxy URL into the Proxy URLs page of the application wizard in Cloud Access Manager. Click Next.
NOTE: Make sure that the URL path is entered in the correct case. In the example, ARServerAdmin must be the URL path.


- You will now see the Permissions page that enables you to control which users can access the application. By default, all Cloud Access Manager users have access to the application. You can restrict access to the application to users who belong to a particular role, but for this example, click Next to allow all users to access the application.
- Enter an Application Name, for example Active Roles Server. On this page you may also set whether the application uses the user’s primary log in credentials. If this is set, the user will be logged into the application with the same credentials they use to log in to Cloud Access Manager. Click Next.
- Configuration of the application is now complete. Click Next, and then click Finish.
To verify that the application is configured correctly
- Close Internet Explorer to end your Cloud Access Manager session.
- Open the Cloud Access Manager Portal using the desktop shortcut Cloud Access Manager Application Portal.
- Log in to the Cloud Access Manager Portal using a test user account defined in your Active Directory forest, and click the Active Roles Server application.
- The first time a user launches this application through Cloud Access Manager, they will be prompted to enter their application username and password. These credentials will be saved in the Password Wallet, to open the Password Wallet, click the username in the top right of the screen. When the application is next launched, the saved credentials are automatically submitted to the application.
- You are now automatically signed into One Identity ActiveRoles Server.
Configuration of SSO to One Identity ActiveRoles Server is now complete. For more information on configuring SSO for applications, please refer to the One Identity Cloud Access Manager Configuration Guide.