Approving resource access request is a two-step process. The resource access request approval workflow recommends a "best fit" group for fulfilling the request, which is then forwarded to the business owner to grant or deny access to the resource and to the suggested group. Once approved by the business owner, the request is forwarded to the group owner to decide if the employee can be added to the group.
All pending requests appear in the following locations in the One Identity Manager web client:
- Home (Welcome) page: (Pending requests)
- My Actions view: (Request | My Actions | Pending Requests)
A decision workflow is triggered when a resource access request is submitted, allowing business owners to grant or deny resource access and recommend a group for fulfillment. The "best fit" group appears on the Pending Requests page when the business owner logs on to the web portal. If necessary, the business owner can specify a different group by selecting a group from a list of groups that match the access request.
To approve a resource access request
-
Log on to the One Identity Manager web portal.
All pending requests appear in the following locations in the One Identity Manager web client:
- Home (Welcome) page: (Pending requests)
- My Actions view: (Request | My Actions | Pending Requests)
- To view a list of all pending requests awaiting your decision, select the Pending Requests tile from one of these pages.
The Pending Requests view appears.
-
Select the request you want to approve. Selecting a request in the left pane displays the request details in the right pane.
Note: If no business owner is assigned to a resource, a warning message appears and you will not be able to approve the resource access request. To assign an owner to a resource, select Responsibilities | Governance Administration | Governed Data Ownership. The Assign ownership view displays all of the governed resources that currently have no assigned owner.
Note: The system automatically assigns the resource to a group and suggests this group to the business owner of the resource. As the business owner, if you determine that the suggested group is not the "best fit" group for the request, you can select a different group by clicking Select a group. If no groups are available or no groups are found that match the access request, the request cannot be approved. For more information on how the "best fit" group is determined, see Group access calculations.
-
Click the  Approve button in the Decision column, then click Next.
The Approvals view appears allowing you to review your decision and enter additional details about your approval decision.
- (Optional) On the Approvals view, enter the following details regarding your decision:
- Reason for approvals: Enter a reason for approving the requests. This reason applies to all approved requests listed, unless there is an individual reason given in the Reason column of an approval.
-
Standard reason: Select a standard reason from a list of previously defined reasons.
Note: For more information about defining standard reasons, see the One Identity Manager IT Shop Administration Guide.
- Valid from: This value is set to immediately and cannot be changed.
- Valid until: Click unlimited (or the date displayed) to change the end date for this request.
- Reason: Click Enter a reason to specify a reason for your decision that is specific to the selected request.
- Once you have specified all the required details about your decision, click Save approvals.
Once you have made an approval decision, the request disappears from your list of pending requests. To view your approval decisions, select Request | My Actions | Approval History. Selecting this option displays the Approval History view.
To request additional information about a request
- From the Pending Requests view (Request | My Actions | Pending Requests), select the request to which you require additional information.
-
Click more | Ask for help, located under the request details pane (right pane).
Clicking this option displays the Submit an inquiry about this request dialog showing a list of employees.
-
Select an employee who is to receive the question.
The Submit an inquiry about this request dialog reappears allowing you to enter your question.
-
Enter your question and click Save to place the request on hold and send your question.
A message stating the inquiry has been submitted is displayed at the top of the Pending Requests view. In addition, a Query step is added to the workflow in the request's details pane.
- If you no longer need additional information about a request, click the Recall last question button. In the Recall last question dialog, enter a reason for recalling the question and click OK.
When you request additional information, a request inquiry is submitted to the recipient. That is, when that employee logs on to the web portal, they see a new action in the Request | My Actions | Request Inquiries action list. In addition, the recipient receives a "Question about a request" email notification with a link to the web portal. From the Request Inquires view, they can then respond to your question.
To view their response, open the Pending Requests page, select the required request and open the Workflow tab in the details pane.
To revoke a request's hold status
NOTE: Requests for which you have requested additional information remain "on hold" even after the question has been answered. This hold state allows you to review the answer to determine if you have the information needed to approve or deny the request. In order to proceed with the approval workflow, release the request from the hold status.
- From the Pending Requests view (Request | My Actions | Pending Requests), select the request you want to release from hold status.
-
Click the Revoke hold status button.
Revoking the hold status of a request releases the request for approval or editing by other approvers.
If an employee tries to access a resource and they are denied, they can request access through the web portal IT Shop. (For resources to be available, they must first be published to the IT Shop.)
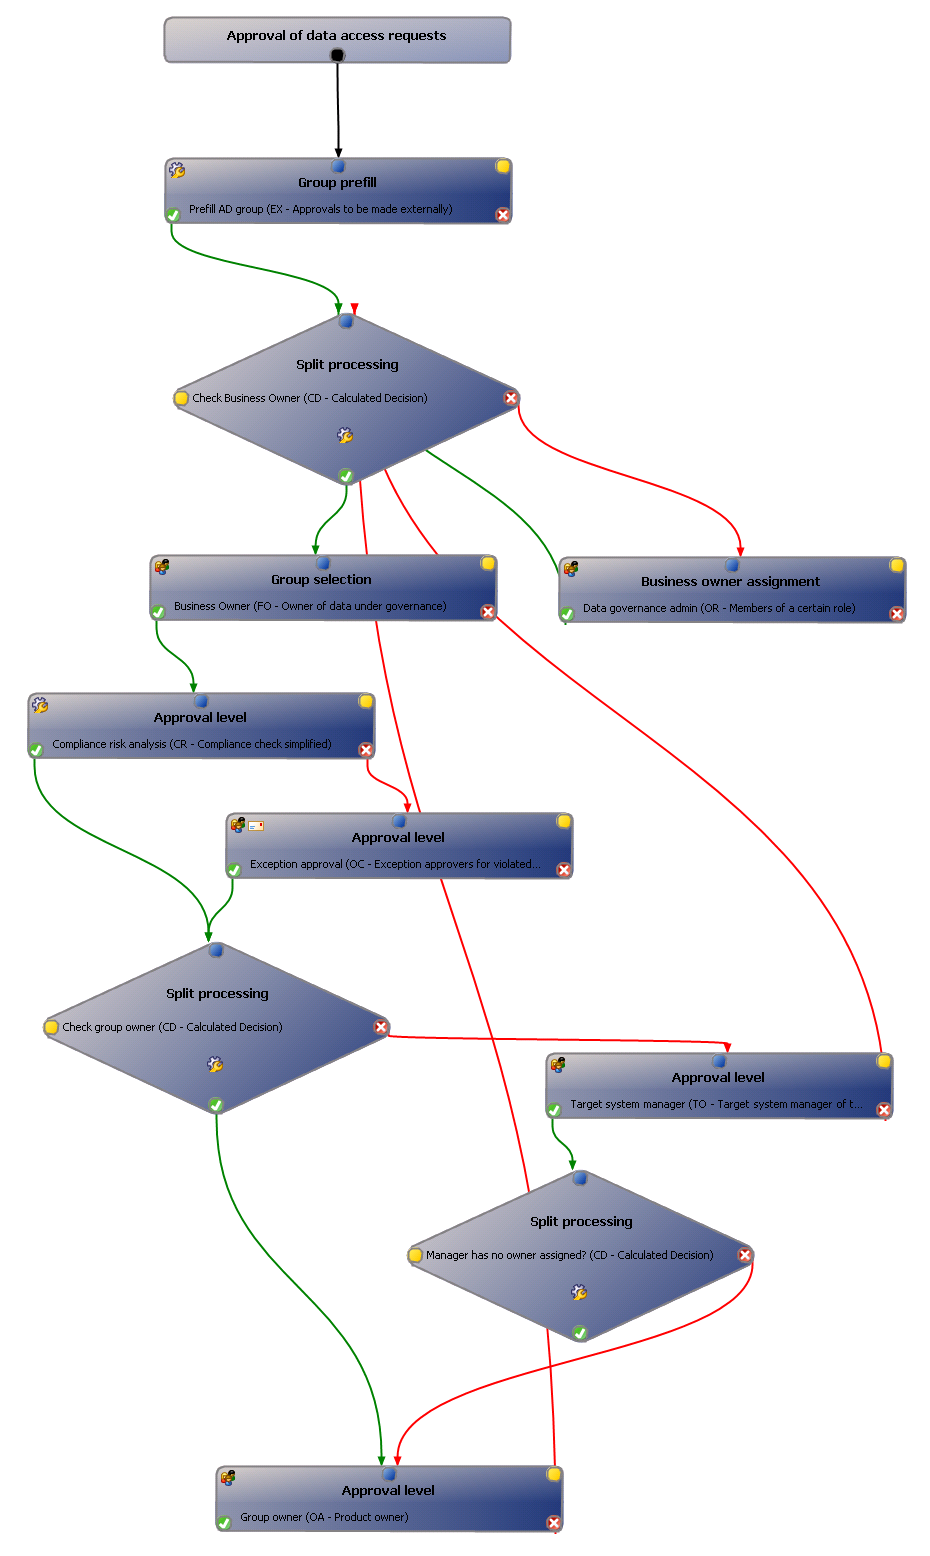
Requests follow a defined approval process that determines whether access to the data can be granted or not.
Default request workflow
- An employee makes a request for access to a resource in the web portal.
-
The "best fit" group is calculated and the assigned business owner decides if the employee’s request should be granted.
They can approve or deny membership in the calculated group or select a different group. For details on how Data Governance Edition determines the groups, see Group access calculations.
- The request is then forwarded to the group owner where they can decide whether to add the employee to the group requested by the business owner.
- If a request is denied, it falls back to the requestor to make another choice.
- If the request is approved, the employee is added to the group.
Figure 1: Request for resource access process
When an employee requests access to a resource, a calculation is made on how to best provide that access. Generally speaking, it is considered favorable to provide access through group membership rather than placing the account directly on the access control list of the resource. Therefore, only suggestions for gaining access to resources through group memberships are calculated.
