
The NFS backup method connects to a shared directory of the target server with the Network File Share protocol.
NOTE: Backup and archive policies only work with existing shares and subdirectories.
If a server has a share at, for example, archive and that directory is empty, when the user configures archive/ssb1 (or similar) as a backup/archive share, it will fail.
-
Navigate to Policies > Backup & Archive/Cleanup, and click
in the Backup policies section to create a new backup policy.
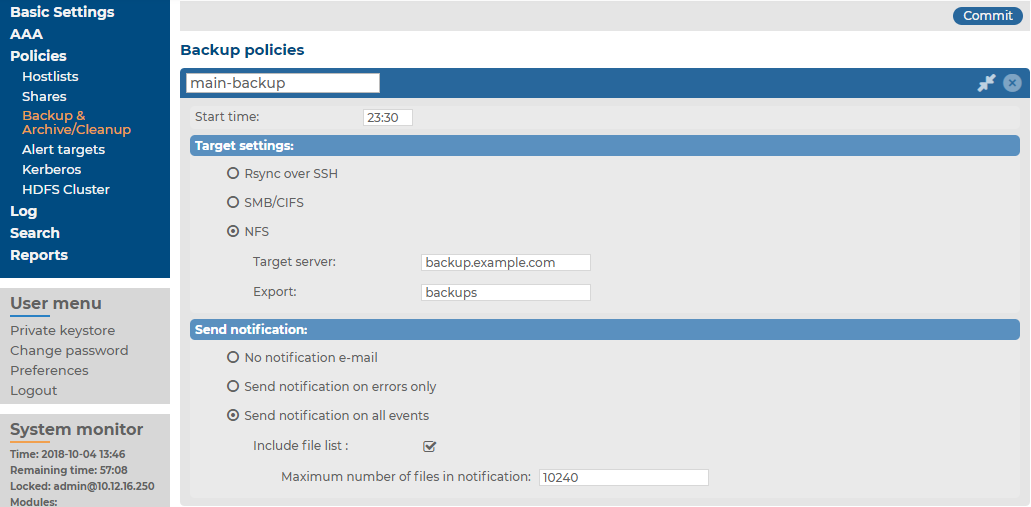
Figure 4: Policies > Backup & Archive/Cleanup > Backup policies — Configure backup
-
Enter a name for the backup policy (for example, main-backup).
-
Enter the time when the backup process should start into the Start time field, in HH:MM format (for example, 23:30).
-
Enter the IP address or the hostname of the remote server into the Target server field (for example, backup.example.com).
-
Select NFS from the Target settings radio buttons.
Figure 5: Policies > Backup & Archive/Cleanup > Backup policies — Configure NFS backups
-
Enter the domain name of the remote server into the Target server field.
-
Enter the name of the NFS export into the Export field.
syslog-ng Store Box (SSB) saves all data into this directory, automatically creating the subdirectories.
-
The remote server must also be configured to accept backups from SSB.
Add a line that corresponds to the settings of SSB to the /etc/exports file of the backup server. This line should contain the following parameters:
-
The path to the backup directory as set in the Export field of the SSB backup policy.
-
The IP address of the SSB interface that is used to access the remote server. For more information on the network interfaces of SSB, see Network settings.
-
The following parameters: (rw,no_root_squash,sync).
Example: Configuring NFS on the remote server
For example, if SSB connects the remote server from the 192.168.1.15 IP address and the data is saved into the /var/backups/SSB directory, add the following line to the /etc/exports file:
/var/backups/SSB 192.168.1.15(rw,no_root_squash,sync)
-
-
On the remote server, execute the following command:
exportfs -a
Verify that the rpc portmapper and rpc.statd applications are running.
-
To receive e-mail notification of the backup, select the Send notification on errors only or the Send notification on all events option. Notifications are sent to the administrator e-mail address set on the Management tab.
To include the list of files in the e-mail, select Send notification on all events and enable the Include file list option. However, note that if list is very long, the SSB web interface might become unaccessible. In this case, set the Maximum number of files in notification lower. After this number has been reached, file names will be omitted from the notification.
NOTE: This e-mail notification is sent to the administrator's e-mail address, while the alerts are sent to the alert e-mail address (see Configuring system monitoring on SSB)..
-
Click
.
-
To assign the backup policy to a logspace, see Creating data backups.