Converse agora com nosso suporte
Chat com o suporte

Active Roles 8.2 - Administration Guide

Introduction Getting started with Active Roles Configuring rule-based administrative views Configuring role-based administration Configuring rule-based autoprovisioning and deprovisioning
Configuring Provisioning Policy Objects
User Logon Name Generation E-mail Alias Generation Exchange Mailbox AutoProvisioning Group Membership AutoProvisioning Home Folder AutoProvisioning Property Generation and Validation Script Execution O365 and Azure Tenant Selection AutoProvisioning in SaaS products
Configuring Deprovisioning Policy Objects
User Account Deprovisioning Group Membership Removal User Account Relocation Exchange Mailbox Deprovisioning Home Folder Deprovisioning User Account Permanent Deletion Office 365 Licenses Retention Group Object Deprovisioning Group Object Relocation Group Object Permanent Deletion Script Execution Notification Distribution Report Distribution
Configuring entry types Configuring a Container Deletion Prevention policy Configuring picture management rules Managing Policy Objects Checking for policy compliance Deprovisioning users or groups Restoring deprovisioned users or groups Configuring policy extensions
Using rule-based and role-based tools for granular administration Workflows
About workflow processes Workflow processing overview Workflow activities overview Configuring a workflow
Creating a workflow definition for a workflow Configuring workflow start conditions Configuring workflow parameters Adding activities to a workflow Configuring an Approval activity Configuring a Notification activity Configuring a Script activity Configuring an If-Else activity Configuring a Stop/Break activity Configuring an Add Report Section activity Configuring a Search activity Configuring CRUD activities Configuring a Save Object Properties activity Configuring a Modify Requested Changes activity Enabling or disabling an activity Enabling or disabling a workflow Using the initialization script
Approval workflow Email-based approval Automation workflow Activity extensions
Temporal Group Memberships Group Family Dynamic groups Active Roles Reporting Management History Entitlement profile Recycle Bin AD LDS data management One Identity Starling Join and configuration through Active Roles Managing One Identity Starling Connect Configuring linked mailboxes with Exchange Resource Forest Management Configuring remote mailboxes for on-premises users Migrating Active Roles configuration with the Configuration Transfer Wizard Managing Skype for Business Server with Active Roles
About Skype for Business Server User Management Active Directory topologies supported by Skype for Business Server User Management User Management policy for Skype for Business Server User Management Master Account Management policy for Skype for Business Server User Management Access Templates for Skype for Business Server Configuring the Skype for Business Server User Management feature Managing Skype for Business Server users
Exchanging provisioning information with Active Roles SPML Provider Monitoring Active Roles with Management Pack for SCOM Configuring Active Roles for AWS Managed Microsoft AD Azure AD, Microsoft 365, and Exchange Online Management
Azure tenant types and environment types supported by Active Roles Using Active Roles to manage Azure AD objects Unified provisioning policy for Azure M365 Tenant Selection, Microsoft 365 License Selection, Microsoft 365 Roles Selection, and OneDrive provisioning Changes to Active Roles policies for cloud-only Azure objects
Managing the configuration of Active Roles
Connecting to the Administration Service Managed domains Using unmanaged domains Evaluating product usage Creating and using virtual attributes Examining client sessions Monitoring performance Customizing the Console Using Configuration Center Changing the Active Roles Admin account Enabling or disabling diagnostic logs Active Roles Log Viewer
SQL Server replication Using regular expressions Administrative Template Configuring federated authentication Communication ports and URLs used by Active Roles Integrating Active Roles with other products and services Active Roles Language Pack Active Roles Diagnostic Tools Active Roles Add-on Manager

Configuring an M365 and Azure Tenant Selection policy

You can configure an O365 and Azure Tenant Selection policy in the Active Roles Console (also known as the MMC Interface) to:

  • Validate the selected Azure tenants for Azure users, guest users, O365 groups, Azure security groups, and contacts.
  • Select O365 Licenses for Azure users and guest users.
  • Select O365 Roles for Azure users and guest users.
  • Preprovision OneDrive for Azure users.
Prerequisites

Consider the following before configuring an O365 and Azure Tenant Selection policy:

  • The OneDrive settings of this policy are applicable to hybrid Azure users only, and will work only if you have already enabled OneDrive for your Azure tenant in the Azure AD Configuration > Modify (Tenant details) window of the Active Roles Configuration Center. For more information on enabling OneDrive for Azure users in an Azure tenant, see Enabling OneDrive in an Azure tenant.

  • To configure an O365 and Azure Tenant Selection policy, your Organizational Unit (OU) must already have the Azure - Default Rules to Generate Properties built-in policy configured. For more information on configuring the policy, see Configuring the Azure - Default Rules to Generate Properties policy.

To configure an O365 and Azure Tenant Selection policy

  1. In the Console tree, navigate to Configuration > Policies > Administration.

  2. To open the New Provisioning Policy Object Wizard dialog, right-click Administration, then select New > Provisioning Policy.

  3. On the Name and Description page, provide a unique Name for the new Policy Object. Optionally, also provide a Description. To continue, click Next.

  4. On the Policy to Configure page, select O365 and Azure Tenant Selection, and click Next.

  5. On the Object Type Selection page, to specify the type of object you want the policy to provision, click Select, then click OK.

    TIP: If you do not see the Object type that you need, to expand the Object type list, select Show all possible object types.

    NOTE: If you want to assign and validate Office 365 licenses and roles, or provision OneDrive storage as part of the configured policy, select the User (user) object type in this step. Office 365 license and role validation, and OneDrive provisioning are not applicable to Azure Groups and Azure Contacts.

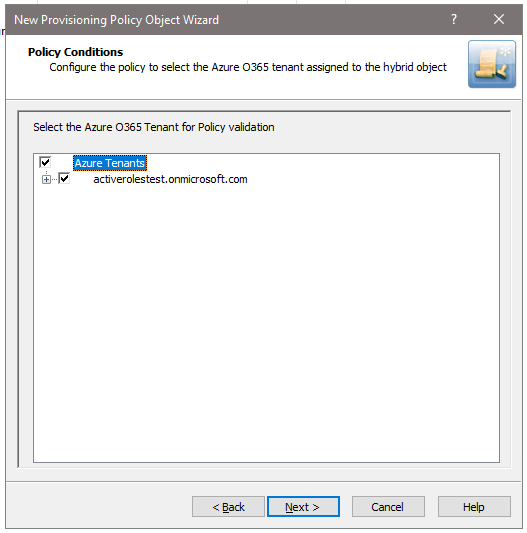
  6. On the Policy Conditions page, select your Azure tenant for which you want to set up the policy. To continue, click Next.

  7. (Optional) On the next Policy Conditions page, select the licenses to validate and assign to new Azure users in the Azure tenant. To continue, click Next.

    NOTE: If OneDrive storage is planned to be provisioned in the selected Azure tenant for Azure users, make sure that you select the SharePoint Online license in this step. Otherwise, the configured OneDrive storage cannot be provisioned for Azure users created later. For more information, see Creating a new cloud-only Azure user in the Active Roles Web Interface User Guide.

  8. (Optional) On the next Policy Conditions page, select the Office 365 roles to validate and assign to new Azure users in the Azure tenant. To continue, click Next.

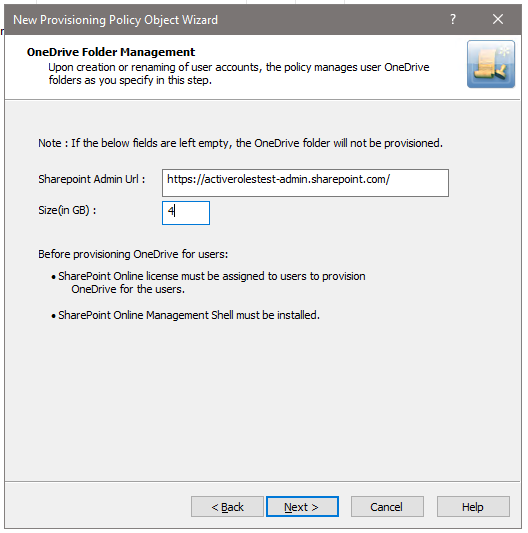
  9. (Optional) To configure OneDrive storage for the Azure users of the Azure tenant, configure the following attributes on the OneDrive Folder Management page:

    • SharePoint Admin URL: Specify the URL of the SharePoint administration site of your Azure tenant. The URL has the following syntax: <azure-tenant-name>-admin.sharepoint.com

    • Size (in GB): Specify the default OneDrive storage size allocated for each Azure user in the Azure tenant.

    If you do not need to provision OneDrive storage for users in the Azure tenant, leave the settings empty and click Next.

    NOTE: If the wizard displays an error when clicking Next after configuring the OneDrive settings:

    • Check that the specified SharePoint Admin URL is correct.

    • Make sure that the specified OneDrive storage size is correct (that is, it is within the range of the individual cloud storage allowed for users in your organization).

  10. On the Enforce Policy page, select the Organizational Unit (OU) for which the policy will be applied. To do so, click Add to open the Select Objects window, then select the OU from the list. To continue, click OK then Next.

  11. To complete the wizard, click Finish.

Applying a new M365 and Azure Tenant Selection policy

Microsoft 365 user license management
  1. From the Web Interface, assign, or modify the Microsoft 365 license for an Azure AD User.

    The Policy is triggered for any Azure AD user in the Organization Unit for which the M365 and Azure Tenant selection policy is applied.

    If the policy conditions are not satisfied while assigning or modifying Azure AD User licenses, the following policy violation error is displayed:

    Provisioning policy failure. The 'O365 and Azure Tenant Selection' policy encountered an error. Exception in Azure Tenant Management Policy violation: The Azure user License(s) O365_BUSINESS_ESSENTIALS-PROJECTWORKMANAGEMENT, cannot be assigned. The policy prescribes that this Azure User requires only the specified license in the policy object to be assigned.

  2. To check whether there are any policy violations, right-click and select Check Policy

    For a container object, this displays the Check Policy dialog.

  3. Review the options in the Check Policy dialog and click OK.

    The Policy Check Results window is displayed.

    IMPORTANT: Office 365 user license management now allows Administrator to select a subset of the licenses selected in policy during user creation or modification.

Microsoft 365 user roles management through provisioning policy

From the Web Interface, assign or modify the Microsoft 365 roles for an Azure AD User.

If the policy conditions are not satisfied while assigning Azure AD User roles while creating an Azure AD user from the Active Roles Web Interface, the following policy violation error is displayed:

Provisioning policy failure. The 'O365 and Azure Tenant Selection' policy encountered an error. Exception in Azure Tenant Management Policy violation: The Azure user Role(s) cannot be assigned. The policy prescribes that this Azure User requires only the specified role in the policy object to be assigned.

Figure 154: OneDrive folder management wizard

Provisioning OneDrive for Azure AD users

  1. From the Web Interface, create an Azure AD User, and assign a valid SharePoint Online license.

  2. After the user is created, the OneDrive provisioning process is performed in the background and after some time the process is completed.

    NOTE: Consider the following when provisioning OneDrive for Azure AD users

    • If the SharePoint Admin URL is incorrect then the OneDrive provisioning is not successful.

    • For an existing Azure AD user, during modification of user properties:

      • If OneDrive is not provisioned, then OneDrive provisioning is triggered.

      • If OneDrive is provisioned, and any changes are made to the OneDrive provisioning policy, then the policy changes are applied on the user.

  3. To check the provisioning result, open the Azure Properties window for the user from the Web Interface, navigate to OneDrive tab.

    On successful provisioning of the user, the OneDrive URL, the used storage size, and the total storage size are displayed.

    NOTE: The storage size indicated in the policy gets synchronized to the Azure AD user's OneDrive.

Changes to Active Roles policies for cloud-only Azure objects

Active Roles 7.4.4 introduced support for cloud-only Azure objects: Azure users, guest users and contacts. To support the management of these cloud-only Azure objects, the existing Active Roles policies received the following updates:

  • The Property Generation and Validation policy now supports specifying object property rules for cloud-only Azure objects. To get started with provisioning cloud-only Azure properties, Active Roles contains a new built-in policy for provisioning cloud-only Azure properties. Find the policy in the following node of the Active Roles MMC console:

    Configuration > Policies > Administration > BuiltIn > Azure CloudOnly Policy - Default Rules to Generate Properties

  • The Group Membership AutoProvisioning policy now supports specifying group membership rules to automatically assign (or unassign) cloud-only Azure users and guest users to (or from) O365 Groups located in the same Azure tenant as the provisioned Azure objects.

    In the New Provisioning Policy Wizard of the Active Roles MMC console, the cloud-only Azure objects supported for provisioning are listed in the Object Type Selection > Select Object Type dialog, while the O365 Groups can be selected in the Group Selection > Browse for Container dialog.

  • Script Execution policies now also support PowerShell and other custom scripts for provisioning cloud-only Azure objects. As part of this change, Active Roles contains a new built-in script module that you can use to configure policies for generating cloud-only Azure user passwords complying with Azure AD password generation policies. This built-in script module is available at the following node of the Active Roles MMC console:

    Configuration > Script Modules > BuiltIn > Generate User Password - Azure only

Managing the configuration of Active Roles

To manage the configuration of Active Roles, you must have the necessary permissions. It is sufficient to be a member of the Active Roles Admin group. The Active Roles Admin account is specified when configuring the Administration Service. It defaults to the Administrators group on the computer running the Administration Service.

The authority to modify the Active Roles configuration can be delegated by applying the Manage Configuration Access Template to the Server Configuration container.

Documentos relacionados

The document was helpful.

Selecione a classificação

I easily found the information I needed.

Selecione a classificação