Creating folder path rules
Use the By Folder Path rule to elevate or decrease privileges for processes that start from a folder path.
To create a By Folder Path rule using the Create Rule Wizard:
- Open the Create Rule Wizard. For more information, see Using the Create Rule Wizard.
- Specify the location of a Folder on the client computer or a network share in one of the following ways:
- Type the folder path in the following format:
\\ComputerName\SharedFolder
DriveLetter:\Folder
- Use the common % variable and the * and ? wildcards to identify the folder, for example, *\Folder
- Use the Browse
button to locate the folder.
|
|
Note: When saving the rule, Privilege Manager for Windows converts the path into environment variables. |
-
Fill in these optional fields, as necessary:
- Available only in Privilege Manager Professional and Professional Evaluation editions. Publisher: Limit elevation to files signed with the digital certificate of a publisher. Enter the exact name or use the Browse
button to locate it.
- Apply settings to sub folders: Apply the rule to processes started from any file under any sub folders of the path.
- Apply settings to child processes: Ensure that child processes triggered by the rule will not fail due to lack of privileges. This checkbox is enabled by default.
- User’s context will be used to resolve system and resource access: Ensure that the client will use the target's user environment to resolve file and registry access. This might be required to resolve drive mappings, and also if the rule specifies the publisher, version, or file hash for the target process running from a network location.
- Available only in Privilege Manager Professional and Professional Evaluation editions. Publisher: Limit elevation to files signed with the digital certificate of a publisher. Enter the exact name or use the Browse
-
Define whether the rule will be user or computer-based.
- User Policy: Select this option to apply the rule to the user logged into the computer. This option corresponds to the User Configuration node of the Group Policy Management Editor and is the default policy for all editions of Privilege Manager for Windows.
- Computer Policy: Select this option to apply the rule to a computer irrespective of the user logged in. This option corresponds to the Computer Configuration node of the Group Policy Management Editor. Available only in Privilege Manager Professional and Professional Evaluation editions.
-
Complete the Privileges (see Granting/denying privileges (Privilege Elevation Rules only)) and Integrity (see Differentiating security levels (Privilege Elevation Rules only)) tabs to modify the rule.
-
Click Finish to quit the wizard.
- The rule will be named after the folder path.
Creating ActiveX rules
Use the By ActiveX Rule to allow installation of ActiveX controls from the Internet.
To create an ActiveX Rule using the Create Rule Wizard:
- Open the Create Rule Wizard. For more information, see Using the Create Rule Wizard.
- Specify the URL for the ActiveX control in the Source URL field, for example: http://*.macromedia.com*
- Available only in Privilege Manager Professional and Professional Evaluation editions.
- Click the Installed ActiveX Controls button to view details of the ActiveX controls installed on the local computer and create rules based on them.
- Fill in these optional fields, as necessary.
- Control: Enter the name of the ActiveX control from the CodeBase attribute of the web page.
- CLSID/MIME: Restrict loading a control unless the CLSID or MIME value on the web page matches the one specified.
- ActiveX Version: Restrict elevation to ActiveX controls with a matching version number on the web page from which it will be downloaded.
-
Define whether the rule will be user or computer-based.
- User Policy: Select this option to apply the rule to the user logged into the computer. This option corresponds to the User Configuration node of the Group Policy Management Editor and is the default policy for all editions of Privilege Manager for Windows.
- Computer Policy: Select this option to apply the rule to a computer irrespective of the user logged in. This option corresponds to the Computer Configuration node of the Group Policy Management Editor. Available only in Privilege Manager Professional and Professional Evaluation editions.
-
Click Finish to quit the wizard.
- The rule will be named after the ActiveX control.
Applying ActiveX rules
In order for an ActiveX rule to take effect on clients, set up the following components:
-
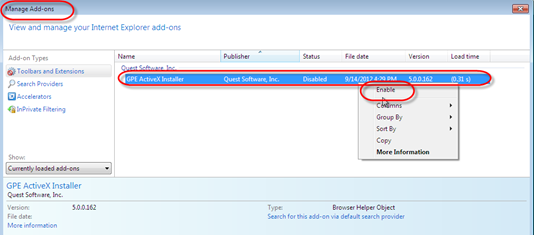
Enable Quest's GPE ActiveX Installer add-on in the Internet Explorer browser.
-
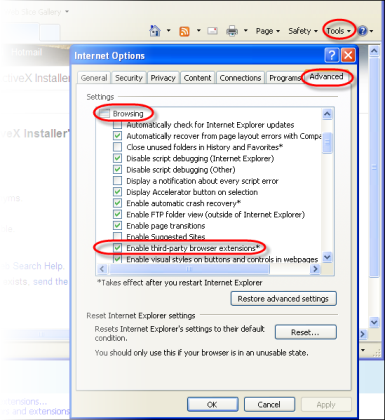
Open the Internet Options menu.
- Uncheck the Enable Protected Mode checkbox on the Security tab.
- Check the Enable third-party browser extensions* checkbox on the Advanced tab.
-
Restart Internet Explorer.
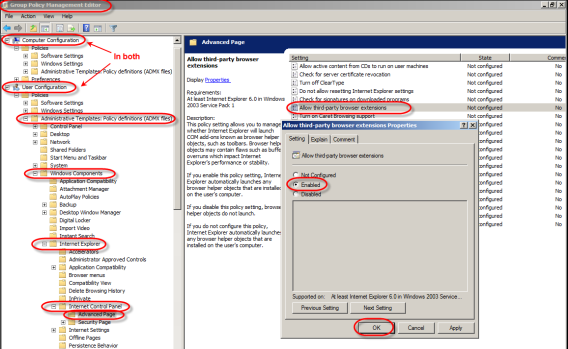
To centrally enable third-party browser extensions by modifying a GPO:
- Create a dedicated GPO or open the Group Policy Management Editor.
-
Go to Computer Configuration > Administrative Templates: Policy definitions (ADMX files) > Windows Components > Internet Explorer > Internet Control Panel > Advanced Page, and double-click on Allow third-party browser extensions in the list to the right and enable it.
- Open the User Configuration node and perform the configurations described in step 2 above.
Creating rules for Windows Installer files
Available only in Privilege Manager Professional and Professional Evaluation editions.
Use the By Path to Windows Installer rule to elevate or decrease privileges for processes that start from Windows Installer files (.msi) and patches (.msp).
To create a By Path to Windows Installer rule using the Create Rule Wizard:
- Open the Create Rule Wizard. For more information, see Using the Create Rule Wizard.
- Fill in the following fields:
- Name: Set a path to an .msi or .msp file. Wildcards are supported and you can use the Browse
button to locate the path.
Optional:
-
Publisher: Limit elevation to files signed with the digital certificate of a publisher. Enter the exact name or use the Browse
button to locate it.
- Product Code: Limit elevation to those whose ProductCode MSI property match the one specified. Enter the exact name or use the Browse
button to locate it.
- Product Version: Limit elevation to those whose ProductVersion MSI property match the one specified.
- File Hash: Click the Browse
button to locate the file and create a unique cryptographic hash that limits elevation to files that match it. This ensures that the rule will not apply to dangerous content that is similarly named and will help prevent security issues.
- Apply settings to child processes: Ensure that child processes triggered by the rule will not fail due to lack of privileges. This checkbox is enabled by default.
- User’s context will be used to resolve system and resource access: Ensure that the client will use the target's user environment to resolve file and registry access. This might be required to resolve drive mappings, and also if the rule specifies the publisher, version, or file hash for the target process running from a network location.
- Name: Set a path to an .msi or .msp file. Wildcards are supported and you can use the Browse
-
Define whether the rule will be user or computer-based.
- User Policy: Select this option to apply the rule to the user logged into the computer. This option corresponds to the User Configuration node of the Group Policy Management Editor and is the default policy for all editions of Privilege Manager for Windows.
- Computer Policy: Select this option to apply the rule to a computer irrespective of the user logged in. This option corresponds to the Computer Configuration node of the Group Policy Management Editor. Available only in Privilege Manager Professional and Professional Evaluation editions.
-
Complete the Privileges (see Granting/denying privileges (Privilege Elevation Rules only)) and Integrity (see Differentiating security levels (Privilege Elevation Rules only)) tabs to modify the rule.
-
Click Finish to quit the wizard.
- The rule will be named after the installer file or patch.
Creating rules for script files
Available only in Privilege Manager Professional and Professional Evaluation editions.
Use the By Path to Script File rule to elevate or decrease privileges for processes that start from a script file.
To create a By Path to Script File rule using the Create Rule Wizard:
- Open the Create Rule Wizard. For more information, see Using the Create Rule Wizard.
- Set the absolute or relative path to one of the following types of script files:
- Command Prompt: .cmd
- Batch File: .bat
- JavaScript: .js
- VBScript: .vbs
- PowerShell: .ps1
- Perl: .pl
Wildcards are supported and you can use the Browse 
- Fill in these optional fields, as necessary:
-
Publisher: Limit elevation to files signed with the digital certificate of a publisher. Enter the exact name or use the Browse
button to locate it.
This field is not supported for .pl, .cmd, and .bat files.
-
File Hash: Click the Browse
button to locate the file and create a unique cryptographic hash that limits elevation to files that match it. This ensures that the rule will not apply to dangerous content that is similarly named and will help prevent security issues.
- Apply settings to child processes: Ensure that child processes triggered by the rule will not fail due to lack of privileges. This checkbox is enabled by default.
- User’s context will be used to resolve system and resource access: Ensure that the client will use the target's user environment to resolve file and registry access. This might be required to resolve drive mappings, and also if the rule specifies the publisher, version, or file hash for the target process running from a network location.
-
-
Define whether the rule will be user or computer-based.
- User Policy: Select this option to apply the rule to the user logged into the computer. This option corresponds to the User Configuration node of the Group Policy Management Editor and is the default policy for all editions of Privilege Manager for Windows.
- Computer Policy: Select this option to apply the rule to a computer irrespective of the user logged in. This option corresponds to the Computer Configuration node of the Group Policy Management Editor. Available only in Privilege Manager Professional and Professional Evaluation editions.
-
Complete the Privileges (see Granting/denying privileges (Privilege Elevation Rules only)) and Integrity (see Differentiating security levels (Privilege Elevation Rules only)) tabs to modify the rule.
-
Click Finish to quit the wizard.
- The rule will be named after the script file.


