
The usermapped_channels view
This view collects data about the connections which used a usermapping policy. The view is defined as follows:
select
    channels.id,
    channels.scp_path,
    channels.subsystem_name,
    channels.protocol,
    channels.originator_port,
    channels.channel_policy,
    channels.target_addr,
    channels._archive_path,
    channels._close_cleanup,
    channels.dynamic_channel,
    channels.environment,
    channels.session_start,
    channels.remote_username,
    channels.local_port,
    channels.four_eyes_authorizer,
    channels.src_ip,
    channels.session_end,
    channels._archive_server,
    channels.server_port,
    channels.username,
    channels._archive_date,
    channels.server_ip,
    channels.exec_cmd,
    channels._archive_policy,
    channels.four_eyes_description,
    channels.connection_id,
    channels._connection_channel_id,
    channels.rule_num,
    channels.target_port,
    channels.src_port,
    channels.originator_addr,
    channels.auth_method,
    channels.audit,
    channels.local_ip,
    channels.session_id,
    channels.device_name,
    channels.channel_type,
    channels."connection",
    channels.verdict,
    channels.dst_port,
    channels.dst_ip
from channels
where channels.remote_username is not null
and channels.username <> channels.remote_username;
The the usermapped_channels view has the following columns. For details of the different columns, see Connection metadata.
|
|
NOTE:
The structure of these database tables may change in future One Identity Safeguard for Privileged Sessions (SPS) versions. |

| Column | Type | Description |
|---|---|---|
| _archive_date | date |
Archive date: The date when the connection was archived or cleaned up. |
| _archive_path | text |
Archive path: The path where the audit trail was archived on the remote server. |
| _archive_policy | text | |
| _archive_server | text |
Archive server: The hostname or IP address of the remote server where the audit trail was archived. |
| audit | text |
Audit-trail: Name and ID of the audit file storing the traffic of the channel. If the session has an audit trail, a icon is displayed. Note that a the following letters may appear on the download icon: |
| auth_method | text |
Authentication method: The authentication method used in the connection. For example, password |
| channel_policy | text |
Channel policy: The Channel policy applied to connection. The Channel policy lists the channels (for example, terminal session and SCP in SSH, or Drawing and Clipboard in RDP) that can be used in the connection, and also determines if the channel is audited or not. The Channel policy can also restrict access to each channel based on the IP address of the client or the server, a user list, user group, or a time policy. |
| channel_type | text |
Channel type: Type of the channel. |
| _close_cleanup | boolean | |
| _connection_channel_id | integer |
Unique connection ID: The unique identifier of the connection. |
| connection_id | text |
Connection policy ID: The identifier of the connection policy. |
| connection | text |
Connection policy: The connection policy that handled the client's connection request. |
| device_name | text |
Device name: The name or ID of the shared device (redirect) used in the RDP connection. |
| dst_ip | text |
Destination IP: The IP address of the server as requested by the client. |
| dst_port | integer |
Destination port: The port number of the server as requested by the client. |
| dynamic_channel | text |
Dynamic channel: The name or ID of the dynamic channel opened in the RDP session. |
| exec_cmd | text |
Exec command: The command executed in a Session exec channel. |
| four_eyes_authorizer | text |
Four-eyes authorizer: The username of the user who authorized the session. Available only if 4-eyes authorization is required for the channel. For details on 4-eyes authorization, see Configuring four-eyes authorization. |
| four_eyes_description | text |
Four-eyes description: The description submitted by the authorizer of the session. |
| id | integer | |
| local_ip | text |
Server-local IP: The IP address of SPS used in the server-side connection. |
| local_port | integer |
Server-local port: The port number of SPS used in the server-side connection. |
| originator_addr | text |
Port/X11 forward originator IP: The IP address of the host initiating the channel in Remote Forward and Local Forward channels. Note that this host is not necessarily the client or the server of the SSH connection. |
| originator_port | integer |
Port/X11 forward originator port: The number of the forwarded port in Remote Forward and Local Forward channels. |
| protocol | text |
Protocol: The protocol used in the connection (Citrix ICA, HTTP, RDP, SSH, Telnet, or VNC). |
| remote_username | text |
Username on server: The username used to log in to the remote server. This username can differ from the client-side username if usermapping is used in the connection. For details on usermapping, see Configuring usermapping policies. |
| rule_num | text |
Rule number: The number of the line in the Channel policy applied to the channel. |
| scp_path | text |
SCP path: Name and path of the file copied via SCP. Available only for SCP sessions (Session exec SCP SSH channels) if the Log file transfers to database option is enabled in the Channel Policy of the connection. |
| server_ip | text |
Server IP: The IP address of the server connected by SPS. |
| server_port | integer |
Server port: The port number of the server connected by SPS. |
| session_end | integer |
End time: Date when the channel was closed. |
| session_id | text |
Session ID: A globally unique string that identifies the session. This session ID has the following format: svc/<unique-random-hash>/<name-of-the-connection-policy>:<session-number-since-service-started>/<protocol>, for example, svc/5tmEaM7xdNi1oscgVWpbZx/ssh_console:1/ssh. Log messages related to the session also contain this ID. For example: 2015-03-20T14:29:15+01:00 demo.example zorp/scb_ssh[5594]: scb.audit(4): (svc/5tmEaM7xdNi1oscgVWpbZx/ssh_console:0/ssh): Closing connection; connection='ssh_console', protocol='ssh', connection_id='409829754550c1c7a27e7d', src_ip='10.40.0.28', src_port='39183', server_ip='10.10.20.35', server_port='22', gateway_username='', remote_username='example-username', verdict='ZV_ACCEPT' |
| session_start | integer |
Start time: Date when the channel was started. |
| src_ip | text |
Source IP: The IP address of the client. |
| src_port | integer |
Source port: The port number of the client. |
| subsystem_name | text |
Subsystem name: Name of the SSH subsystem used in the channel. |
| target_addr | text |
Port-forward target IP: The traffic was forwarded to this IP address in Remote Forward and Local Forward channels. |
| target_port | integer |
Port-forward target port: The traffic was forwarded to this port in Remote Forward and Local Forward channels. |
| username | text |
Username: The username used in the session.
|
| verdict | text |
Verdict: Indicates what SPS decided about the channel.
|
Querying trail content with the lucene-search function
|
|
Caution:
This function works only if you have enabled indexing for the audit trails. |

The lucene_search function allows you to search the content of indexed audit trails for a specific keyword and return the IDs of the channels that contain the search keyword. The lucene_search function requires four parameters:
-
search phrase: The keyword or keyphrase you are looking for, for example, a command issued in an SSH session (exit). The keyphrase can contain the following special operators to be used & (AND), | (OR), ! (NOT). Brackets can be used to group parts of the keyphrase.
-
beginning_timestamp: The date in UNIX-timestamp format. Only audit trails created after this date will be queried.
-
ending_timestamp: The date in UNIX-timestamp format. Only audit trails created before this date will be queried.
For example:
select lucene_search
from lucene_search('root', 1287402232, 1318938150);

# Sample output:
(1,2,3,1)
(1 row)
The output of this query is a formatted as the following:
(<channel_id>,<trail_id>,<hits_count>,<rank>)
Alternatively, you can use the following query format that returns a header of the displayed columns, and uses the pipe (|) character for separator:
For example:
select * from lucene_search('tmp',1496885628,1496954028);
channel_id | trail_id | hits_count | rank
-----------------------------+-----
1    | 2    | 3    | 1
(1 row)
The output contains the following columns:
-
channel_id: The ID of the channel within the audit trail (an audit trail file can contain audit trails of multiple channels).
-
trail_id: Identifies the audit trail using the unique identifier of the session (the _connection_channel_id of the channel for which the audit trail was created).
-
hits_count: The number of hits in the audit trail.
-
rank: Shows the relevance of the search result on a 0-1 scale, where 1 is the most relevant. Note that on the SPS search page, this information is scaled to 0-5 (and shown graphically with stars).
For details on how to use more complex keyphrases, see the Apache Lucene documentation.
For details of content indexing, see Configuring the internal indexer.
Generating partial reports
The following describes how to generate a report manually for a period that has not been already covered in an automatic report.
|
|
Caution:
Generating a report that includes an Advanced statistics chapter that returns several thousands of entries requires significant CPU and memory resources from One Identity Safeguard for Privileged Sessions (SPS). While generating such a partial report, the web interface of SPS can become slow or unresponsive. |
To generate a report manually for a period that has not been already covered in an automatic report
-
Log in to the SPS web interface, and navigate to Reporting > Configuration.
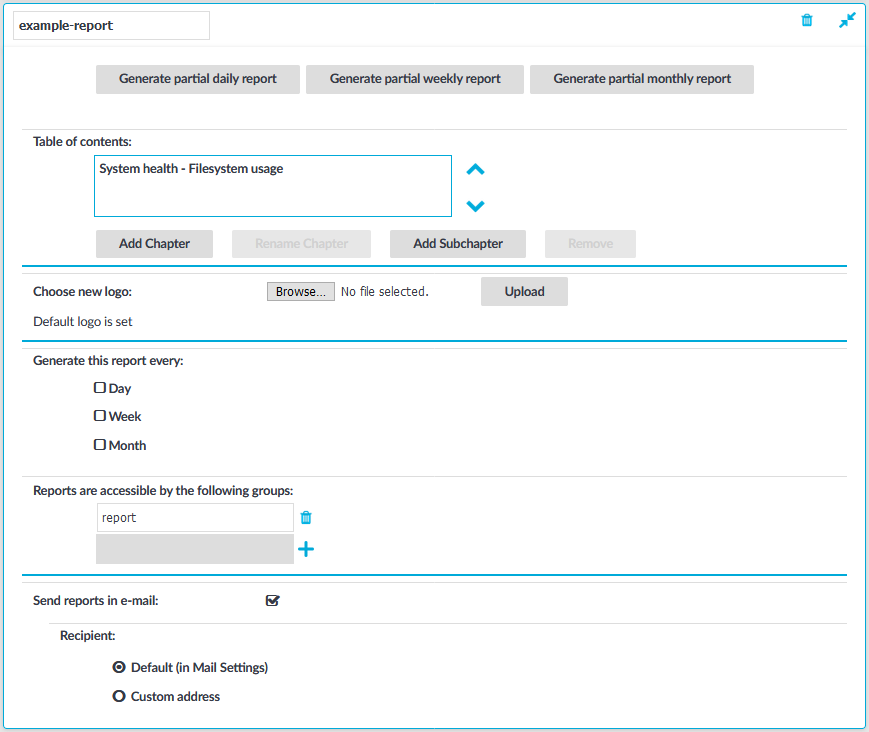
Figure 269: Reporting > Configuration — Configuring custom reports
-
Select the report you want to generate.
-
Click any of the following buttons:
-
To create a report from the last daily report till now, click Generate partial daily report. For example, if you click this button at 11:30 AM, the report will include the period from 00:01 to 11:30.
-
To create a report from the last weekly report till now, click Generate partial weekly report. For example, if you click this button on Wednesday at 11:30 AM, the report will include the period from Monday 00:01 to Wednesday 11:30.
-
To create a report from the last monthly report till now, click Generate partial monthly report. For example, if you click this button at 11:30 AM, December 13, the report will include the period from December 1, 00:01 to December 13, 11:30.
The report will be automatically added in the list of reports (Reporting > Reports), and also sent in an e-mail to the regular recipients of the report.
-
-
Click
.
Creating PCI DSS reports
To help you comply with the regulations of the Payment Card Industry Data Security Standard (PCI DSS), One Identity Safeguard for Privileged Sessions (SPS) can generate reports on the compliance status of SPS. Note that this is not a fully-featured compliance report: it is a tool to enhance and complement your compliance report by providing information available in SPS. The report corresponds with the document Payment Card Industry (PCI) Data Security Standard, Requirements and Security Assessment Procedures, Version 3.0, published by the PCI Security Standards Council.
For details on the contents of the report, see Contents of PCI DSS reports.
To create PCI DSS reports
-
Log in to the SPS web interface, and navigate to Reporting > PCI DSS.
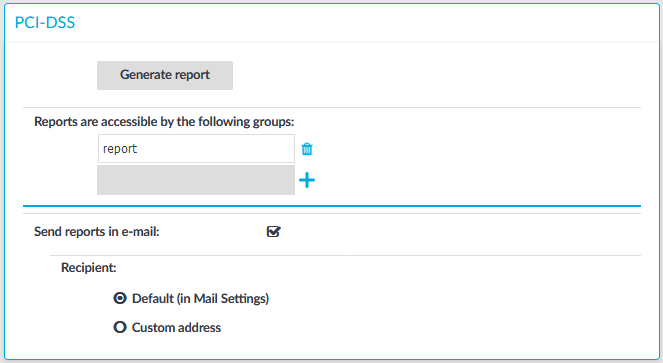
Figure 270: Reporting > PCI DSS — Generating PCI DSS reports
-
By default, members of the report group can access the custom reports via the SPS web interface. To change this, enter the name of a different group into the Reports are accessible by the following groups field, or click to grant access to other groups.
NOTE: Members of the listed groups will be able to access only these custom reports even if their groups does not have read access to the Reporting > Reports page. However, only those reports will be listed, to which their group has access to.
-
By default, SPS sends out the reports in e-mail to the address set in the Basic Settings > Management > Mail settings > Send reports to field.
NOTE: If this address is not set, the report is sent to the SPS administrator's e-mail address.
-
To disable e-mail sending, unselect the Send reports in e-mail option.
-
To e-mail the reports to a different address, select Recipient > Custom address, and enter the e-mail address where the reports should be sent. Click to list multiple e-mail addresses if needed.
-
-
Click .
-
Click Generate report.
The report will be automatically added in the list of reports (Reporting > Reports), and also sent in an e-mail to the regular recipients of the report.