
Setting up ICA connections
This section focuses on describing the ICA-specific details of connection configuration. For a detailed description on configuring connections, see General connection settings.
|
|
Caution:
If the clients are accessing a remote application or desktop that is shared for Anonymous users (that is, the Users properties of the application is set to Allow anonymous users in the Citrix Delivery Services Console), the actual remote session will be running under an Anonymous account name (for example, Anon001, Anon002, and so on), not under the username used to access the remote server. Therefore, you need to enable usermapping to the Anon* usernames. To accomplish this, create a usermapping policy and set the Username on the server option to Anon*, and the Groups option to *, then use this usermapping policy in your ICA connections. For details on using usermapping policies, see Configuring usermapping policies. |

Reliable connection is also known as Common Gateway Protocol (CGP). It attempts to reconnect to the server in case of a network failure. To use this feature, enable Reliable and enter the default port in the Port field in the upper right corner.
Enable Act as SOCKS proxy to configure the client to use One Identity Safeguard for Privileged Sessions (SPS) as a SOCKS proxy. If you have enabled this option, you can select Inband destination selection as Target. Enter the IP address or the IP address/Prefix of the brokers (Citrix XML Brokers) used by the client in this connection policy into the Address field. It is also recommended to enable access to the brokers on port 443, as the clients usually try to access the broker using this port first. Disabling port 443 will cause a denied connection to appear on the SPS Search interface for every connection attempt (but the clients will be able to connect the server).
|
|
Caution:
SPS does not audit or monitor the traffic between the brokers and the clients in any way, and are not listed on the SPS search interface. Only the connections between the clients and the actual servers are audited. |
|
|
Caution:
If SPS is acting as a SOCKS proxy and a client attempts to access a server that it is not permitted to access according to the configuration of SPS, SPS will deny the connection. However, the Citrix client application will automatically attempt to connect the server directly without using a proxy and will succeed if the server is directly accessible from the client. Ensure that your firewalls are configured properly to prevent such connections, as these direct connections cannot be audited by SPS. |
|
|
NOTE:
When enabling Reliable connection or Act as SOCKS proxy the first time, a warning is displayed suggesting the default port to be used based on the specific settings. Also, read the tooltips on these options as they contain up-to-date information about the default port numbers. |

Supported ICA channel types
The available ICA channel types and their functionalities are described below. For a list of supported client applications, see Supported protocols and client applications.
-
Drawing (Thinwire): Enables access to the server's desktop (screen). This channel is for remoting graphics and user input (keyboard, mouse). This channel must be enabled for ICA to work.
-
Audio Mapping: Enable access to the sound device of the server.
-
Drive Mapping: Enable access to the client's hard drives on the server.
-
Clipboard: Enable access to the server's clipboard: the clipboard of the remote desktop can be pasted into local applications (and vice-versa). Note that One Identity Safeguard for Privileged Sessions (SPS) can audit the clipboard channel, but the Safeguard Desktop Player currently cannot search or display its contents.
-
Smartcard: Enable using client side installed smartcards in server-side applications.
-
Printer (COM1): Enable access to the serial port COM1.
-
Printer (COM2): Enable access to the serial port COM2.
-
Printer (LPT1): Enable access to the parallel port LPT1.
-
Printer (LPT2): Enable access to the parallel port LPT2.
-
Printer Spooler: Enable access to the client's printer from the remote desktops and applications.
-
HDX Mediastream: Some user widgets (for example Flash player) will not run on the server but on the client. These widgets are controlled from the server side using this channel. This is not supported by Safeguard Desktop Player and it is disabled by default.
-
USB: Enable using client side installed USB devices in server-side applications.
-
Seamless: Enable seamless channels that run a single application on the ICA server, instead of accessing the entire desktop. When disabled, the application window will be accessed along with an empty desktop.
-
Speedbrowse: Speeds up web browsing. Not currently supported by Safeguard Desktop Player, should be disabled by default.
-
Custom: Applications can open custom channels to the clients connecting remotely to the server. Enabling the Custom channel allows the clients to access all of these custom channels. To permit only specific channels, enter the unique names of the channel into the Details field.
|
|
NOTE:
When the channel opens, there are certain cases when the remote group is not known yet. For example, in case of an RDP or ICA login screen, the drawing channel has to be opened first to properly display the logon screen. Only those channel rules will apply, where the Remote group field is empty. In case of network level authentication, all required information is present already so this limitation does not apply. |
|
|
NOTE:
Multi-stream ICA is not supported in SPS 6.0. |
Creating and editing protocol-level ICA settings
ICA settings determine the parameters of the connection on the protocol level, including timeout value, and so on.
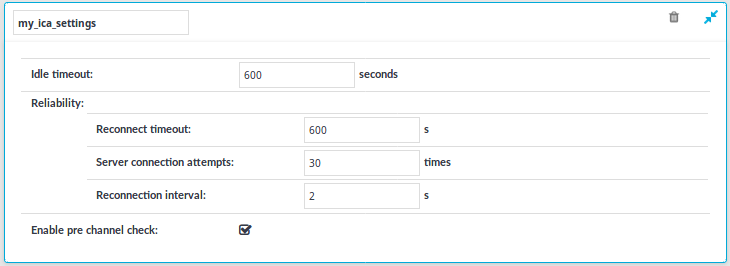
Figure 170: ICA Control > Settings — ICA settings
|
|
Caution:
Modifying the ICA settings is recommended only to advanced users. Do not modify these settings unless you exactly know what you are doing. |
To create a new ICA settings profile or edit an existing one
-
Navigate to the Settings tab of the ICA Control menu item and click
to create an ICA setting profile. Enter a name for the profile (for example ica_special).
-
Click
to display the parameters of the ICA connection.
-
Modify the parameters as needed. The following parameters are available:
-
Idle timeout: Connection timeout value in milliseconds. To avoid early timeout, set it to a larger value, for example a week (604800 seconds).
Caution: Determining if a connection is idle is based on the network traffic generated by the connection, not the activity of the user. For example, if an application or the taskbar of a graphical desktop displays the time which is updated every minute, it generates network traffic every minute, negating the effects of timeout values greater than one minute and preventing One Identity Safeguard for Privileged Sessions (SPS) from closing the connection.
-
Reconnect timeout: How many seconds SPS waits for reconnections when reliable connections are used. Reliable connections use the Common Gateway Protocol (CGP).
-
Server connection attempts: How many times SPS tries to connect to the target server.
-
Reconnection intervals: How many seconds SPS waits between two connection attempts on the server side.
-
Enable pre channel check: Select this option to evaluate the connection and channel policies before establishing the server-side connection. That way if the connection is not permitted at all, SPS does not establish the server-side connection.
NOTE: Reliability settings only apply if you have enabled Reliable connection in ICA Control > Connections.
-
-
Click
.
-
Select this settings profile in the ICA settings field of your connections.
One Identity Safeguard for Privileged Sessions (SPS) deployment scenarios in a Citrix environment
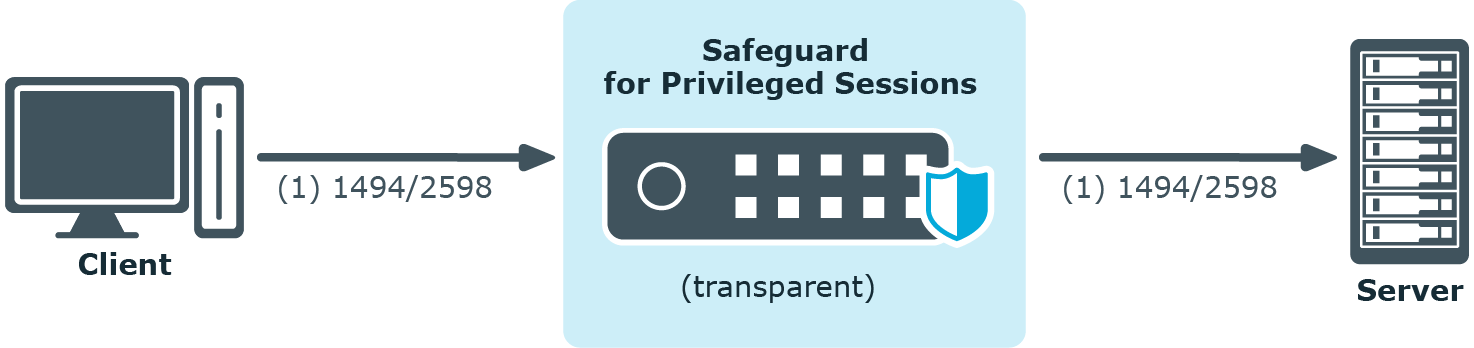
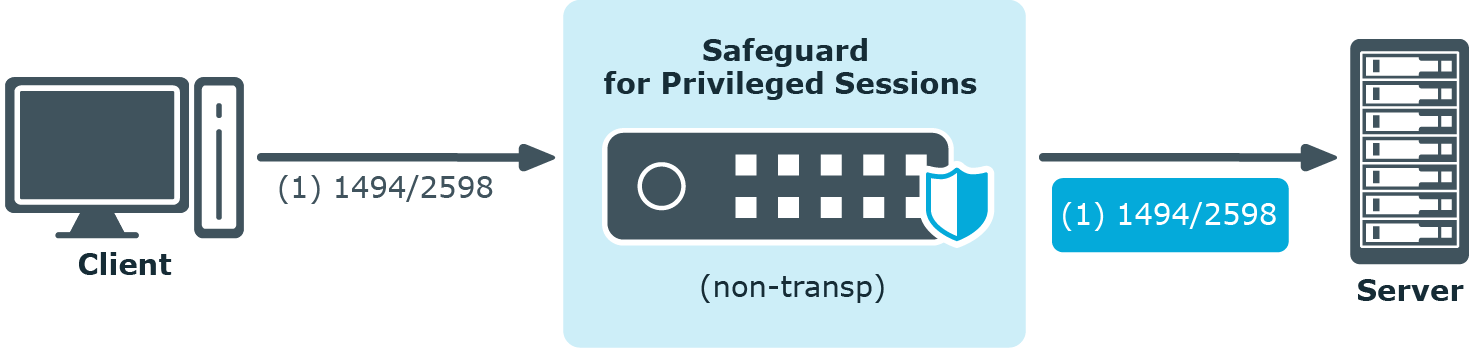
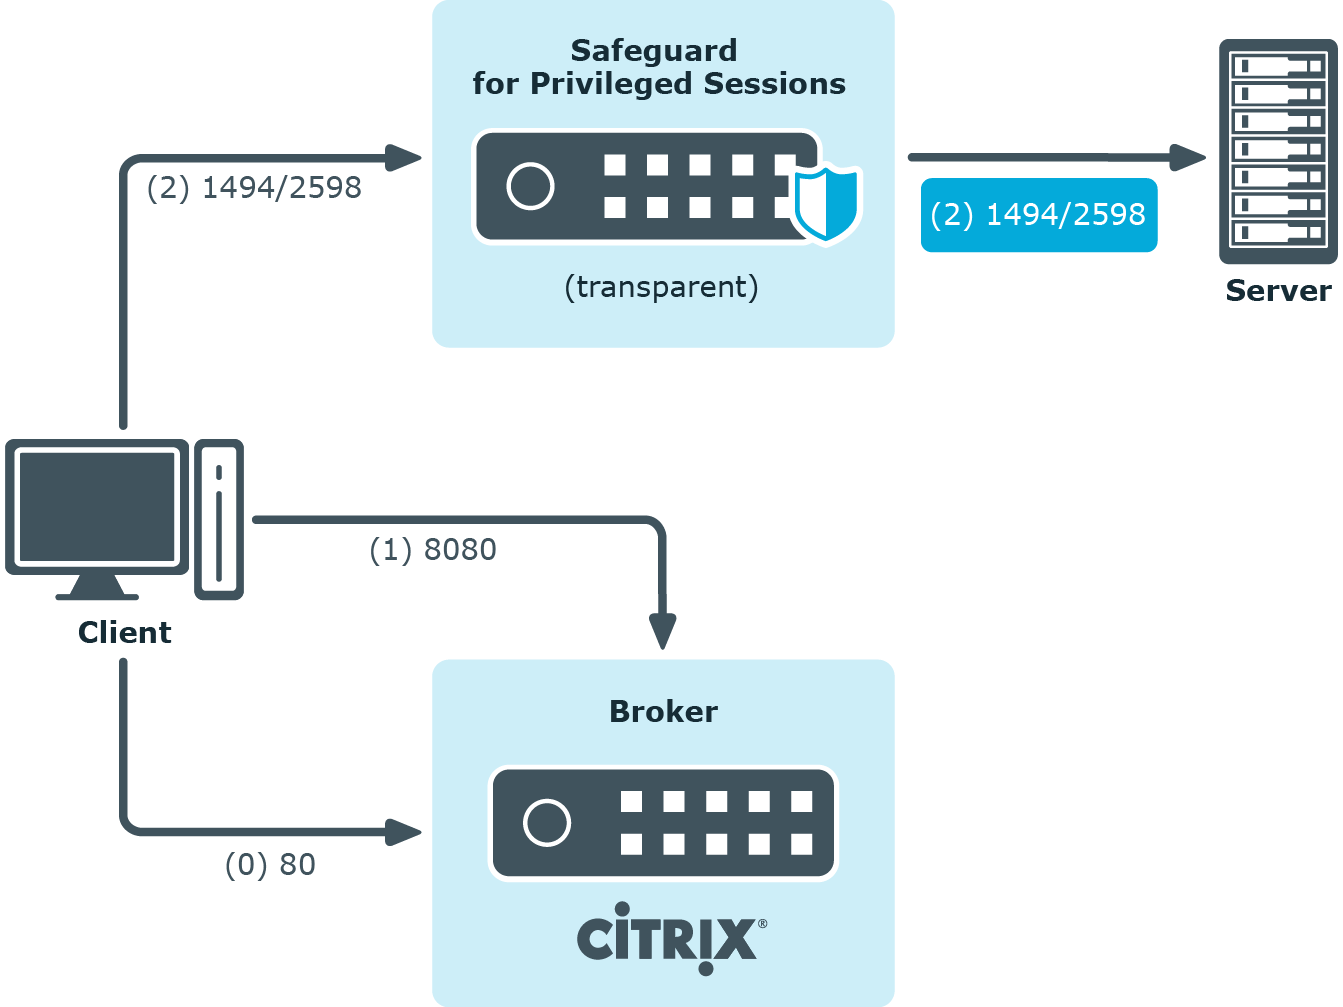
This section enlists the available One Identity Safeguard for Privileged Sessions (SPS) deployment scenarios in a Citrix environment. The text on the arrows are formatted in (<step number>) <target port> format. The target ports define the protocols used in the communication:
-
80: Web service, HTTP: the list of available resources fetched in an XML format from the broker (v12 and v11 with Citrix Virtual Apps (formerly known as Citrix XenApp) only). The broker sends all the necessary information, including secure gateway and server addresses to the client.
-
8080: XML service, HTTP+XML: application discovery, load balancing (v12 and v11 with Citrix Virtual Apps (formerly known as Citrix XenApp) only), used to fetch target to the application/desktop by the client from the broker (used for load balancing, and so on).
-
443: XML service access or SOCKS/ICA or CGP/ICA wrapped in TLS. The client communicates with the secure gateway on this port for everything.
-
1080: SOCKS. The client can be configured to access the target server and the broker using a SOCKS proxy.
-
1494: Plain ICA.
-
2598: CGP/ICA (reliable mode enabled).
|
|
Caution:
Accessing Citrix Virtual Desktops (formerly known as Citrix XenDesktop) is supported only in the following scenarios. Only reliable connections (CGP) are supported. |
Client - SPS - Server (Transparent mode)
The SPS is deployed between the client and the server and the clients use predefined connection files or Program Neighbourhood, without a broker or secure gateway. The clients try to connect to their original ICA/CGP server.
Figure 171: Client - SPS - Server (Transparent mode)
Client - SPS - Server (Non-transparent mode)
The SPS is deployed between the client and the server and the clients use predefined connection files or Program Neighbourhood, without a broker or secure gateway. The clients try to connect to SPS, which can distinguish between the potential targets for example by source IP, or by having multiple IP addresses itself.
Figure 172: Client - SPS - Server (Non-transparent mode)
Client - Broker - SPS - Server (Transparent mode)
The clients are using a farm broker which gives them a list of the available applications and servers, but they do not use a secure gateway in the network. The SPS is placed between the clients and the servers in transparent mode, and it catches the connections when the clients try to connect to the server IP addresses they got from the broker.
Figure 173: Client - Broker - SPS - Server (Transparent mode)
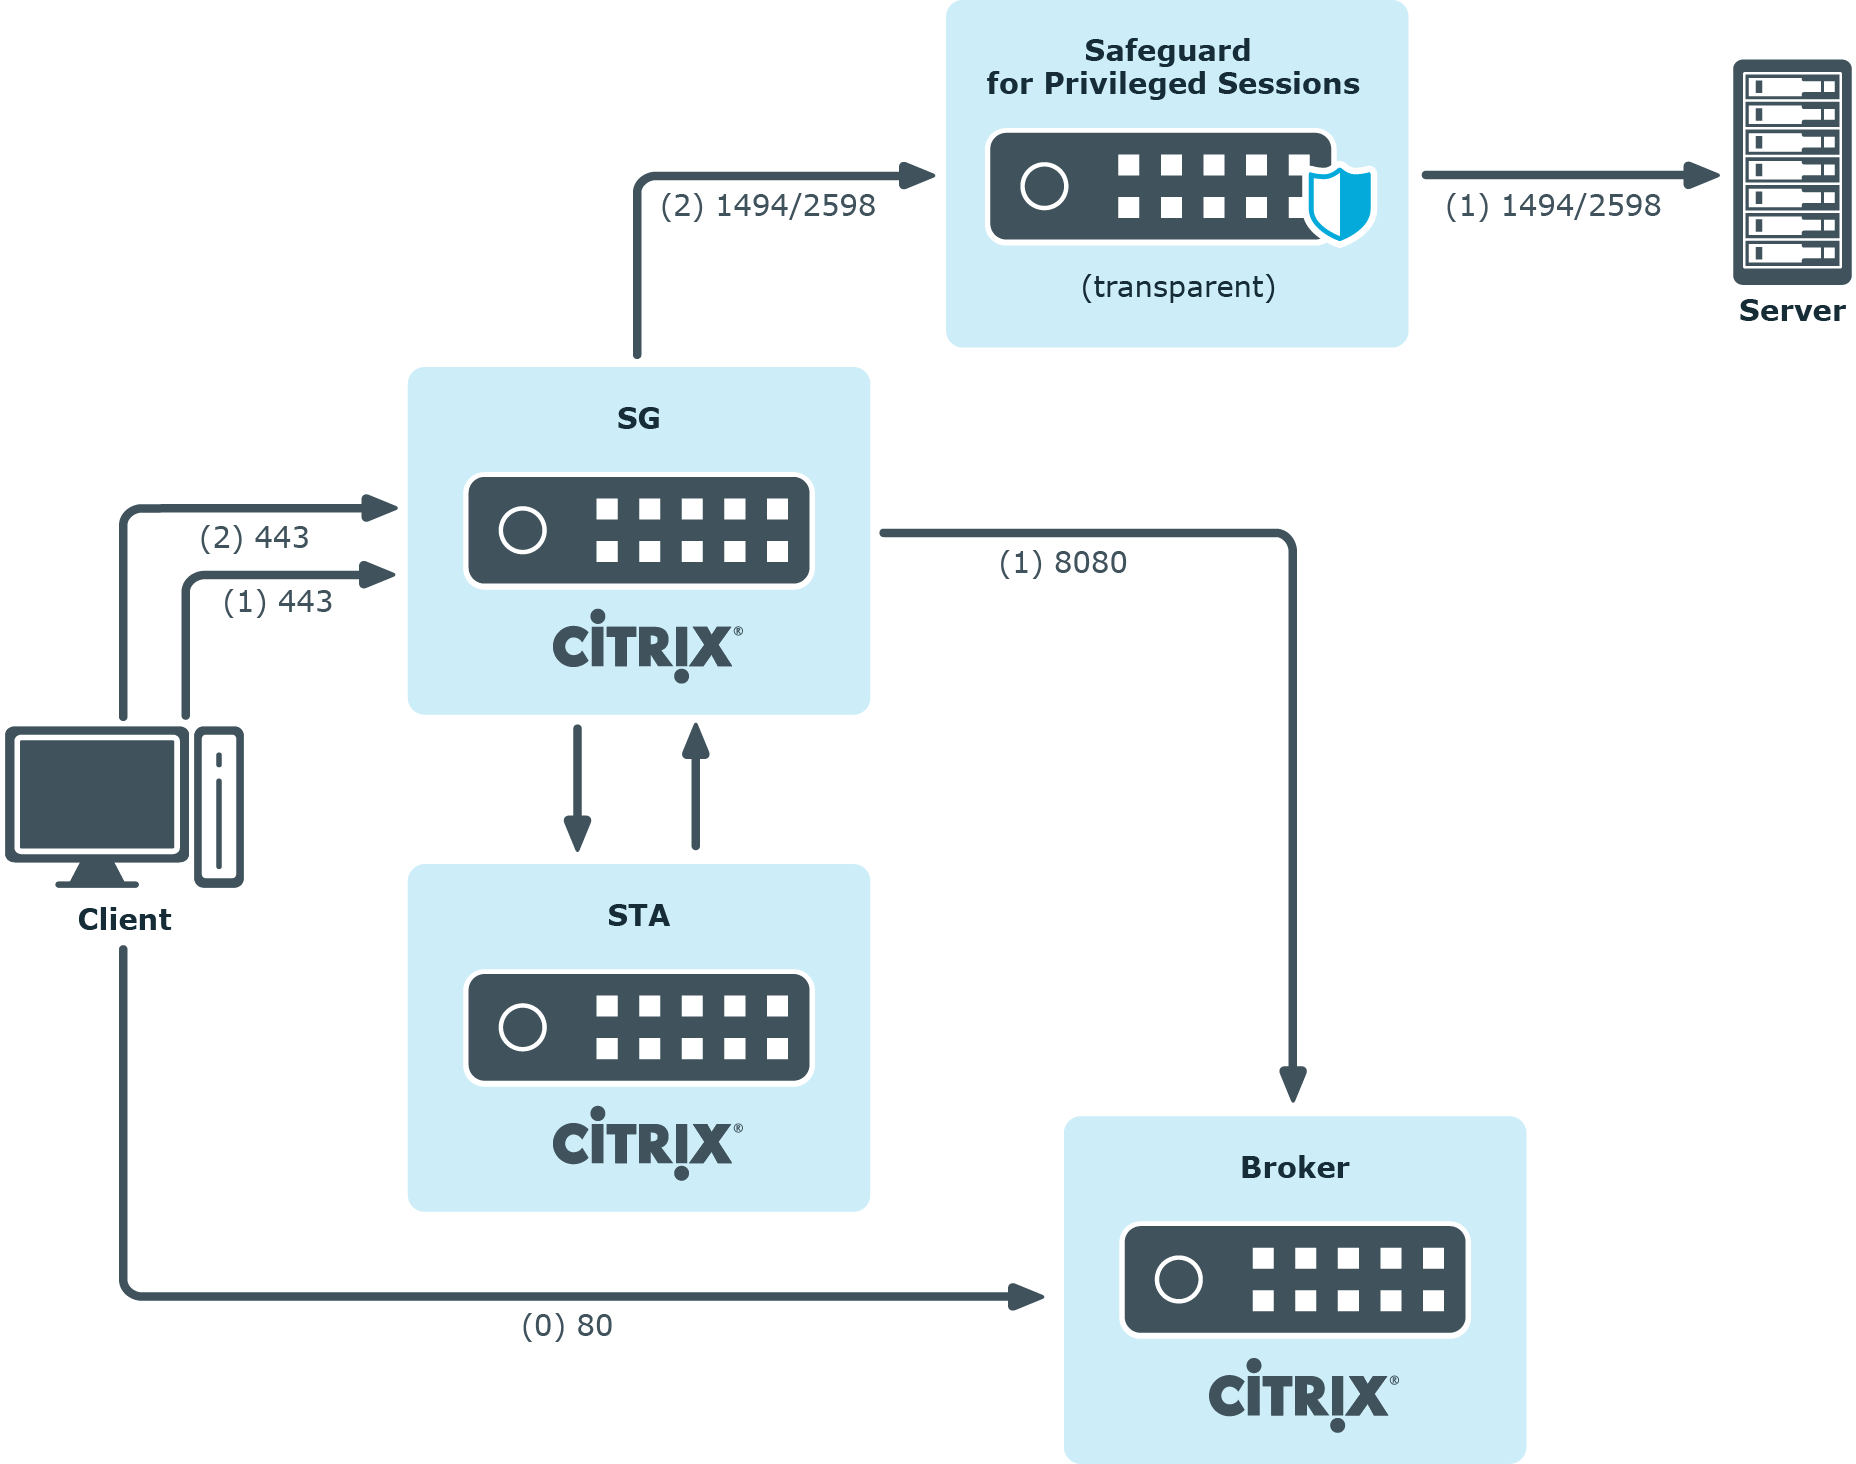
Client - Broker - original secure gateway - Secure Ticket Authority (STA) - SPS - Server
In this setup, a secure gateway is used in the network and the SPS is placed between this gateway and the servers in transparent mode. The clients connect to the broker for the list of available applications/servers and then make their further connections through the original secure gateway. That gateway forwards the connections either to the broker or to the CGP/ICA servers, which latter the SPS intercepts and audits/controls.
Figure 174: Client - Broker - original secure gateway - Secure Ticket Authority (STA) - SPS - Server
Client - Broker - SPS as socks proxy - Server
In this setup, the SPS acts as a SOCKS proxy for the client. It can be set either manually or specified by the broker. The client then makes all its connections to the broker or to the server using SPS as a proxy and hence it can audit/control these connections.
Figure 175: Client - Broker - SPS as socks proxy - Server
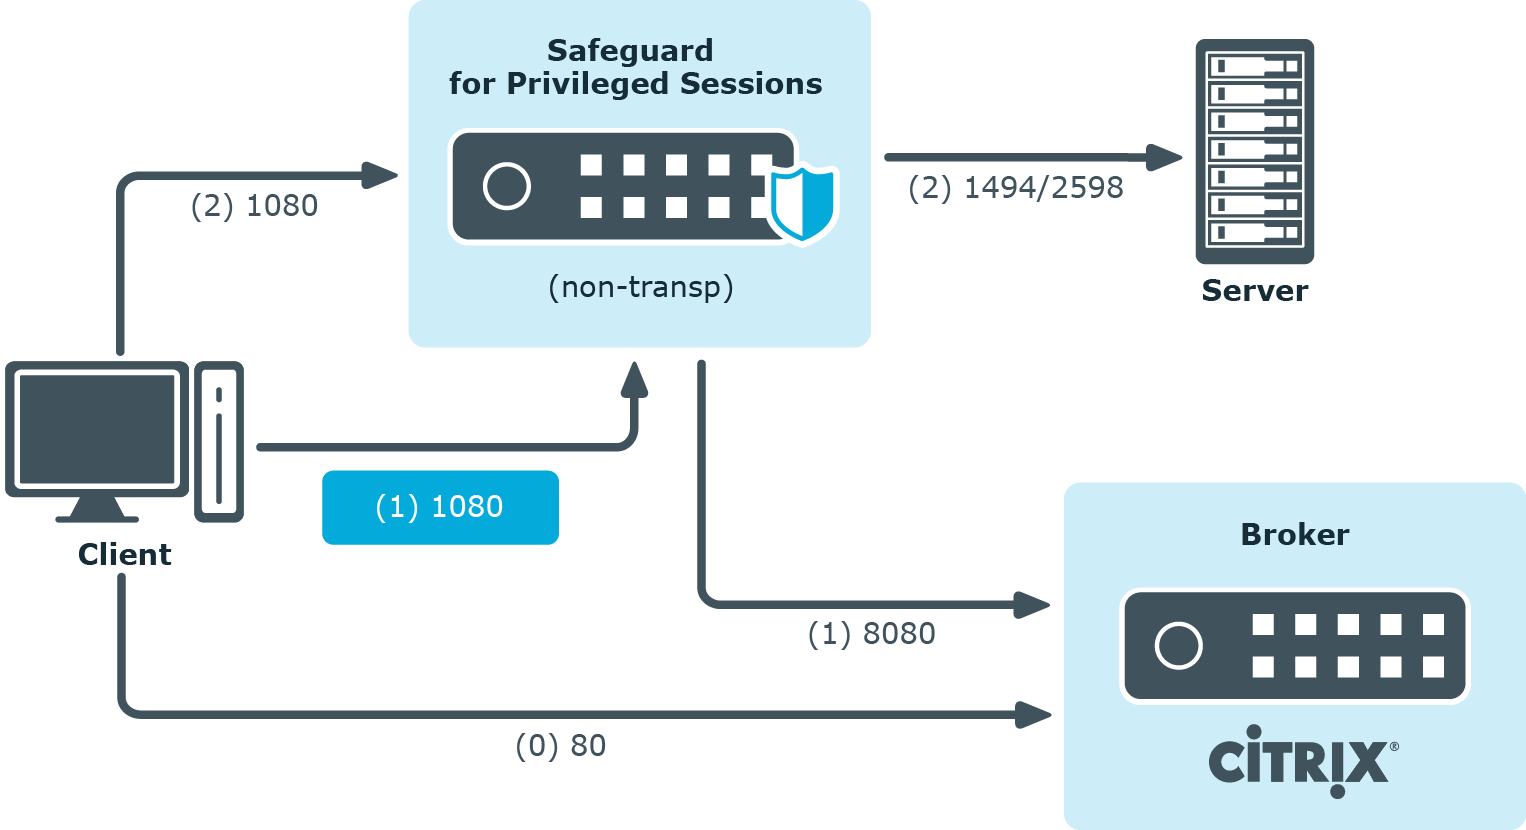
To configure such a scenario, you must set the ICA Connection Policy as follows:
-
Enter the IP address of SPS into the To field. This must be the public IP address that the clients will target.
-
Select Inband destination selection, and list the IP addresses or networks of target servers in the Targets field. (For details, see Configuring inband destination selection.)
-
Select Act as a SOCKS proxy.
-
Add the IP addresses of your brokers to the Brokers field.