
Hardware requirements for the external indexer host
-
CPU: You can configure the number of audit trails that an indexer host processes at the same time. For optimal performance, each indexer process should have a dedicated CPU core.
-
Memory requirements: In addition to the memory requirements of the operating system of the host, the indexer requires about 300 MB memory for each worker process, depending on the protocol of the indexed audit trails. The audit trails of terminal connections require less memory.
-
Disk: The indexer requests the data from One Identity Safeguard for Privileged Sessions (SPS) in small chunks, it does not store the entire audit trail nor any temporary files. You will need only disk space for the operating system, and a few GB to store logs.
For example, if you want to have a host that can process 6 audit trails at the same time, you need 6 CPU cores and 1.8 GB of memory for the indexer service. If you install only a minimal operating system and the external indexer on the host, 6 GB disk space should be enough.
Configuring One Identity Safeguard for Privileged Sessions (SPS) to use external indexers
The following describes how to configure One Identity Safeguard for Privileged Sessions (SPS) to accept connections from external indexer services.
To configure SPS to accept connections from external indexer services
-
Log in to the SPS web interface, and navigate to Basic Settings > Local Services > Indexer service.
-
Select Indexer service.
-
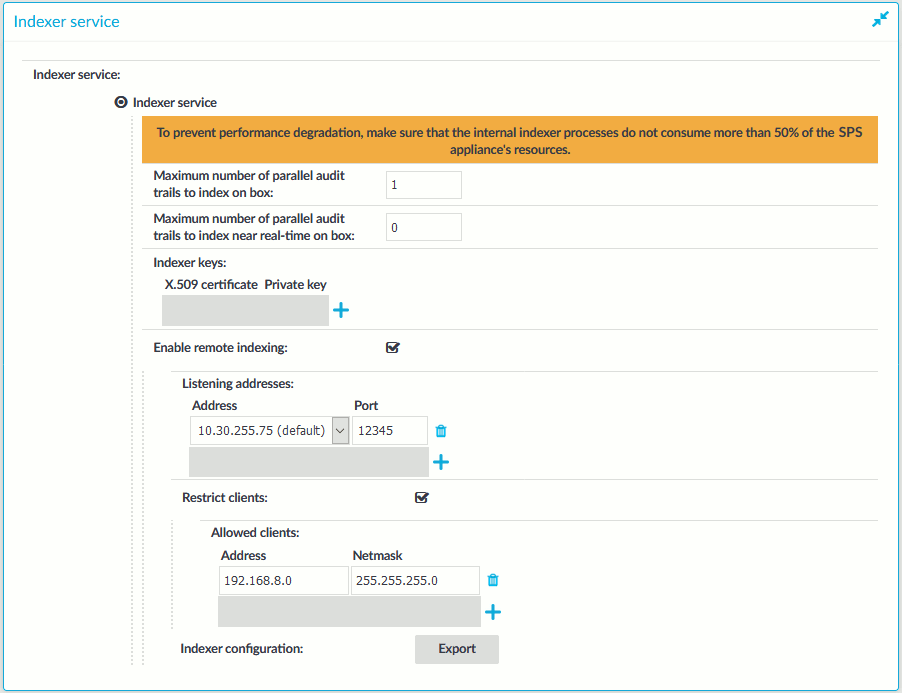
Select Enable remote indexing.
Figure 207: Basic Settings > Local Services > Indexer service > Enable remote indexing — Configure external indexers
-
In the Listening addresses > Address field, select the network interface where SPS should accept external indexer connections. Repeat this step to add other interfaces if needed.
The available addresses correspond to the interface addresses configured in Basic Settings > Network > Interfaces. Only IPv4 addresses can be selected.
-
Select Restrict clients, and list the IP address and netmask of your external indexer hosts.
Use an IPv4 address.
-
Click Commit.
Installing the external indexer
Prerequisites
The external indexer can be installed on the following 64-bit operating systems: Red Hat Enterprise Linux Server 6.7, Red Hat Enterprise Linux Server 7, CentOS 6.7, and CentOS 7. The installer is a self-contained package that includes every required dependency of the indexer.
To install the external indexer
-
Log in as root to the host that you want to use to index your audit trails.
-
Copy the installer package to the host.
NOTE:Due to legal reasons, installation packages of the external indexer application will be available only from the SPS web interface. After SPS versions 6.4 and 6.0.3 are released, the installation packages will be removed from our website.
-
Install the package using the package manager of the operating system. For example:
yum install external-indexer-standalone-<version-number>.x86_64.rpm
The installer performs the following steps automatically.
-
Unpacks the indexer files into the /opt/external-indexer/ directory.
-
Installs the related init scripts (the /etc/init.d/external-indexer init script, and adds the init script configuration to /etc/sysconfig/external-indexer).
-
Creates the indexer user and usergroup. This is an unprivileged user that is used to run the indexer application.
-
Registers the service to start automatically on system boot. Note that the indexer init script uses bind mount points.
-
-
Edit the firewall rules of the host to accept connections from One Identity Safeguard for Privileged Sessions (SPS) on the TCP/12345 port. For example:
iptables -A INPUT -p tcp --destination-port 12345 --jump ACCEPT
NOTE: If there is a firewall between the indexer host and SPS, enable two-way communication between them on the TCP/12345 port.
-
Configure the indexer. For details, see Configuring the external indexer.

Configuring the external indexer
In order to connect to One Identity Safeguard for Privileged Sessions (SPS) and index the audit trails, you must configure the external indexer.
|
|
Caution:
Unless you know exactly what you are doing, modify only the parameters you are instructed to. |

To configure the external indexer
-
Log in to the SPS web interface, and navigate to Basic Settings > Local Services > Indexer service.
-
Export the configuration file for the external indexer: click Export. (Note that the Export button is displayed only after the configuration to enable SPS to use remote indexers has been committed.)
The configuration file contains the listening address (IP and port) of SPS, the OCR license, and the necessary keys for SSL authentication.
Upload the file to the host of the external indexer.
-
On the external indexer host, import the configuration file with the following command:
indexer-box-config <configuration-file>.config
-
Configure the external indexer service: open the /etc/indexer/indexerworker.cfg configuration file for editing.
-
To edit the number of worker groups assigned to a certain worker process type, find the worker_groups line.
A worker group has the following parameters:
-
name: the name of the worker group
-
count: the number of workers to use for processing
-
capabilities: the type of job(s) this process will perform (index, screenshot, video, near-realtime)
NOTE: Setting the near-realtime capability exclusively determines whether active or closed sessions will be indexed. Take the following examples:
-
When setting [near-realtime, index] capabilities for a worker, that worker will only index active, ongoing sessions.
-
When setting [index, screenshot, video] capabilities for a worker, that worker will only index closed sessions.
NOTE: A connection policy configured with near real-time priority (Connection policy > Enable indexing > Priority) requires that you also configure indexer workers that are capable of near real-time indexing. To configure such indexer workers, set the near-realtime capability for the relevant workers.
NOTE: Indexer workers with the near-realtime capability require fewer CPU cores but more memory than indexer workers that do not have this capability.
-
Make sure that the sum value of the workers are equal to the number of CPU cores in the host (or the number of CPU cores minus one if you want to save resources for other tasks).
One Identity recommends using dedicated hosts for external indexing. If the host is not dedicated exclusively to the external indexer, decrease the number of workers accordingly.
-
-
(Optional) To fine-tune performance, you can configure the number of OCR threads each worker can initiate using the ocr_thread_count key.
The default setting is 3. When configuring this setting, pay attention to the available CPU cores, as raising the number of possible threads too high can impact performance negatively.
-
(Optional) If instructed by One Identity Support, configure the OCR engine.
Find the engine key, and change its value to one of the following options:
-
omnipage-external is the default setting. It provides the best performance and stability by allowing workers to initiate multiple OCR threads.
This setting also allows you to search for images where OCR could not be performed. On the search UI of SPS enter the OOCCRRCCRRAASSHH search string to list all such images. If possible, contact our Support Team, so we can continue improving the engine.
Note that multiple OCR threads can only speed up processing graphical protocols (RDP, VNC and ICA trails), and do not affect the processing speed for terminal-based protocols (telnet and SSH).
-
omnipage only supports one OCR thread per worker.
If you have to use this option, make sure to also set the ocr_thread_count to 0.
-
-
Save your changes. To continue with uploading decryption keys (for indexing encrypted audit trails), see Uploading decryption keys to the external indexer.
To start the indexer service, see Starting the external indexer.