
Search interface changes between version 5.0 and 6.0
Between versions 5 LTS (5.0) and 6.0 of One Identity Safeguard for Privileged Sessions (SPS), we have completely redesigned the Search page, and improved it with several new features. This section highlights the most important changes, and helps you find how to do the common search tasks on the new page. For the detailed documentation of the new Search page, see Using the Search interface.
Table view, card view
In addition to listing sessions and search results as a table, the new card view highlights the most important details of a session at a glance.
Figure 242: Search interface improvements

Note that in table view now the list of displayed columns is fixed and cannot be modified. However, if you search for specific values of fields that are not displayed, the values of these fields will be visible in card view.
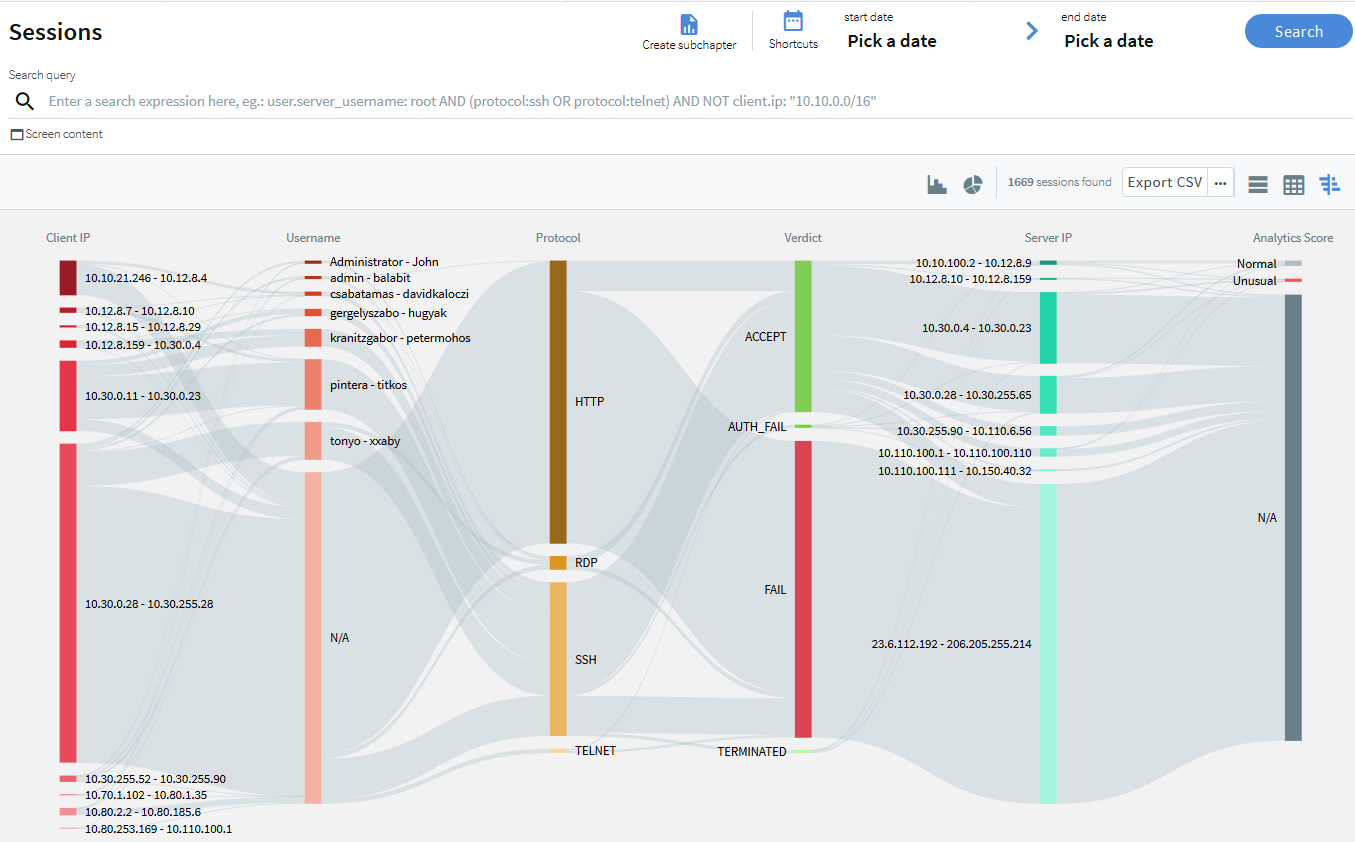
Quick session analytics with the flow view
Display an interactive, visual overview of your search results to quickly visualize their distribution along multiple attributes, such as client and target IP addresses, protocol, or usernames. Helps to identify patterns in user behavior and to drill down fast to the most relevant sessions. For details, see Using the Search interface.
Figure 243: Search — Flow view
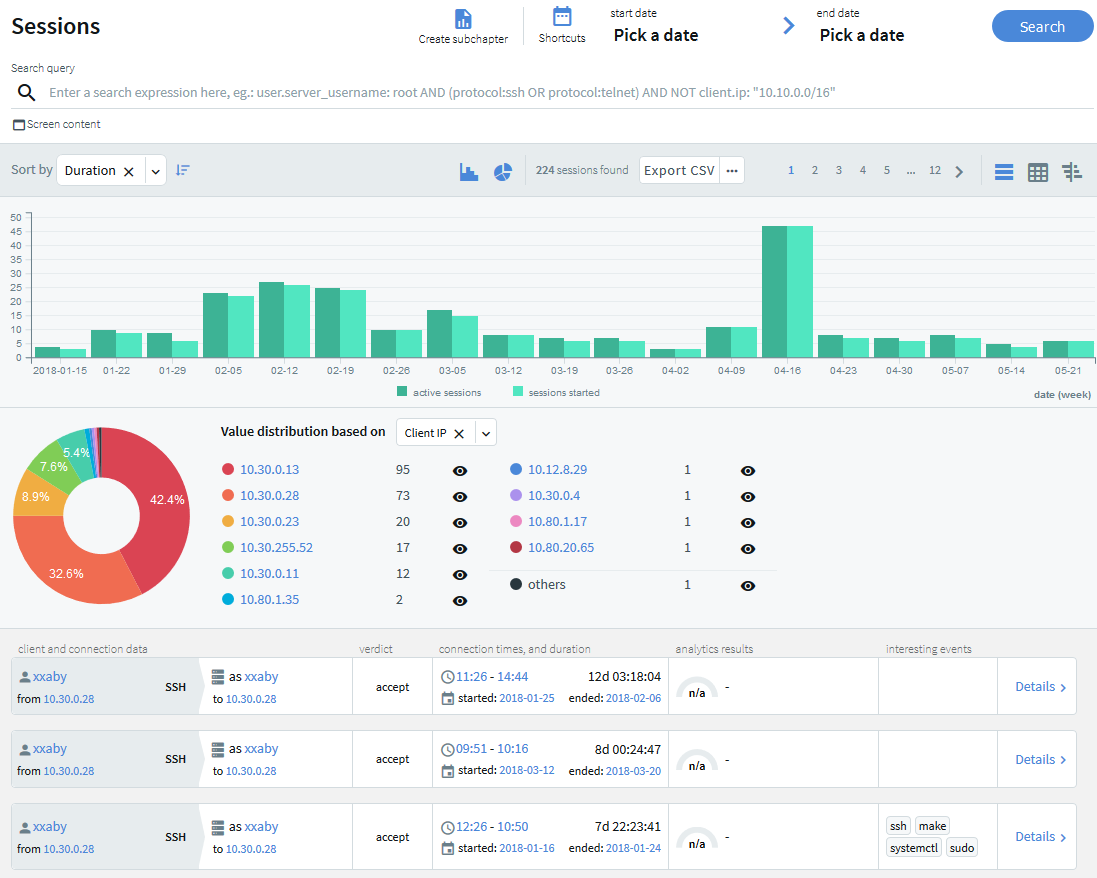
Timeline
The Search interface can now display a timeline showing the search results. Also, you can quickly sort and visualize the distribution of the sessions based on their various metadata, for example, username, server address, and so on.
Figure 244: Search — Displaying statistics and timeline
Set a custom or preset date range
Specify a time range to restrict or filter your search criteria by setting boundaries on your searches. Use one of the preset time ranges, or use a custom time range for a more specific search.
Figure 245: Search — Pick a date

Unified search field
Find everything from a single search box, filter search to a specific field, and combine searches in multiple fields using logical operators. You can also combine content search queries arbitrarily with other search queries. Flow view and quick statistics charts can handle content searches as well. For details, see Using search filters.
Figure 246: Search — Search filters
Further functions of the old search page (and where they are located on the new search page)
Some functions of the old search page are located somewhere else on the new page. Here is a list of the important ones.
Download the audit trail of a session: Click details or ... to open the details of the session, then click download trail. For details, see Viewing session details.
Display the timeline: Click the 
Change the time interval of the search: To limit the date range of the search, click Pick a date or shortcuts. For details, see Specifying time ranges. Alternatively, you can select a period on the timeline: click at the beginning of the interval, keep the button pressed, then move the pointer to the end of the interval. The timeline and the search results will be updated automatically.
Search in the screen content: To search in the content of the audited sessions, use the screen.content field in your search query. For example: screen.content="exit". To search in the contents of a specific session, download the audit trail, open it in the Safeguard Desktop Player application, and use the Search feature of the Safeguard Desktop Player. For details, see Searching in the contents of audit trails.
Search or filter in a specific field: To search in a specific data field, start typing the name of the field into the search field. The possible field names and their description is automatically displayed. For example, to search for a specific username, use the user.name:"my-username" search query. For details, see Viewing session details.
Save a filter or a search query: SPS does not store filters anymore, but you can bookmark the page.
Searching session data on a central node in a cluster
The central search functionality is available when your deployment consists of two or more instances of One Identity Safeguard for Privileged Sessions (SPS) organized into a cluster. When you have a cluster of nodes set up, you have the possibility to search all session data recorded by all nodes in the cluster on a single node. This is achieved by assigning roles to the individual nodes in your cluster: you can set up one of your Safeguard for Privileged Sessions nodes to be the Search Master and the rest of the nodes to be Search Minions. Search Minions send session data that they record to the Search Master, and the Search Master acts as a central search node.
To set up your environment for central searching, complete the following steps:
- Enable cluster management on the nodes that you want to be part of your cluster.
- Build a cluster.
-
Assign roles to nodes in your cluster.
Familiarize yourself with:
- The available search roles before assigning them to nodes. For more information, see Cluster roles.
- Managing a central search configuration. For more information, see Managing a cluster with central search configuration and configuration synchronization.
Once you have your cluster set up and the appropriate roles assigned, you can start searching session data using the Search interface.
|
|
NOTE:
Central search is not available on the Search (classic) interface. |

Limitations of the central search functionality
Currently, the central search functionality comes with the following limitations:
-
Session data recorded by a node before it was joined to the cluster will not be searchable centrally. Only session data recorded after the node has been joined to the cluster is available for central search.
-
You cannot to run the indexer process on unindexed sessions after assigning the Search Master role to a node. Make sure all important sessions are indexed before assigning the Search Master role to the node.
-
The Search Master node cannot run internal indexer processes, nor does it receive connections from external indexers. Indexers work only with Search Minion nodes.
-
User behavior analysis provided by One Identity Safeguard for Privileged Analytics is not available.
-
It is not possible to replay audit trail files in your browser from the Search Master node.
-
When near real-time indexing is configured on a Search Minion node, while session data from active connections is visible on the Search interface of the Search Master node, it is not possible to:
-
export the audit trail of an active connection,
-
follow an active connection, and
-
terminate an active connection.
Note, however, that you can terminate the active, ongoing connection on the Search Minion node that is recording the connection in question.
-
-
A reliable, high-bandwidth connection is required between the nodes. Small loss of connection is handled well but if the connection between the Search Minions and the Search Master is lost for a longer period of time, the Search Minions will stop accepting new connections until the connection is repaired. Data is automatically pushed to the Search Master after the connection is restored.
|
|
NOTE:
Search Minion nodes do not send the files storing the audit trails to the Search Master node. When a user clicks |
 , the Search Master node streams the trail files to the user from the original Search Minion node that recorded the sessions. If a Search Minion node does not have a backup policy set up and an error occurs that causes data loss, then session data recorded by that node will not be available.
Advanced authentication and authorization techniques
This section describes the advanced authentication and authorization techniques available in One Identity Safeguard for Privileged Sessions.
-
For details on creating usermapping policies, see Configuring usermapping policies.
-
For details on configuring gateway authentication, see Configuring gateway authentication.
-
For details on configuring four-eyes authorization and real-time monitoring, see Configuring four-eyes authorization.
-
For details on configuring Credential Stores, see Using credential stores for server-side authentication.
Configuring usermapping policies
For SSH, RDP, Telnet, and Citrix ICA connections, usermapping policies can be defined. A usermapping policy describes who can use a specific username to access the remote server: only members of the specified local or LDAP usergroups (for example, administrators) can use the specified username (for example, root) on the server.
|
|
Caution:
In SSH connections, the users must use the following as their username: gu=username@remoteusername, where username is the username used in the LDAP directory, One Identity Safeguard for Privileged Sessions will use this username to determine their group memberships, and remoteusername is the username they will use on the remote server. For example, to access the example.com server as root, use: gu=yourldapusername@root@example.com For the username of SSH users, only valid UTF-8 strings are allowed. |

|
|
Caution:
In Telnet connections, usermapping policy works only if Extract username from the traffic is enabled. For details, see Extracting username from Telnet connections. |
When configuring ICA connections, also consider the following:
|
|
Caution:
If the clients are accessing a remote application or desktop that is shared for Anonymous users (that is, the Users properties of the application is set to Allow anonymous users in the Citrix Delivery Services Console), the actual remote session will be running under an Anonymous account name (for example, Anon001, Anon002, and so on), not under the username used to access the remote server. Therefore, you need to enable usermapping to the Anon* usernames. To accomplish this, create a usermapping policy and set the Username on the server option to Anon*, and the Groups option to *, then use this usermapping policy in your ICA connections. For details on using usermapping policies, see Configuring usermapping policies. |
|
|
NOTE:
Starting from SPS version 3.2, usermapping is possible only when gateway authentication is used as well. |
To configure usermapping
-
Navigate to Policies > Usermapping Policies.
Figure 247: Policies > Usermapping Policies — Configuring usermapping policies
-
Click
to create a new policy, and enter a name for the policy.
-
Click
-
Select Groups, click
-
If you have an LDAP Server set in the connection policy where you will use usermapping, enter the name of the local or LDAP usergroup (for example admins) whose members will be permitted to use the remote username. For details on LDAP authentication, see Authenticating users to an LDAP server.
NOTE: The LDAP server configured in the connection policy is not necessarily the same as the LDAP server used to authenticate the users accessing the SPS web interface.
-
If you do not authenticate the connections to an LDAP server, enter the name of the userlist whose members will be permitted to use the remote username. For details on using userlists, see Creating and editing user lists.
Repeat this step to add further groups if needed.
-
-
Repeat steps 3-4 to add further usernames if needed.
-
To permit other users, who are not explicitly listed in the Usermapping Policy access the remote servers, select the Allow other unmapped usernames option. Note that these users must use the same username on the SPS gateway and the remote server.
-
Click
.
-
Navigate to the Connections page of the traffic (for example to SSH Control > Connections), and select the connection policy to modify.
-
Select the usermapping policy created in Step 2 from the Usermapping policy field.
-
Click
NOTE: For RDP connections, usermapping is possible only when gateway authentication is used as well. When configuring usermapping for RDP connections, proceed to Configuring out-of-band gateway authentication and configure gateway authentication.
