
Upgrading syslog-ng Agent for Windows to the latest version
The exact upgrading procedure of the syslog-ng Agent for Windows application depends on how you have installed and how you manage the agent.
|
|
Caution:
|

-
If a host is running syslog-ng Agent in standalone mode, download and execute the
syslog-ng-agent-<versionnumber>-setup.exeinstaller on the host and verify that the displayed information is correct. The agent will be automatically restarted when you close the configuration window. -
If a domain host is running the syslog-ng Agent that was installed by the domain controller from the
.msiinstaller package, complete the steps described in the section called “Installing the syslog-ng Agent on the domain controller and the hosts of a domain”. The system will automatically recognize that the new package will update the syslog-ng Agent for Windows application. -
If a domain host is running the syslog-ng Agent that was installed manually from the
syslog-ng-agent-nosnapin-<versionnumber>-setup.exefile, run the newsyslog-ng-agent-nosnapin-<versionnumber>-setup.exefile on the host. After the installation is complete, select and execute the gpupdate command to refresh the domain settings of the agent. -
If syslog-ng Agent has been installed with an XML configuration file with
syslog-ng-agent-<versionnumber>-setup.exeorsyslog-ng-agent-nosnapin-<versionnumber>-setup.exe, download and execute the same installer. It will display the previous XML configuration file, and upgrades it if desired.
Chapter 3. How to configure the syslog-ng Agent
This section describes how to configure the syslog-ng Agent application. The exact method depends on the installation scenario and also on the configuration method (regular or XML-based) you want to use. The syslog-ng Agent for Windows application is configured usually using its MMC snap-in (when managed globally from the domain controller or when configuring it in standalone mode). However, it is also possible to use an XML-based configuration file.
-
For details on how to configure a syslog-ng Agent that was installed in standalone mode, see Procedure 3.1, “Configuring a standalone syslog-ng Agent”.
-
For details on how to configure the syslog-ng Agents of the domain hosts, see Procedure 3.2, “Configuring the syslog-ng Agents of the domain hosts”.
-
For details on how to configure the syslog-ng Agents of the domain controllers, see Procedure 3.3, “Configuring the syslog-ng Agents of the domain controllers”.
-
For details on how to configure syslog-ng Agent from file, see the section called “Using an XML-based configuration file”.
Procedure 3.1. Configuring a standalone syslog-ng Agent
Purpose:
To configure an already installed standalone syslog-ng Agent, perform the following steps.
Steps:
-
Start the syslog-ng PE configuration interface by navigating to .
-
Select , and configure the syslog-ng Agent as needed for your environment.
-
After modifying its configuration, you have to restart the
syslog-ng Agentservice for the changes to take effect. To restart the syslog-ng Agent service, select , enterservices.mscand restart the service.
This section describes how to configure the syslog-ng Agent for Windows application in domain mode.
-
For details on how to configure the syslog-ng Agents of the domain hosts, see Procedure 3.2, “Configuring the syslog-ng Agents of the domain hosts”.
-
For details on how to configure the syslog-ng Agents of the domain controllers, see Procedure 3.3, “Configuring the syslog-ng Agents of the domain controllers”.
-
For details on the relationship of different group-policy levels, see the section called “Domain versus local settings”.
Procedure 3.2. Configuring the syslog-ng Agents of the domain hosts
Purpose:
To configure an already installed syslog-ng Agent from the domain controller, perform the following steps.
Steps:
-
Start the syslog-ng PE configuration interface by navigating to .
-
Navigate to , and select the Group Policy you want to modify (for example, the ).
-
Configure the syslog-ng Agent as needed for the domain hosts. The changes will take affect when the domain hosts update their settings from the domain controller. By default, this happens every 90 minutes, depending on your domain settings. To download the configuration earlier, execute the gpupdate command on the members of the domain.
NOTE: When the domain hosts update their settings, the syslog-ng Agent will be automatically restarted to load the new settings, except when there is no difference between the old and the new settings.

Procedure 3.3. Configuring the syslog-ng Agents of the domain controllers
Purpose:
To configure the syslog-ng Agent running on the domain controllers, perform the following steps.
In a domain tree or forest, to configure the syslog-ng Agent for a specific domain, you must be a Domain Administrator of the domain.
Steps:
-
Start the syslog-ng PE configuration interface by navigating to .
-
-
To configure syslog-ng PE only on a single domain controller, select . Note that if you have configured syslog-ng PE also in a Group Policy that affects domain controllers, the settings of the Group Policy will override these local settings.
-
To configure syslog-ng PE on every domain controller, select , then select the appropriate Group Policy of your domain controllers (for example, ).
-
-
Configure the syslog-ng Agent as needed for the domain controllers. If you have multiple domain controllers, the changes will take affect when the other domain controllers update their settings from this domain controller. By default, this happens every 5 minutes, depending on your domain settings. To download the configuration earlier, execute the gpupdate command on the domain controllers.
NOTE: When the domain controllers receive the new settings, the syslog-ng Agent will be automatically restarted to load the new settings, except when there is no difference between the old and the new settings.
The syslog-ng Agent follows the standard policy-inheritance methods of Windows:
GPOs (Group Policy Objects) from parent containers are inherited by default. When multiple GPOs apply to these computers, the settings in the GPOs are aggregated. The final value of a given policy setting is set only by the highest precedent GPO that contains the setting. (However, the final value for a few settings will actually be the combination of values across GPOs.) In this processing order, sites are applied first, but have the least precedence. OUs (Organization Units) are processed last, but have the highest precedence.
When multiple group policy objects are assigned, the group policies are applied in the following order:
-
The local group policy object is applied.
-
The group policy objects linked to sites are applied. If multiple GPOs exist for a site, they are applied in the order specified by the administrator.
-
GPOs linked to the domains are applied in the specified order.
-
GPOs linked to OUs are applied. The OU group policy objects are set from the largest to the smallest organizational unit, that is, first the parent OU and then the child OU. By default, a policy applied later overwrites a policy that was applied earlier. Hence, the settings in a child OU can override the settings in the parent OU.
-
If any group policy is not configured, the syslog-ng Agent checks its local policy settings, and uses the local setting if available.
The following are the rules regarding group policy settings inheritance:
-
A policy setting is configured ( or ) for a parent OU, and the same policy setting is not configured for its child OUs. The child OUs inherit the parent’s policy.
-
A policy setting is configured ( or ) for a parent OU, and the same policy setting is configured for its child OUs. The child OUs settings override the settings inherited from the parent’s OU. There is a specific case, when the type of this setting is list:
-
The syslog-ng Agent will aggregate the contents of these lists and will use the same elements only once.
-
If any policy is not configured (), no inheritance takes place.
-
|
|
NOTE:
Do not use setting in local settings, because in that case, it can still use previously configured values. Use settings or instead. |
Using an XML-based configuration file
Starting from syslog-ng Agent for Windows version 3.2, it is possible to export the configuration of syslog-ng Agent into an XML file. This configuration file can be used as the default configuration when installing the syslog-ng Agent to another host, or can be imported to an existing installation using a command-line utility.
|
|
Caution:
Do not manually edit or modify the exported XML file. In case you want to validate the XML file, use the |
Procedure 3.4. Creating an XML configuration file for the syslog-ng Agent
Purpose:
To create an XML configuration file that can be used by other syslog-ng Agent configurations, perform the following steps.
Steps:
-
Install the syslog-ng Agent for Windows application on a host.
-
Create the configuration you want to use on other hosts using the graphical interface. The syslog-ng Agent for Windows application will store this configuration in the registry.
-
Right-click on and select to export the configuration of syslog-ng Agent from the registry to an XML file. Select where to save the XML file.
Alternatively, you can export the configuration of syslog-ng Agent from the command line using the configmanager.exe -export <source> "destination xml file" command. The <source> parameter determines which configuration is exported:
NOTE: To overwrite the XML configuration file, use the /F option. This will force export even if the file already exists.
-
Use the configuration file on other hosts. For details on the different options, see the section called “Configuring syslog-ng Agent from an XML file”.
How you configure the syslog-ng Agent application to use an XML configuration file depends on your environment. The following list describes the available possibilities.
-
To use the XML file during the installation of the syslog-ng Agent application, navigate to window and select . In the next window, browse your XML configuration. Note that the XML schema file will be installed in the syslog-ng Agent directory.
-
If you want to use the .msi installer with an XML file, use the syslog-ng-agent-setup-<version>-<amd64/i386>.msi SLNGOPTS="/xmlconfig=fullpath\myconfigfile.xml" command, or edit the installer with the Orca MSI editor, and add the
SLNGOPTS="/xmlconfig=fullpath\myconfigfile.xml"to the installation parameters on the tab. -
Use an XML file as the configuration file of syslog-ng Agent for Windows. To start an already installed, standalone syslog-ng Agent using an XML configuration file, execute the following steps in a command line. In this case, the configuration of syslog-ng PE is stored in the XML file, it is not imported into the registry (for details on importing a configuration from XML file into the registry, see Import the XML configuration into the registry).
-
cd <syslog-ng agent installation directory>\bin
-
net stop "syslog-ng agent"
-
syslog-ng-agent.exe /r
-
syslog-ng-agent.exe /i <PATH>\configuration.xml
-
net start "syslog-ng agent"
-
-
Import the XML configuration into the registry. To import the XML configuration file into the registry of the host, use the following command: configmanager.exe -import <destination> "source xml file" command, then restart the syslog-ng Agent service. The <destination> parameter determines which configuration the XML configuration will be converted to:
Caution: Importing the configuration file from an XML file into the registry of the host has no effect if syslog-ng Agent is configured to use an XML configuration file.
Chapter 4. Configuring destinations
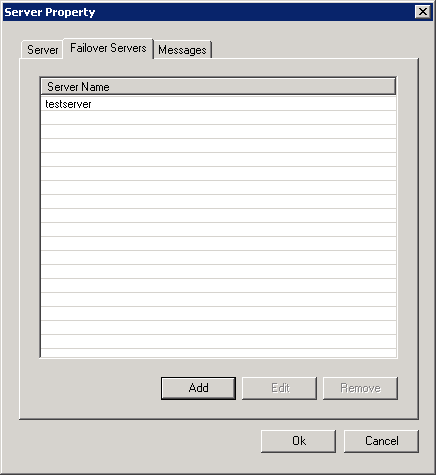
The syslog-ng Agent for Windows application can send the log messages of the Windows host to a central log server or relay. It is possible to send the same messages to multiple servers, when each server receives the same messages. You can configure failover servers, when the agent sends the messages to a primary server, or to a failover server if the primary becomes unavailable. If the agent loses the connection to a destination server and the reconnection fails, it will generate an eventlog message. The successful reconnection attempt is also logged. (If the server is unavailable for a long time, the agent generates a log message about the failed connection once in every ten seconds.)
If the failover server also becomes unavailable, the application will switch to the next failover server, and so on. If the last failover server is unavailable, it switches back to the primary. The application does not switch back automatically to the primary server if it becomes available again, only if the syslog-ng Agent for Windows has been restarted.
|
|
NOTE:
The failover servers will use the same options that the primary server uses. Only the name and the address can be configured for the failover servers. |
Similarly to the Linux version, the agent now sends MARK messages to the server to indicate that the client host is alive but there are no log messages to send. A MARK message is sent every ten minutes.
|
|
Caution:
The syslog-ng Agent for Windows application does not support the unreliable UDP protocol. Configure your central log server to accept logs using TCP or TLS connections. If needed, adjust your firewall configuration to permit such traffic to the log server. |
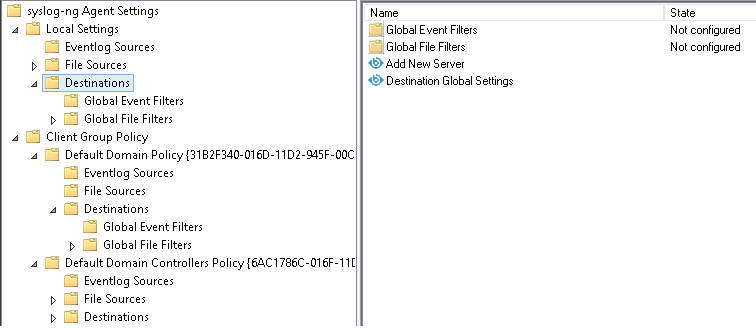
Procedure 4.1. Configuring the destination log servers
Purpose:
To configure a new destination, complete the following steps:
Steps:
-
Start the configuration interface of the syslog-ng Agent for Windows application.
-
Select , and double-click on .
-
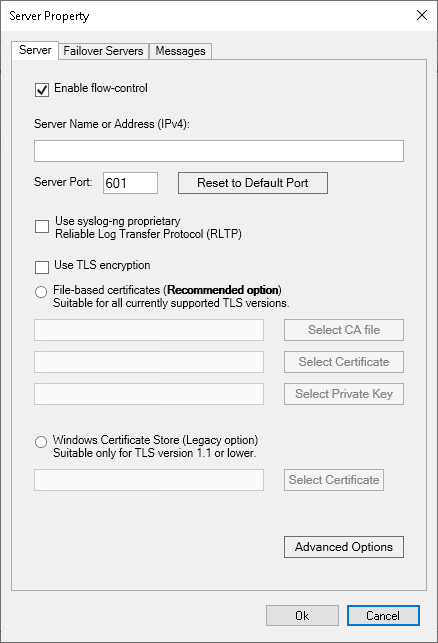
Enter the hostname or the IP address of the log server into the field. If your log server is configured to accept messages on a non-standard port, type the port number into the field. To use the default port (
35514when RLTP™ is enabled and514when RLTP™ is disabled), click .To enable flow-control, select . For details, see the section called “Flow-control in syslog-ng Agent for Windows”.
To use SSL encryption, enable . For details, see Chapter 6, Using SSL-encrypted connections with the syslog-ng Agent.
-
Optional Step: To use the Reliable Log Transfer Protocol™ (RLTP™), enable .
NOTE: You cannot disable flow-control when using the Reliable Log Transfer Protocol™ (RLTP™).
-
Click .
To compress the messages during transfer to save bandwidth, select the option. Note that for syslog-ng Agent to actually use compression, the following points must be met.
-
The option must be enabled.
-
You must use SSL and/or RLTP to send messages to the logserver (that is, at least one of the or options must be enabled.
-
The logserver must be configured to enable compression. If the logserver is syslog-ng PE the proper
allow-compress()option must be enabled in the source. If the logserver is syslog-ng Store Box, enable the option. Note that to send compressed messages to syslog-ng Store Box, you must use the RLTP™ protocol (for details, see the syslog-ng Documentation page).
-
-
Change the following options if necessary:
NOTE: Do not adjust or modify the following settings unless you know exactly what you are doing.
-
: The number of messages sent before waiting for acknowledgement from the server.
-
: After not receiving any message in the given timeframe, syslog-ng Agent terminates the connection with the server.
-
: After not receiving any reply to the messages in the given timeframe, syslog-ng Agent terminates the connection with the server.
-
-
Click .
-
-
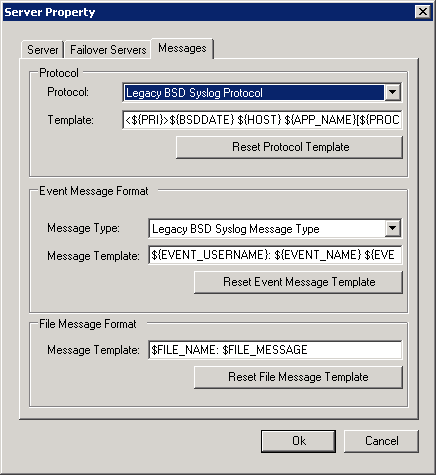
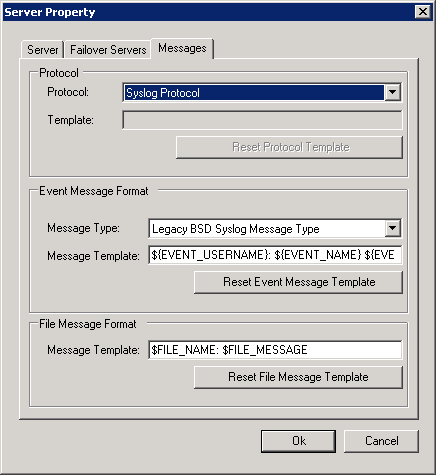
On tab, select the protocol used to transfer log messages and press to apply the selected template. The following protocol templates are available (for details on the default templates and on customizing the message format, see Chapter 8, Customizing the message format):
-
: Use the legacy BSD-syslog protocol specified in RFC3164. This option uses the following message template:
<${PRI}>${BSDDATE} ${HOST} ${MSGHDR}${MESSAGE}. Within the message part, syslog-ng Agent replaces CRLF with 2 spaces and TAB character with 1 space.
Example 4.1. Legacy BSD Syslog Protocol log
<134>Oct 04 14:45:33 zts-win019.ztswin2008dom.balabit Microsoft-Windows-Eventlog[2880]: ZTSWIN2008DOM\balabit: System Microsoft-Windows-Eventlog: [Information] The Application log file was cleared. (EventID 104)
-
: Use the new IETF-syslog protocol specified in RFC 5424-5426. This is the default setting.
When using the IETF-syslog protocol to transfer Eventlog messages, the syslog-ng Agent application includes the macros (name-value pairs) in the SDATA part of the log message by default. This includes every available Event macro, except
EVENT_CONTAINER_COUNTER,EVENT_DATA,EVENT_GLOBAL_COUNTER,EVENT_MSG (EVENT_MESSAGE),EVENT_MSG_XML (EVENT_MESSAGE_XML). Macros that do not have a value will not be included in the message.499 <132>1 2010-09-28T12:02:30+02:00 zts-win004.ztswin2003dom.balabit testapp 1220 - [win@18372.4 EVENT_ID="1000" EVENT_NAME="Application" EVENT_REC_NUM="1673" EVENT_SID="S-1-5-21-3460971693-970282485-2299281428-1001" EVENT_SID_TYPE="User" EVENT_SOURCE="testapp" EVENT_TYPE="Warning" EVENT_USERNAME="ZTS-WIN004\\balabit"][meta sequenceId="1" sysUpTime="1"] ZTS-WIN004\balabit: Application testapp: [Warning] test message (EventID 1000)
To include only the data mandated by RFC5424, disable . To do this, navigate to , select and deselect . For example, only the following data will be included in the message:
[meta sequenceId="value" sysUpTime="value"]
-
: Send log messages in a format compatible with the Snare log monitoring tool.
NOTE: Snare is a tab-separated message format. Within the message part, agent replaces CRLF with 2 space, TAB character with 1 space.
You cannot modify the log format if you have selected this protocol.
Example 4.2. Snare log
<134>Oct 06 13:49:41 zts-win019.ztswin2008dom.balabit MSWinEventLog 1 Application 1 Wed Oct 06 13:49:41 2010 1 syslog-ng Agent S-1-5-21-551780264-1021859348-3425375765-1003 User Information zts-win019.ztswin2008dom.balabit None Application started 1
-
-
If needed, modify the template of the messages. The format of the messages can be different for the eventlog and the file sources.
Caution: The maximal length of the template is 1023 characters.
-
If you have a backup server that can accept log messages if the primary log server becomes unavailable, select the tab, click , and enter the hostname or the IP address of the backup log server into the field. Repeat this step if you have more than one backup servers.
-
If you want to send the log messages to more than on server in parallel, so that every server receives every message, repeat Steps 3-4 to add the other destination servers. These servers may have failover servers as well.
-
Select , then . To activate the changes, restart the syslog-ng Agent service.
-
Optional Step: If the host running syslog-ng Agent is sometimes logged in into a domain, sometimes not, then its hostname might change depending on its actual domain membership. This can cause that the hostname appearing in the syslog messages depends on the domain membership of the host. To avoid this situation, select . That way syslog-ng Agent resolves the name of its host from the DNS server, and uses the resolved FQDN in the syslog messages.

Procedure 4.2. Limiting the rate of messages
Purpose:
The syslog-ng Agent can control the rate of messages (message per second) sent to the central server. That way sudden message-bursts can be avoided, and the load of the server is decreased.
To limit the number of messages sent to a destination, complete the following steps:
Steps:
-
Start the configuration interface of the syslog-ng Agent for Windows application.
-
Select .
-
Select . To limit the number of messages that the syslog-ng Agent sends to the server per second, enter the desired limit into the field. By default (
0), the syslog-ng Agent does not limit the number of messages sent.The throttling parameter applies to the total number of messages sent, not to every source independently. The same value applies to every destination.
-
Click . To activate the changes, restart the syslog-ng Agent service.
Procedure 4.3. Sending MARK messages
Purpose:
If there are no new messages that have to be sent to the destination server, the syslog-ng Agent for Windows application automatically sends a MARK message every ten minutes to notify the server that the connection is still active. The exact format of the MARK message depends on the protocol:
Legacy BSD protocol (RFC3164):
<46>Apr 18 11:34:21 <hostname> -- MARK --
Snare protocol:
<46>Apr 18 11:34:21 <hostname> -- MARK --
Syslog protocol (RFC5424):
82 <46>1 2013-04-23T10:51:29+02:00 <hostname> - - - [meta sequenceId="3"] -- MARK --
To change how often the syslog-ng Agent sends these messages, complete the following steps.
Steps:
-
Start the configuration interface of the syslog-ng Agent for Windows application.
-
Select and double-click on .
-
Select , then select .
-
Set the frequency of MARK messages that the syslog-ng Agent for Windows application sends.
-
Never: Do not send MARK messages.
-
When destination idle: Send MARK messages only if there were no other messages sent to the destination during the specified period.
-
Periodically: Send MARK messages every time the specified period expires.
-
-
Set the time between two MARK messages in the . By default, this is 600 seconds (10 minutes).
-
Select , then . To activate the changes, restart the syslog-ng Agent service.
Starting with version 5 LTS, the flow-control feature of syslog-ng Premium Edition is automatically enabled for the destinations. Using flow-control means that the syslog-ng Agent will stop reading messages from the sources if the destination cannot accept them (for example, because of a network error).
To enable or disable flow-control for a destination, select , double-click on the destination, then select .
|
|
NOTE:
You cannot disable flow-control when using the Reliable Log Transfer Protocol™ (RLTP™). |
|
|
NOTE:
The flow-control of syslog-ng Agent 5 LTS replaces the option of earlier versions. |
Using flow-control on a source has an important side-effect if the messages of the source are sent to multiple destinations. If flow-control is in use and one of the destinations cannot accept the messages, the other destinations do not receive any messages either, because syslog-ng stops reading the source. For example, if messages from a source are sent to two remote servers, and the network connection to one of the servers becomes unavailable, neither servers will receive any messages.
|
|
NOTE:
Creating separate log paths for the destinations that use the same flow-controlled source does not avoid the problem. |