Chat now with support
Chat with Support

One Identity Safeguard for Privileged Sessions 7.2.1 - Administration Guide

Preface Introduction The concepts of One Identity Safeguard for Privileged Sessions (SPS)
The philosophy of One Identity Safeguard for Privileged Sessions (SPS) Policies Credential Stores Plugin framework Indexing Supported protocols and client applications Modes of operation Connecting to a server through One Identity Safeguard for Privileged Sessions (SPS) Archive and backup concepts Maximizing the scope of auditing IPv6 in One Identity Safeguard for Privileged Sessions (SPS) SSH host keys Authenticating clients using public-key authentication in SSH The gateway authentication process Four-eyes authorization Network interfaces High Availability support in One Identity Safeguard for Privileged Sessions (SPS) Versions and releases of One Identity Safeguard for Privileged Sessions (SPS) Accessing and configuring One Identity Safeguard for Privileged Sessions (SPS)
Cloud deployment considerations The Welcome Wizard and the first login Basic settings
Supported web browsers The structure of the web interface Network settings Configuring date and time System logging, SNMP and e-mail alerts Configuring system monitoring on SPS Data and configuration backups Archiving Cleaning up audit data Using plugins Forwarding data to third-party systems Starling integration
User management and access control
Login settings Managing One Identity Safeguard for Privileged Sessions (SPS) users locally Setting password policies for local users Managing local user groups Managing One Identity Safeguard for Privileged Sessions (SPS) users from an LDAP database Authenticating users to a RADIUS server Authenticating users with X.509 certificates Authenticating users with SAML2 Managing user rights and usergroups Creating rules for restricting access to search audit data Displaying the privileges of users and user groups Listing and searching configuration changes
Managing One Identity Safeguard for Privileged Sessions (SPS)
Controlling One Identity Safeguard for Privileged Sessions (SPS): reboot, shutdown Managing One Identity Safeguard for Privileged Sessions (SPS) clusters Managing a High Availability One Identity Safeguard for Privileged Sessions (SPS) cluster Upgrading One Identity Safeguard for Privileged Sessions (SPS) Managing the One Identity Safeguard for Privileged Sessions (SPS) license Accessing the One Identity Safeguard for Privileged Sessions (SPS) console Sealed mode Out-of-band management of One Identity Safeguard for Privileged Sessions (SPS) Managing the certificates used on One Identity Safeguard for Privileged Sessions (SPS)
General connection settings HTTP-specific settings ICA-specific settings MSSQL-specific settings RDP-specific settings SSH-specific settings Using Sudo with SPS Telnet-specific settings VMware Horizon View connections VNC-specific settings Indexing audit trails Using the Search interface Advanced authentication and authorization techniques Reports The One Identity Safeguard for Privileged Sessions (SPS) REST API One Identity Safeguard for Privileged Sessions (SPS) scenarios Troubleshooting One Identity Safeguard for Privileged Sessions (SPS)
Network troubleshooting Gathering data about system problems Viewing logs on One Identity Safeguard for Privileged Sessions (SPS) Changing log verbosity level of One Identity Safeguard for Privileged Sessions (SPS) Collecting logs and system information for error reporting Collecting logs and system information of the boot process for error reporting Support hotfixes Status history and statistics Troubleshooting a One Identity Safeguard for Privileged Sessions (SPS) cluster Understanding One Identity Safeguard for Privileged Sessions (SPS) RAID status Restoring One Identity Safeguard for Privileged Sessions (SPS) configuration and data VNC is not working with TLS Configuring the IPMI from the BIOS after losing IPMI password Incomplete TSA response received Using UPN usernames in audited SSH connections
Using SPS with SPP Configuring external devices Using SCP with agent-forwarding Security checklist for configuring One Identity Safeguard for Privileged Sessions (SPS) Jumplists for in-product help Configuring SPS to use an LDAP backend Glossary

Using a custom Authentication and Authorization plugin to authenticate on the target hosts

The following describes how to configure One Identity Safeguard for Privileged Sessions (SPS) to use an Authentication and Authorization plugin (AA plugin) before accessing the target host.

Prerequisites
  • SPS supports AA plugins in the MSSQL, RDP, SSH, and Telnet protocols.

  • In RDP, using an AA plugin together with Network Level Authentication in a Connection Policy has the same limitations as using Network Level Authentication without domain membership.

  • In RDP, using an AA plugin requires TLS-encrypted RDP connections. For details, see "Enabling TLS-encryption for RDP connections" in the Administration Guide.

To configure SPS to use an Authentication and Authorization plugin before accessing the target host

  1. If your plugin supports configuration, then you can create multiple customized configuration instances of the plugin for your site. Create an instance by completing the following steps:

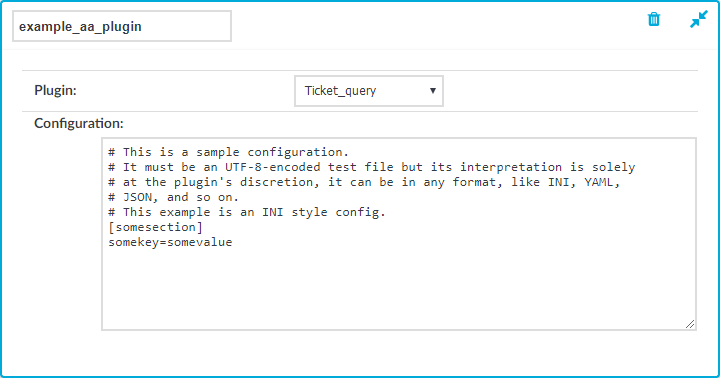
    1. Navigate to Policies > AA Plugin Configurations. Select the plugin to use from the Plugin list.

    2. The Configuration textbox displays the example configuration of the plugin you selected. You can edit the configuration here if you wish to create a customized instance of the plugin.

      NOTE: Plugins created and issued before the release of SPS 5.1 do not support configuration. If you create a configuration for a plugin that does not support this, the affected connection will stop with an error message.

      Figure 342: Policies > AA Plugin Configurations — Creating a customized plugin configuration instance

  2. Navigate to the Connection policy where you want to use the plugin (for example, to RDP Control > Connections), select the plugin configuration instance to use in the AA plugin field, then click .

  3. If the plugin sets or overrides the gateway username of the connection, configure a Usermapping policy and use it in the Connection policy. For details, see "Configuring usermapping policies" in the Administration Guide.

  4. Verify that the configuration works properly: try to establish a test connection. For details, see "Performing authentication with AA plugin in Remote Desktop connections" in the Administration Guide. If the plugin is configured to store any metadata about the connection, these data will be available in the Additional metadata field of the SPS Search interface.

Performing authentication with AA plugin in terminal connections

The following describes how to establish a terminal connection (SSH, TELNET, or TN3270) to a server.

To establish a terminal connection (SSH, TELNET, or TN3270) to a server

  1. Connect to the server.

    To encode additional data as part of the username, you can use the @ as a field separator, for example:

    ssh token_id=id@user@server

    Replace id with your actual token ID.

  2. If One Identity Safeguard for Privileged Sessions (SPS) prompts you for further information (for example, a one-time password), enter the requested information.

  3. Authenticate on the server.

  4. If authentication is successful, you can access the server.

Performing authentication with AA plugin in Remote Desktop connections

The following describes how to establish a Remote Desktop (RDP) connection to a server when the AA plugin is configured.

To establish an RDP connection to a server when the AA plugin is configured

  1. Open your Remote Desktop client application.

  2. If you have to provide additional information to authenticate on the server, you must enter this information in your Remote Desktop client application into the User name field, before the regular content (for example, your username) of the field.

    To encode additional data, you can use the following special characters:

    • % as a field separator

    • ~ as the equal sign

    • ^ as a colon (for example, to specify the port number or an IPv6 IP address)

    For example, to add a token ID before your username, use the following format:

    domain\token_id~12345%Administrator

    Note how domain information is provided. If your server is in a domain, make sure that you specify the domain in this format: putting it in front, followed by a backslash (\).

  3. Connect to the server.

  4. If One Identity Safeguard for Privileged Sessions (SPS) prompts you for further information (for example, a one-time password), enter the requested information.

  5. Authenticate on the server.

  6. If authentication is successful, you can access the server.

Integrating ticketing systems

The plugin framework provided by One Identity Safeguard for Privileged Sessions (SPS) can also be used to integrate SPS to external ticketing (or issue tracking) systems, allowing you to request a ticket ID from the user before authenticating on the target server. That way, SPS can verify that the user has a valid reason to access the server — and optionally terminate the connection if he does not. Requesting a ticket ID currently supports the following protocols:

  • Remote Desktop (RDP)

  • Secure Shell (SSH)

  • TELNET

  • TN3270

Topics:
Related Documents

The document was helpful.

Select Rating

I easily found the information I needed.

Select Rating