Unit: 1 U
Drive Bays: 4 x 3.5
Redundant PSU: Yes
NIC:
-
2 x 10GBase-T Ethernet ports via onboard Intel Corporation Ethernet Controller 10G X550T (rev 01) (Intel X550 controller)
-
2 x 10G SFP+ ports via Broadcom NetXtreme-E Series P210P 2x10G PCIe NIC (Broadcom BCM57412 controller)
-
2 x 10GBase-T Ethernet ports via Broadcom NetXtreme-E Series P210TP 2x10GBASE-T PCIe NIC (Broadcom BCM57416 controller)
IPMI: version 2.0
CPU: 1 x Intel Xeon Silver ICX 4310T @ 2.30 GHz, 10C/20T
Memory: 64GB 3200Mhz ECC RDIMM RAM
HDD: 4 x Seagate Exos X20 20TB
Motherboard: Supermicro X12SPW-TF
RAID:
RAID Type: RAID 6
Usable Storage: 40 TB
Chassis (W x H x D): 17.2" x 1.7" x 28.5" (437 x 43 x 724 mm)
Weight:
Wattage IDLE / LOAD: N/A
Electrical: Redundant 500W 80 Plus, Platinum 110 - 240V
Operating Temperature: 10°C to 35°C (50°F ~ 95°F)
Non-operating Temperature: -40°C to 70°C (-40°F to 158°F)
Humidity Range: 8% to 90% (non-condensing)
Non-operating Humidity: 5% to 95% (non-condensing)
Link to manufacturer documentation
NOTE:The syslog-ng Store Box (SSB) Appliance 4000 is equipped with a dual-port 10Gbit SFP+ interface (numbered 8 on the photo of the backplate), where you can connect up to two 10G SFP+ transceivers. These transceivers are not shipped with the original package and must be purchased separately.
List of appliance ports

-
Redundant Platinum 500W Power Supply
-
1 x Serial port
-
1 x Dedicated IPMI LAN port
-
2 x USB ports
-
2 x USB 3.2 Gen 1 ports
-
2 x RJ45 10GbE LAN ports
-
1 x VGA port
-
2 x 10GB SFP+ NIC
-
2 x 10GB RJ45 NIC
syslog-ng Store Box Software Installation Guide
This section describes how to install the syslog-ng Store Box (SSB) software on a certified hardware.
Note that installing and reinstalling SSB can take a long time, especially for a HA cluster. There are no supported workarounds for reducing the necessary downtime. One Identity recommends testing SSB in a virtual environment, and using physical hardware only for verifying HA functionality and measuring performance.
This section describes how to install a new SSB on a server.
To install a new SSB on a server
-
Log in to your support portal account and download the latest syslog-ng Store Box installation ISO file.
NOTE: You must have partner access to download syslog-ng Store Box ISO files. If you are a partner but do not see the ISO files, request partner access in the support portal.
-
Mount the ISO image, or burn it to a CD-ROM.
-
Connect your computer to the IPMI interface of SSB. For details, see the following documents:
For syslog-ng Store Box (SSB) Appliance 3000, 3500 and 4000, see Knowledge Base Article Latest IPMI firmware for Syslog-ng Store Box 3000/3500/4000 and One Identity Safeguard for Privileged Sessions 3000/3500/4000 appliances.
-
Power on the server.
-
Log in to the IPMI web interface, and boot the syslog-ng Store Box installation media on the server using a virtual drive. For more information, see:
For syslog-ng Store Box (SSB) Appliance 3000, 3500 and 4000, see Knowledge Base Article Latest IPMI firmware for Syslog-ng Store Box 3000/3500/4000 and One Identity Safeguard for Privileged Sessions 3000/3500/4000 appliances.
-
When the syslog-ng Store Box installer starts, select Installer, press Enter, and wait until the server finishes the boot process.
-
Select Install a new SSB and press Enter to start the installation process. Depending on the size of the disks, the installation process takes from a few minutes to an hour to complete. The progress of the installation is indicated in the Installation Steps window.
-
If the installer shows Warning, all data on the hard drive(s) will be erased. Are you sure?, select Yes and press Enter.
-
When the installer shows the MAC addresses of the network interfaces found in the SSB, take note of the addresses.
-
The installer displays the product name (the SSB configuration that was installed). If the product name displayed does not match the product you wanted to install, complete the following steps:
-
Check that the hardware configuration of the appliance matches the specifications provided by One Identity.
-
If the configuration matches the specifications, but the installer displays a different product name, contact our Support Team.
-
During the Finishing the Setup step, the installer performs RAID synchronization.
-
Select Yes to perform the RAID synchronization. RAID synchronization is a two-step process, the progress of the active step is indicated on the progress bar. Wait until both steps are completed.
NOTE: RAID synchronization may take several hours (about 8 hours on average).
-
Select No to skip the RAID synchronization.
NOTE: If you skip RAID synchronization, the system will automatically perform synchronization after the first boot. However, the process will take several days.
-
After the installation is finished, return to the main menu by pressing Enter.
-
To restart the system, select Reboot and press Enter. Wait until the system reboots.
-
Connect your computer to the EXT interface of SSB. Create an alias IP address for your computer that falls into the 192.168.1.0/24 subnet (for example, 192.168.1.10). For details, see The initial connection to SSB.
-
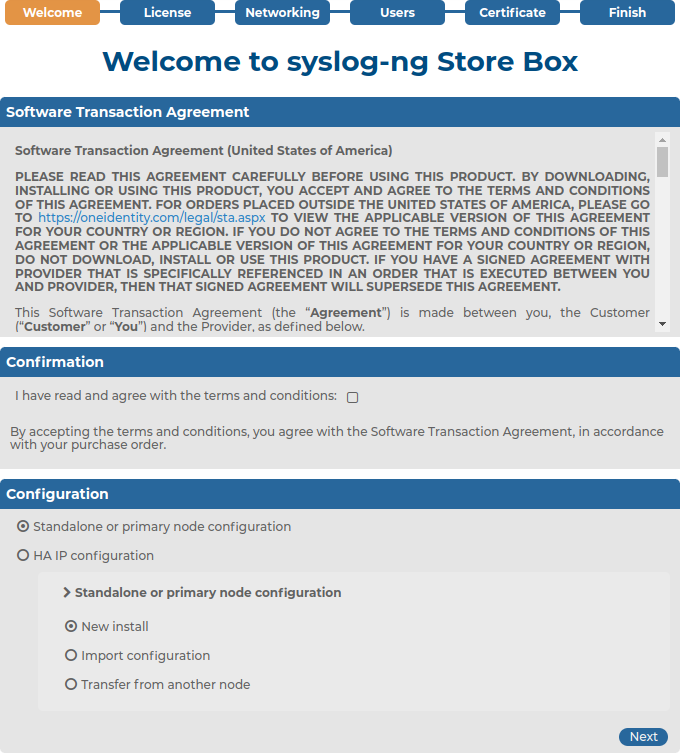
Open the http://192.168.1.1 URL in your web browser and verify that the Welcome Wizard of the syslog-ng Store Box is available.
Figure 1: The Welcome Wizard

-
Power off the system.
syslog-ng Store Box VMware Installation Guide
This tutorial describes the possibilities and limitations of installing syslog-ng Store Box (SSB) 7.4.0 as a virtual appliance under a VMware ESXi server.


