Chat now with support
Chat with Support

One Identity Safeguard for Privileged Sessions 7.0.5.1 LTS - Administration Guide

Preface Introduction The concepts of One Identity Safeguard for Privileged Sessions (SPS)
The philosophy of One Identity Safeguard for Privileged Sessions (SPS) Policies Credential Stores Plugin framework Indexing Supported protocols and client applications Modes of operation Connecting to a server through One Identity Safeguard for Privileged Sessions (SPS) Archive and backup concepts Maximizing the scope of auditing zIPv6 in One Identity Safeguard for Privileged Sessions (SPS) SSH host keys Authenticating clients using public-key authentication in SSH The gateway authentication process Four-eyes authorization Network interfaces High Availability support in One Identity Safeguard for Privileged Sessions (SPS) Versions and releases of One Identity Safeguard for Privileged Sessions (SPS) Accessing and configuring One Identity Safeguard for Privileged Sessions (SPS)
Cloud deployment considerations The Welcome Wizard and the first login Basic settings
Supported web browsers and operating systems The structure of the web interface Network settings Configuring date and time System logging, SNMP and e-mail alerts Configuring system monitoring on SPS Data and configuration backups Archiving Using plugins Forwarding data to third-party systems Starling integration
User management and access control Managing One Identity Safeguard for Privileged Sessions (SPS)
Controlling One Identity Safeguard for Privileged Sessions (SPS): reboot, shutdown Managing One Identity Safeguard for Privileged Sessions (SPS) clusters Managing a High Availability One Identity Safeguard for Privileged Sessions (SPS) cluster Upgrading One Identity Safeguard for Privileged Sessions (SPS) Managing the One Identity Safeguard for Privileged Sessions (SPS) license Accessing the One Identity Safeguard for Privileged Sessions (SPS) console Sealed mode Out-of-band management of One Identity Safeguard for Privileged Sessions (SPS) Managing the certificates used on One Identity Safeguard for Privileged Sessions (SPS)
General connection settings HTTP-specific settings ICA-specific settings MSSQL-specific settings RDP-specific settings SSH-specific settings Using Sudo with SPS Telnet-specific settings VMware Horizon View connections VNC-specific settings Indexing audit trails Using the Search interface Advanced authentication and authorization techniques Reports The One Identity Safeguard for Privileged Sessions (SPS) REST API One Identity Safeguard for Privileged Sessions (SPS) scenarios Troubleshooting One Identity Safeguard for Privileged Sessions (SPS)
Network troubleshooting Gathering data about system problems Viewing logs on One Identity Safeguard for Privileged Sessions (SPS) Changing log verbosity level of One Identity Safeguard for Privileged Sessions (SPS) Collecting logs and system information for error reporting Collecting logs and system information of the boot process for error reporting Support hotfixes Status history and statistics Troubleshooting a One Identity Safeguard for Privileged Sessions (SPS) cluster Understanding One Identity Safeguard for Privileged Sessions (SPS) RAID status Restoring One Identity Safeguard for Privileged Sessions (SPS) configuration and data VNC is not working with TLS Configuring the IPMI from the BIOS after losing IPMI password Incomplete TSA response received Using UPN usernames in audited SSH connections
Using SPS with SPP Configuring external devices Using SCP with agent-forwarding Security checklist for configuring One Identity Safeguard for Privileged Sessions (SPS) Jumplists for in-product help Configuring SPS to use an LDAP backend Glossary

Active Directory LDAP backend

The One Identity Safeguard for Privileged Sessions (SPS) web interface can authenticate users to an external LDAP database to simplify the integration of SPS to your existing infrastructure. You can also specify multiple LDAP servers, so that if the first server becomes unavailable, SPS can try to connect to another server.

NOTE: Consider the following:

  • Local users, including the admin user, are available by default.

  • The admin user has every privilege and cannot be deleted.

  • SPS accepts both pre-Windows 2000 style and Windows 2003 style User Principal Names (UPNs). UPNs consist of a username, the at (@) character, and a domain name, for example administrator@example.com.

  • For SSH usernames, SPS supports only valid UTF-8 strings.

  • The following characters cannot be used in:

    • user names: /\[]:;|=+*?<>"
    • group names: /\[]:;|=+*?<>"@,

  • When using RADIUS authentication with LDAP users, the users are authenticated to the RADIUS server; however, their group memberships are managed in LDAP. For details, see Authenticating users to a RADIUS server in the Administration Guide.

  • If the matching rule for an attribute is case insensitive in the LDAP database, SPS treats user names and group names in a case insensitive manner.
Prerequisites

Make sure that the response timeout of the LDAP/Active Directory server is set to a minimum of 120 seconds.

To configure an LDAP server

  1. Navigate to Users & Access Control > Login options > Manage AD/LDAP Servers.

  2. Select the LDAP server from the list. Alternatively, if no LDAP server exists yet, click Add new server and select the server type you want to create:

POSIX LDAP backend

The One Identity Safeguard for Privileged Sessions (SPS) web interface can authenticate users to an external LDAP database to simplify the integration of SPS to your existing infrastructure. You can also specify multiple LDAP servers, so that if the first server becomes unavailable, SPS can try to connect to another server.

NOTE: Consider the following:

  • Local users, including the admin user, are available by default.

  • The admin user has every privilege and cannot be deleted.

  • SPS accepts both pre-Windows 2000 style and Windows 2003 style User Principal Names (UPNs). UPNs consist of a username, the at (@) character, and a domain name, for example administrator@example.com.

  • For SSH usernames, SPS supports only valid UTF-8 strings.

  • The following characters cannot be used in:

    • user names: /\[]:;|=+*?<>"
    • group names: /\[]:;|=+*?<>"@,

  • When using RADIUS authentication with LDAP users, the users are authenticated to the RADIUS server; however, their group memberships are managed in LDAP. For details, see Authenticating users to a RADIUS server in the Administration Guide.

  • If the matching rule for an attribute is case insensitive in the LDAP database, SPS treats user names and group names in a case insensitive manner.
Prerequisites

Make sure that the response timeout of the LDAP/Active Directory server is set to a minimum of 120 seconds.

To configure an LDAP server

  1. Navigate to Users & Access Control > Login options > Manage AD/LDAP Servers.

  2. Select the LDAP server from the list. Alternatively, if no LDAP server exists yet, click Add new server and select the server type you want to create:

Authenticating users to a RADIUS server

One Identity Safeguard for Privileged Sessions (SPS) can authenticate its users to an external RADIUS server. Group memberships of the users must be managed either locally on SPS or in an LDAP database.

Caution:

The challenge/response authentication method is currently not supported. Use other authentication methods (for example password, SecureID).

Authenticating SPS users to a RADIUS server

To authenticate SPS users to a RADIUS server, complete the following steps.

  1. Navigate to Users & Access Control > Login Options.

  2. To configure a RADIUS login method, select one of the following options:

    • Select an existing RADIUS login option and click Edit.

    • Click Create new authentication method and select RADIUS.

    The following figure shows the configuration options of the RADIUS login method.

    Figure 86: Users & Access Control > Login options — Configuring RADIUS authentication

  3. In the Name field, specify a name for the login option.

  4. (Optional) Enable the RADIUS login method.

  5. To add a new RADIUS server, click Create new RADIUS server.

    1. In the Address field, enter the IP address or domain name of the RADIUS server. Use an IPv4 address or hostname.

    2. In the Server port field, enter the port number.

    3. In the Shared secret field, enter the password that SPS can use to access the RADIUS server.

      NOTE: SPS accepts passwords that are not longer than 150 characters and supports the following characters:

      • Letters A-Z, a-z

      • Numbers 0-9

      • The space character

      • Special characters: !"#$%&'()*+,-./:;<>=?@[]\^-`{}_|

    4. Click Save.

  6. (Optional) To add more RADIUS servers, click 
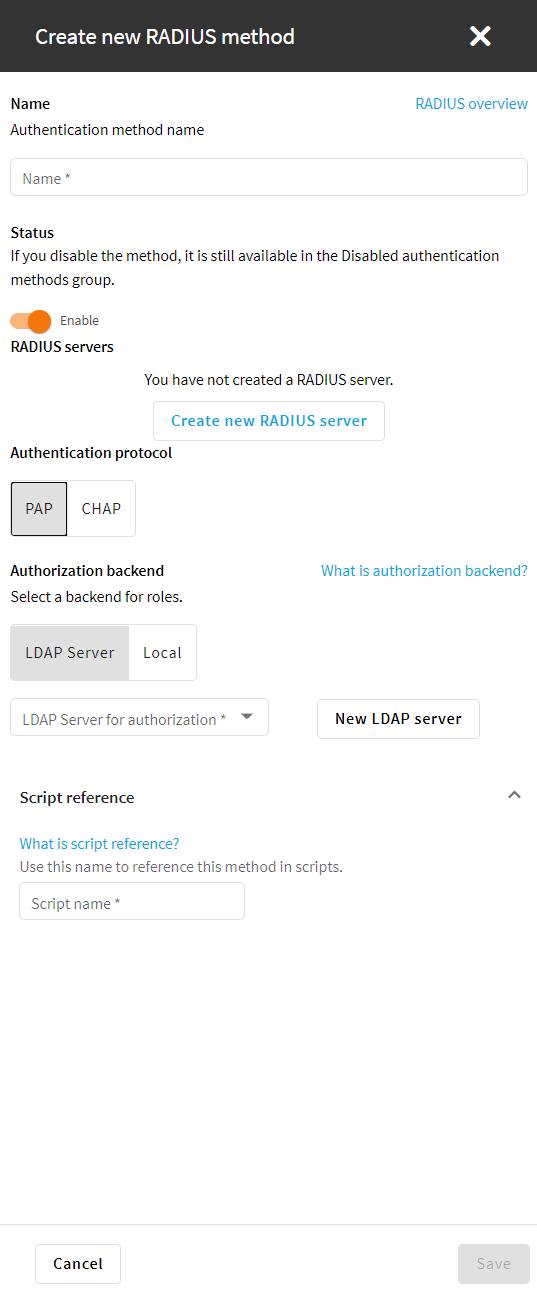
and repeat the procedure for adding a new RADIUS server.

    If a server is unreachable, SPS tries to connect to the next server in the list in failover mode.

  7. Select the authentication protocol.

    • To use the Password Authentication Protocol, select PAP.

    • To use the Challenge-Handshake Authentication Protocol, select CHAP.

  8. Select LDAP server or Local as the Authorization Backend.

  9. (Optional) To add a new LDAP server, click New LDAP server under Authorization backend and select one of the server types:

  10. Script reference is filled out automatically when you specify the name for the login option. Special characters are automatically replaced with dashes ("-"). The Script name is a unique, human readable ID that is used by the REST API clients to select the login method.

  11. To save your modifications, click Commit.

    Caution:

    After you commit this configuration, the SPS web interface will be available only after successfully authenticating to the RADIUS server. Note that the default admin account of SPS will be able to login normally, even if the RADIUS server is unaccessible.

Authenticating users with X.509 certificates

One Identity Safeguard for Privileged Sessions (SPS) provides a method to authenticate the users of the web interface with X.509 client certificates. The client certificate is validated against a trust store, and the username is exported from the client certificate for identification.

TIP: One Identity recommends using 2048-bit RSA keys (or stronger).

Prerequisites

Navigate to Basic Settings > Trust Stores and create a custom trust store. For more information, see Verifying certificates with Certificate Authorities using trust stores.

Figure 87: Basic Settings > Trust Stores— Creating a custom trust store

Authenticating SPS users on the SPS interface with X.509 certificates

To authenticate SPS users on the SPS web interface with X.509 client certificates, complete the following steps.

  1. Navigate to Users & Access Control > Login options.

  2. To configure an X.509 login method, select one of the following options:

    • Select an existing X.509 login option and click Edit.

    • Click Create new authentication method and select X.509.

    The following figure shows the configuration options of the X.509 login method.

    Figure 88: Users & Access Control > Login options — Configuring X.509 authentication

  3. In the Name field, specify a name for the login option.

  4. (Optional) Enable the X.509 login method.

    NOTE: You can enable only one X.509 login method at a time.

  5. Select the trust store you created as a prerequisite in Basic Settings > Trust Stores.

    CAUTION: From version 6.8, SPS changes authenticating the users of the web interface with X.509 client certificates: certificates are validated against a trust store instead of a trusted CA list. During the upgrade, the trusted CA list formerly used for authentication is copied to a trust store that has revocation check disabled by default.

    If you have previously enabled revocation check for your trusted CA list and already added the URLs of Certificate Revocation Lists (CRL), or you want to enable revocation check, you must edit the trust store settings manually.

    • Navigate to Basic Settings > Trust Stores.

    • Select the revocation check type Leaf or Full for the trust store.

    • Add a CRL URL for each root and intermediate CA.

    For more information about trust stores and how to configure them, see Verifying certificates with Certificate Authorities using trust stores in the Administration Guide.

  6. In the Certificate attribute field, select the user certificate field that contains the username. In most cases, it is the commonName or userid field, but SPS supports the emailAddress and userPrincipalName fields as well.

  7. Select LDAP server or Local as the Authorization Backend.

  8. (Optional) To add a new LDAP server, click New LDAP server under Authorization backend and select one of the server types:

  9. Script reference is filled out automatically when you specify the name for the login option. Special characters are automatically replaced with dashes ("-"). The Script name is a unique, human readable ID that is used by the REST API clients to select the login method.

  10. To save your modifications, click Commit.

Related Documents

The document was helpful.

Select Rating

I easily found the information I needed.

Select Rating