
Dell™ One Identity Cloud Access Manager 8.1.1 - How to Configure for High Availability
This guide describes how to extend a typical two host environment described in the Dell™ One Identity Cloud Access Manager Installation Guide to include two additional hosts to provide both redundancy and additional capacity. One host will be deployed in the DMZ to become a clone of the Cloud Access Manager Proxy host and the other will be deployed on the internal network to become a clone of the Cloud Access Manager Security Token Service (STS) host.

Cloning the database
Dell™ One Identity Cloud Access Manager requires an instance of Microsoft® SQL Server® Edition 2012,
2008R2 or 2008 to store its configuration, audit and session data. In a high availability Cloud Access Manager environment the database should also be configured for high availability, for example using SQL Server AlwaysOn Availability Groups.
2008R2 or 2008 to store its configuration, audit and session data. In a high availability Cloud Access Manager environment the database should also be configured for high availability, for example using SQL Server AlwaysOn Availability Groups.
|
1 |
|
2 |
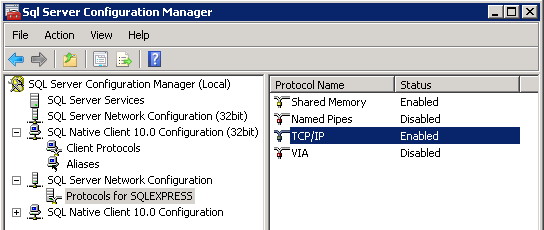
In the console pane, click Protocols for <Instance Name> for the database instance used by Cloud Access Manager. |
|
3 |
In the details pane, ensure that the TCP/IP protocol is Enabled. If it is not enabled, right-click and select Enable. |
|
4 |
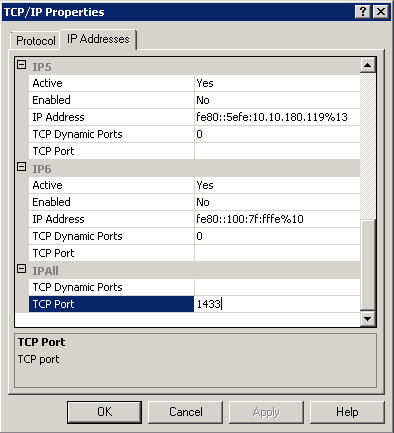
Next, verify that the database is configured to allow access using a fixed port. To do this, double-click TCP/IP to display the TCP/IP Properties page. |
|
5 |
From the IP Addresses tab, check that the TCP Dynamic Ports field is not populated in the IPAll section. If it is populated, clear the port range to ensure a fixed port is used to access the database. |
|
6 |
In the TCP Port field, verify a port is specified to access the database. For example, the default SQL Server® port 1433. |
|
8 |
In the console pane, click SQL Server Services. |
|
9 |
In the details pane, right-click SQL Server instance name, and then click Restart to stop and restart the SQL Server service. |
|
1 |
Login to the STS host and access the Cloud Access Manager Administration UI using the Cloud Access Manager Administration (fallback login) shortcut on the desktop. Using the fallback shortcut allows you to access the instance of the STS running on the host you are logged into. This is important if you change the database connection settings as each STS host stores a copy of the connection details. If you change the connection details, you must update them on each STS host. |
Note: If you plan to configure your database for high availability after configuring Cloud Access Manager for high availability, you need to repeat this section for each STS host. This is true if the database hostname/IP address or port changes as a result of changing the database configuration for high availability. For example, if the database now needs to be accessed using the virtual IP address of the cluster.
|
2 |
|
3 |
Click Configure the Database. |
|
4 |
The Data Source should contain the hostname or IP address to connect to the database and optionally the port number and database instance. If the hostname/IP is not present or has changed since configuring the database for high availability, update the database and click Save. |
Note: The port number is required when using a port number other than the standard SQL Server port 1433. A comma is used to append a port number to the hostname/IP address. In addition the instance name is required when using a named instance rather than a default instance. A backslash is used to append the instance name.

|
5 |
Click the Configuration Status icon in the top-right corner, verify that you can see each host and that the status of the components on each host is running and configured. |
Note: If you do not see your hosts, revisit the database settings and verify that the connection details are correct. You may also need to check that any firewalls between the two hosts are configured to allow access to the database.
Cloning the STS host
|
3 |
Start the Dell Autorun and navigate to the Install section. |
|
4 |
|
6 |
Click Production Installation. |
|
8 |
Click Install to deploy the components required for the new STS host. Note: The STS host requires the Microsoft® .NET framework version 4.5. If this is not already installed on the host, the installer will download and install the Microsoft .NET framework from the internet |
|
9 |
When the installation is complete, click Launch to start the configuration wizard. The configuration wizard will guide you through the steps to connect your new STS host to your existing environment. |
|
10 |
When prompted for the database connection details, select the My database server is not an SQL Express instance installed on the same machine as Cloud Access Manager check box and enter the same data source used in the previous section, for example, the same data source used by the first STS host. |
|
11 |
On the Proxy Settings page confirm the settings are the same as those on the initial STS host, and then click Next. |
|
12 |
|
13 |
When the configuration wizard has finished, click the Configuration Status icon in the top-right corner and verify that: |
Verifying the new STS host
|
1 |
Verify that users can log in to the Dell™ One Identity Cloud Access Manager portal as normal using the hostname configured on the Proxy Settings configuration page: |
https://<proxy host FQDN>/CloudAccessManager
|
2 |
Stop the World Wide Web Publishing service on the existing Security Token Service (STS) host so that only the new STS host is running. |
|
4 |
Restart the World Wide Web Publishing service on the existing host and stop the World Wide Web Publishing service on the new STS host. |
|
6 |
Restart the World Wide Web Publishing service on the new host. |
|
7 |
From within the Cloud Access Manager Administration UI, click the Configuration Status icon in the top-right corner. Verify that you can see each Cloud Access Manager host and that the status of the components on each host is running and configured. |
Note: Some components may not show as running until users have accessed the Cloud Access Manager application portal.