
The Rsync over SSH backup method connects the target server with SSH and executes the rsync UNIX command to copy the data to the remote server. SPS authenticates itself with a public key — password-based authentication is not supported.
|
|
Caution:
The backup server must run rsync version 3.0 or newer. |

To create a backup policy using Rsync over SSH
-
Navigate to Policies > Backup & Archive and click
in the Backup policies section to create a new backup policy.
-
Enter a name for the backup policy (for example, config-backup).
-
Enter the time when the backup process should start into the Start time field in HH:MM format (for example, 23:00).
You can add the start time for additional backup processes.
Caution: When specifying an additional start time, ensure that the previous backup process finishes before the new backup process starts.
-
Enter the IP address or the hostname of the remote server into the Target server field (for example, backup.example.com).
Use an IPv4 address.
-
Select Rsync over SSH from the Copy data from PSM radio buttons.
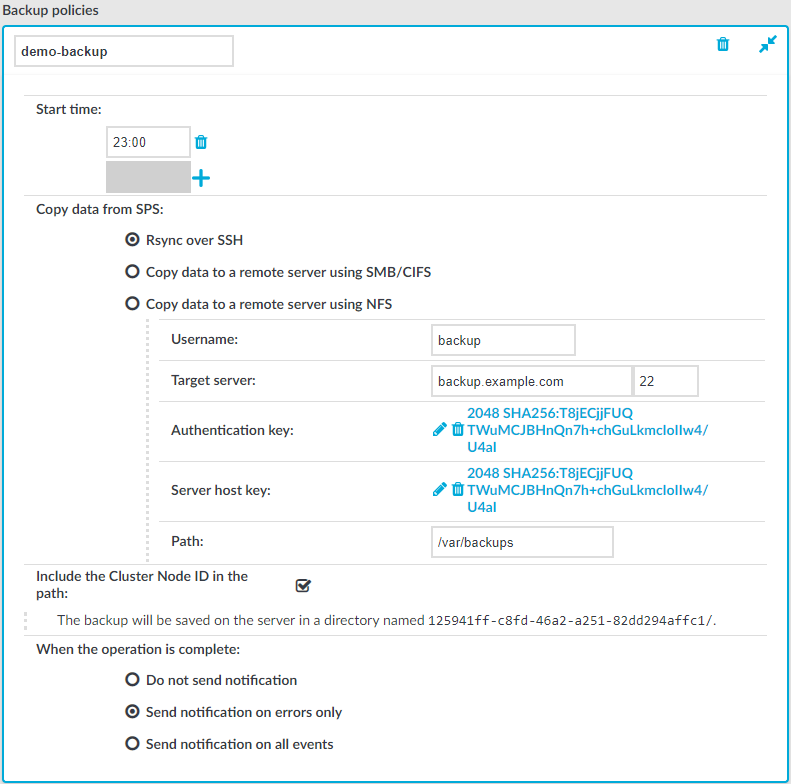
Figure 23: Policies > Backup & Archive > Backup policies — Configuring backups using rsync
-
Enter the username used to log on to the remote server into the Username field.
-
Click
in the Authentication key field. A popup window is displayed.
-
Generate a new keypair by clicking Generate or upload or paste an existing one. This key will be used to authenticate SPS on the remote server. The public key of this keypair must be imported to the remote server.
-
Click
-
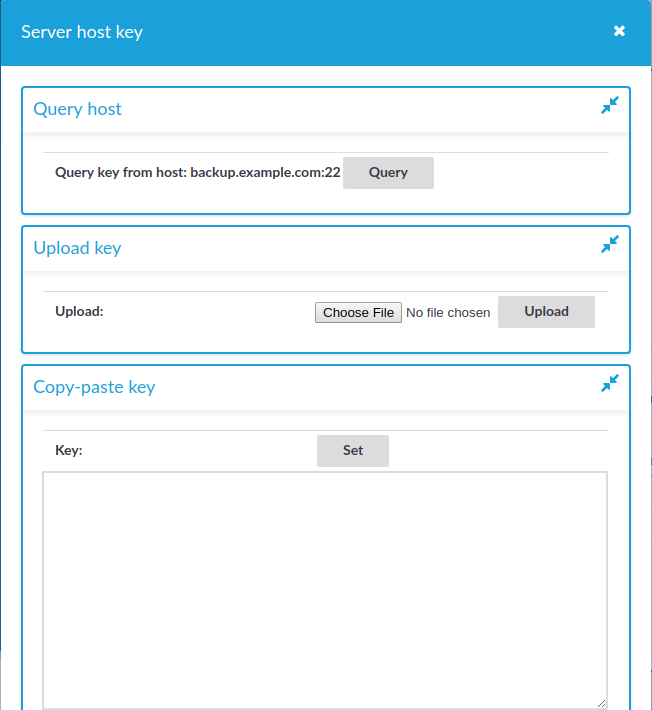
Click Query to download the host key of the server, or upload or paste the host key manually. SPS will compare the host key shown by the server to this key, and connect only if the two keys are identical.
Figure 24: Policies > Backup & Archive > Backup policies — Configuring SSH keys
-
Enter the port number of the SSH server running on the remote machine into the Port field.
-
Enter the path to the backup directory on the target server into the Path field (for example /backups).
SPS saves all data into this directory, automatically creating the subdirectories. Backups of audit-trails are stored in the data, configuration backups in the config subdirectory.
-
When your SPS instance is a node in a cluster, select Include the Cluster Node ID in the path. This ensures that the ID of the node is included in the path of the relevant directory, which is required to prevent cluster nodes from backing up data to the same location, and so overwriting each other's data and resulting in data loss. In addition, having the node's ID in the directory name also enables easy identification.
Caution: Hazard of data loss
Unchecking Include the Cluster Node ID in the path when your SPS is a node in a cluster can result in data loss if you have configured configuration synchronization across your cluster nodes.
-
To receive e-mail notification of the backup, select the Send notification on errors only or the Send notification on all events option. Notifications are sent to the administrator e-mail address set on the Management tab.
To include the list of files in the e-mail, select Send notification on all events and enable the Include file list option. However, note that if the list is very long
NOTE: This e-mail notification is different from the one set on the Alerting & Monitoring tab. This notification is sent to the administrator's e-mail address, while the alerts are sent to the alert e-mail address (see Configuring system monitoring on SPS).
-
Click
.
-
To assign the backup policy to a connection, see Creating data backups.