Modifying the destination address
The destination address is the address of the server where the clients finally connect to.
To modify the destination address of a connection
-
Navigate to the Connections tab storing the connection and click
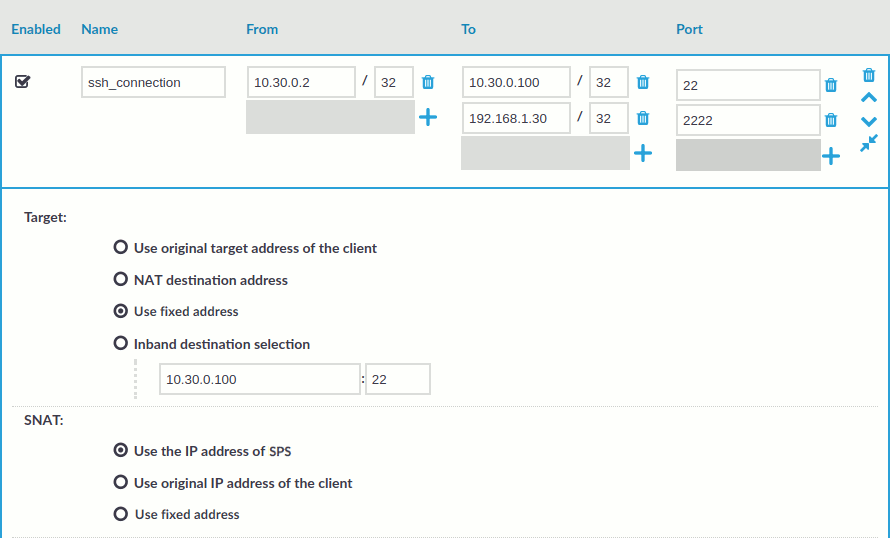
to display the details of the connection.
Figure 142: <Protocol name> Control > Connections — Configuring connections
-
The Target section allows you to configure Network Address Translation (NAT) on the server side of One Identity Safeguard for Privileged Sessions (SPS). Destination NAT determines the target IP address of the server-side connection. Set the destination address as required. The following options are available:
NOTE: It is not possible to direct the traffic to the IP addresses belonging to SPS.
-
Use the original target address of the client: Connect to the IP address targeted by the client. This is the default behavior in transparent mode. This option is not available in non-transparent mode. For HTTP connections, you can use the Use the original target address of the client option only when the Act as HTTP proxy option is disabled.
-
NAT destination address: Perform a network address translation on the target address. Enter the target address in IP address/Prefix format.
You can also enter a hostname instead of the IP address, and One Identity Safeguard for Privileged Sessions (SPS) automatically resolves the hostname to IP address. Note the following limitations:
-
SPS uses the Domain Name Servers set Basic Settings > Network > Naming > Primary DNS server and Secondary DNS server fields to resolve the hostnames.
-
If the Domain Name Server returns multiple IP addresses, SPS selects randomly from the list.
-
-
Use fixed address: Enter the IP address and port number of the server. The connection will connect always to this address, redirecting the clients to the server.
You can also enter a hostname instead of the IP address, and One Identity Safeguard for Privileged Sessions (SPS) automatically resolves the hostname to IP address. Note the following limitations:
-
SPS uses the Domain Name Servers set Basic Settings > Network > Naming > Primary DNS server and Secondary DNS server fields to resolve the hostnames.
-
If the Domain Name Server returns multiple IP addresses, SPS selects randomly from the list.
-
-
Inband destination selection: Extract the address of the server from the username. Note that for HTTP connections, you can use the Inband destination selection option only when the Act as HTTP proxy option is enabled. For details, see Configuring inband destination selection.
-
-
Click
.