Chat now with support
Chat with Support

One Identity Safeguard for Privileged Sessions 6.0.7 - Administration Guide

Preface Introduction The concepts of One Identity Safeguard for Privileged Sessions (SPS) The Welcome Wizard and the first login Basic settings
Supported web browsers and operating systems The structure of the web interface Network settings Configuring date and time System logging, SNMP and e-mail alerts Configuring system monitoring on SPS Data and configuration backups Archiving and cleanup Forwarding data to third-party systems Joining to One Identity Starling
User management and access control Managing One Identity Safeguard for Privileged Sessions (SPS)
Controlling One Identity Safeguard for Privileged Sessions (SPS): reboot, shutdown Managing Safeguard for Privileged Sessions (SPS) clusters Managing a high availability One Identity Safeguard for Privileged Sessions (SPS) cluster Upgrading One Identity Safeguard for Privileged Sessions (SPS) Managing the One Identity Safeguard for Privileged Sessions (SPS) license Accessing the One Identity Safeguard for Privileged Sessions (SPS) console Sealed mode Out-of-band management of One Identity Safeguard for Privileged Sessions (SPS) Managing the certificates used on One Identity Safeguard for Privileged Sessions (SPS)
General connection settings HTTP-specific settings ICA-specific settings RDP-specific settings SSH-specific settings Telnet-specific settings VMware Horizon View connections VNC-specific settings Indexing audit trails Using the Search interface Searching session data on a central node in a cluster Advanced authentication and authorization techniques Reports The One Identity Safeguard for Privileged Sessions (SPS) RPC API The One Identity Safeguard for Privileged Sessions (SPS) REST API One Identity Safeguard for Privileged Sessions (SPS) scenarios Troubleshooting One Identity Safeguard for Privileged Sessions (SPS) Using SPS with SPP Configuring external devices Using SCP with agent-forwarding Security checklist for configuring One Identity Safeguard for Privileged Sessions (SPS) Jumplists for in-product help LDAP user and group resolution in SPS Appendix: Deprecated features Glossary

Managing logical interfaces

You can assign logical interfaces to a physical interface. Each logical interface must have its own VLAN ID, and can have its own set of (alias) IP addresses and prefixes. The configured name for each logical interface is visible on One Identity Safeguard for Privileged Sessions (SPS)'s user interface only.

You can configure IPv4 and IPv6 addresses as well. IPv6 is intended for configuring monitored connections. Local services (including the web login) require IPv4 addresses. An interface can have multiple IP addresses, including a mix of IPv4 and IPv6 addresses.

NOTE:

SPS does not support scenarios with two hosts using the same IP address on different VLAN groups.

To manage logical interfaces

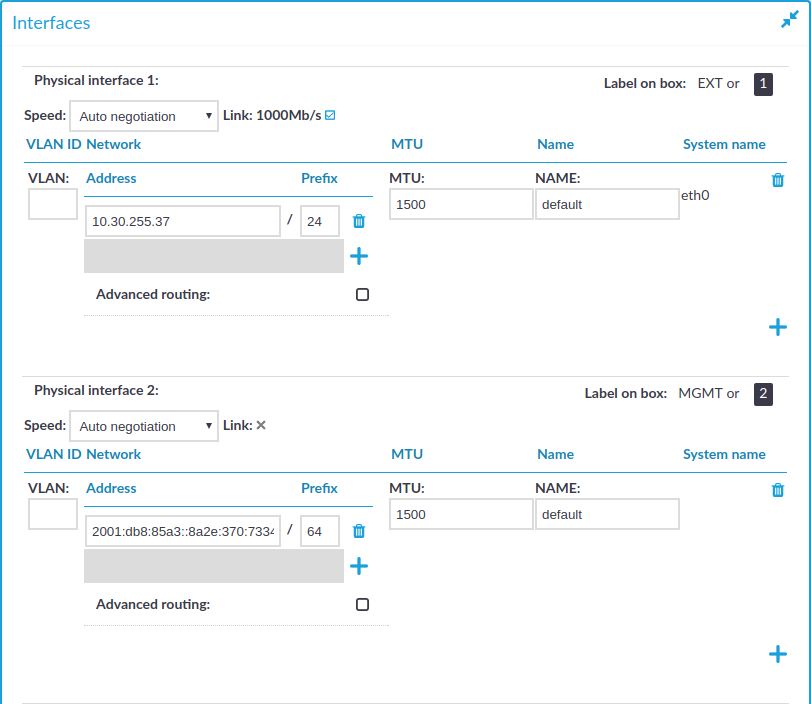
  1. Navigate to Basic Settings > Network > Interfaces.

    Figure 44: Basic Settings > Network > Interfaces — Managing the logical interfaces

  2. If necessary, use the label on the SPS hardware to identify the physical interface to which you want to assign a logical interface.

  3. Choose to add a new logical interface. Provide the following:

    • VLAN: The VLAN ID of the logical interface. Optional.

      Caution:

      Do not set the VLAN ID unless your network environment is already configured to use this VLAN. Otherwise, your SPS appliance will be unavailable using this interface.

    • Address: The IP address of the logical interface.

      You can also enter a hostname instead of the IP address, and One Identity Safeguard for Privileged Sessions (SPS) automatically resolves the hostname to IP address. Note the following limitations:

      • SPS uses the Domain Name Servers set Basic Settings > Network > Naming > Primary DNS server and Secondary DNS server fields to resolve the hostnames.

      • If the Domain Name Server returns multiple IP addresses, SPS selects randomly from the list.

      NOTE:

      Do not use IP addresses that fall into the following ranges:

      • 1.2.0.0/16 (reserved for communication between SPS cluster nodes)

      • 127.0.0.0/8 (localhost IP addresses)

    • Prefix: The IP range of the logical interface.

    • Optional: To add additional (alias) IP addresses and prefixes to a logical interface, click . To remove an alias IP address, click the corresponding .

    • MTU: Maximum Transmission Unit (MTU) to set per network interface (VLAN or network interface card). The default value is 1500.

    • Name: The name of the logical interface. This name is visible on SPS's user interface only.

    To remove a logical interface, choose the on the right side.

  4. Click Commit.

Related Documents

The document was helpful.

Select Rating

I easily found the information I needed.

Select Rating