Chat now with support
Chat with Support

One Identity Safeguard for Privileged Sessions 6.9.2 - Administration Guide

Preface Introduction The concepts of One Identity Safeguard for Privileged Sessions (SPS)
The philosophy of One Identity Safeguard for Privileged Sessions (SPS) Policies Credential Stores Plugin framework Indexing Supported protocols and client applications Modes of operation Connecting to a server through One Identity Safeguard for Privileged Sessions (SPS) Archive and backup concepts Maximizing the scope of auditing IPv6 in One Identity Safeguard for Privileged Sessions (SPS) SSH host keys Authenticating clients using public-key authentication in SSH The gateway authentication process Four-eyes authorization Network interfaces High Availability support in One Identity Safeguard for Privileged Sessions (SPS) Versions and releases of One Identity Safeguard for Privileged Sessions (SPS) Accessing and configuring One Identity Safeguard for Privileged Sessions (SPS)
The Welcome Wizard and the first login Basic settings
Supported web browsers and operating systems The structure of the web interface Network settings Configuring date and time System logging, SNMP and e-mail alerts Configuring system monitoring on SPS Data and configuration backups Archiving and cleanup Using plugins Forwarding data to third-party systems Starling integration
User management and access control Managing One Identity Safeguard for Privileged Sessions (SPS)
Controlling One Identity Safeguard for Privileged Sessions (SPS): reboot, shutdown Managing Safeguard for Privileged Sessions (SPS) clusters Managing a High Availability One Identity Safeguard for Privileged Sessions (SPS) cluster Upgrading One Identity Safeguard for Privileged Sessions (SPS) Managing the One Identity Safeguard for Privileged Sessions (SPS) license Accessing the One Identity Safeguard for Privileged Sessions (SPS) console Sealed mode Out-of-band management of One Identity Safeguard for Privileged Sessions (SPS) Managing the certificates used on One Identity Safeguard for Privileged Sessions (SPS)
General connection settings HTTP-specific settings ICA-specific settings MSSQL-specific settings RDP-specific settings SSH-specific settings Telnet-specific settings VMware Horizon View connections VNC-specific settings Indexing audit trails Using the Search interface Advanced authentication and authorization techniques Reports The One Identity Safeguard for Privileged Sessions (SPS) RPC API The One Identity Safeguard for Privileged Sessions (SPS) REST API One Identity Safeguard for Privileged Sessions (SPS) scenarios Troubleshooting One Identity Safeguard for Privileged Sessions (SPS) Using SPS with SPP Configuring external devices Using SCP with agent-forwarding Security checklist for configuring One Identity Safeguard for Privileged Sessions (SPS) Jumplists for in-product help Configuring SPS to use an LDAP backend Glossary

Configuring user and administrator login addresses

You can configure two separate login addresses for accessing the web interface of One Identity Safeguard for Privileged Sessions (SPS):

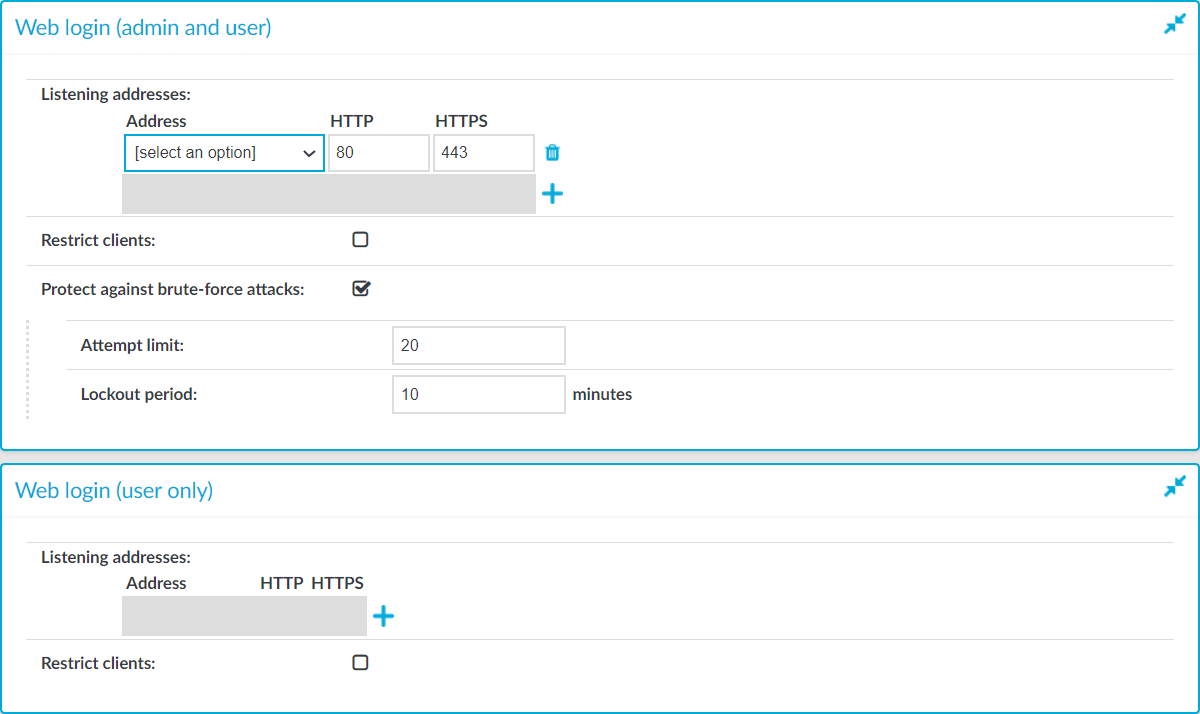
  • Web login (admin and user): On this address, users can, depending on their access privileges, modify the configuration of SPS, and perform authentication-related activities (gateway authentication, 4-eyes authorization).

  • Web login (user only): The configuration of SPS cannot be viewed or altered from this address. Users (even ones with administrator privileges) can only perform gateway authentication and 4-eyes authorization.

NOTE: For more information on gateway authentication and 4-eyes authorization, see Advanced authentication and authorization techniques.

Both login addresses can be configured to restrict connections to a configured set of IP addresses only.

NOTE:

When configuring HTTP or SSH connections, avoid using the IP address configured for administrator or user login on One Identity Safeguard for Privileged Sessions (SPS) .

The login addresses are, by default, protected against brute-force attacks. For more information on the Protect against brute-force attacks option, see section Protecting against brute-force attacks.

To configure two separate login addresses for accessing the web interface of SPS

  1. Navigate to Basic Settings > Local Services > Web login.

    Figure 46: Basic Settings > Local Services > Web login — Configuring web login address

  2. Choose in the Listening addresses field.

  3. Enter the IP address to use for connecting to SPS's user interface into the Address field.

    The available addresses correspond to the interface addresses configured in Basic Settings > Network > Interfaces. Only IPv4 addresses can be selected.

  4. Enter the port number for HTTP connections into the HTTP field.

  5. Enter the port number for HTTPS connections into the HTTPS field.

  6. (Optional) To permit access to the SPS web interface only from selected subnets or IP addresses, select Restrict clients, click and enter the IP address and netmask of the allowed clients. Note that these settings do not affect the SSH access to SPS.

    Caution:

    Permit administrative access to SPS only from trusted networks. If possible, monitored connections and administrative access to the SPS web interface should originate from separate networks.

    After comitting the changes, the web interface will be available only from the configured subnets or IP addresses.

    Use an IPv4 address.

  7. (Optional) Protect against brute-force attacks: modify the values of Attempt limit, Lockout period, or both, according to your security requirements.

    NOTE: You can configure the Protect against brute-force attacks option only under Web login (admin and user), but these settings are inherited by the Web login (user only) settings too.

    For detailed information on the Protect against brute-force attacks option, see section Protecting against brute-force attacks.

  8. Recommended: configure a separate login address for user connections in Web login (user only). The configuration settings of SPS cannot be viewed or modified from this address.

  9. Click .

Related Documents

The document was helpful.

Select Rating

I easily found the information I needed.

Select Rating