One Identity Safeguard for Privileged Sessions (SPS) can check the validity of certificates using the certificates and certificate revocation lists of the certificate authorities (CA) that issued the certificates. This can be used to verify the certificates of the servers in TLS connections.
Trust stores serve as local certificate storages where you can store the certificate chains of trusted CAs. Create and configure custom trust stores to verify the certificates in TLS connections. Note that you cannot modify the built-in trust store, which contains common CA certificates that the operational system of SPS uses.
You can use custom trust stores in the following locations:
-
Basic Settings > Management > Syslog — Check server certificate. For more information, see Configuring system logging.
-
Basic Settings > Management > Universal SIEM forwarder — TLS with certificate validation. For more information, see Using the universal SIEM forwarder.
-
Users & Access Control > Settings > Authentication settings — Configuring X.509 authentication. For more information, see Authenticating users with X.509 certificates.
-
Users & Access Control > Settings > Authentication settings — Configuring LDAP, TLS and STARTLS encryption method. For more information, see Managing One Identity Safeguard for Privileged Sessions (SPS) users from an LDAP database
-
Policies > LDAP Servers — Configuring encryption. For more information, see Authenticating users to an LDAP server.
Prerequisites
To specify cipher settings and version requirements that SPS uses for establishing TLS connections in the Cryptography Settings section, navigate to Basic Settings > Trust Stores.
Figure 180: Basic Settings > Trust Stores — Cryptography settings
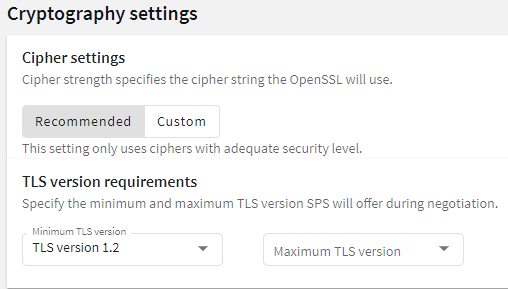
Cipher strength specifies the cipher string OpenSSL will use. The following settings options are possible:
-
Recommended: this setting only uses ciphers with adequate security level.
-
Custom: this setting allows you to specify the list of ciphers you want to permit SPS to use in the connection. This setting is only recommended to ensure compatibility with older systems. For more details on customizing this list, check the 'openssl-ciphers' manual page on your SPS appliance.
For example: ALL:!aNULL:@STRENGTH
Minimum TLS version specifies the minimal TLS version SPS will offer during negotiation. The following settings options are possible:
-
TLS 1.2: this setting will only offer TLS version 1.2 during negotiation. This is the recommended setting.
-
TLS 1.1: this setting will offer TLS version 1.1 and later versions during negotiation.
-
TLS 1.0: this setting will offer TLS version 1.0 and later versions during negotiation.
Maximum TLS version specifies the maximal TLS version SPS will offer during negotiation. The following settings options are possible:
-
TLS 1.2: this setting will only offer TLS version 1.2 during negotiation. This is the recommended setting.
-
TLS 1.1: this setting will offer TLS version 1.1 and later versions during negotiation.
-
TLS 1.0: this setting will offer TLS version 1.0 and later versions during negotiation.
-
Latest: this setting will offer the latest TLS version during negotiation.
NOTE: Note that SPS only permits TLS-encrypted connections. SSLv3 is not supported.
NOTE: TLS 1.1 and 1.2 support for Windows 7 Service Pack 1 (SP1) and for Windows Server 2008 R2 Service Pack 2 (SP2) is not available by default. For more information about the requirements and process of enabling this feature, click here or contact our Support Team.
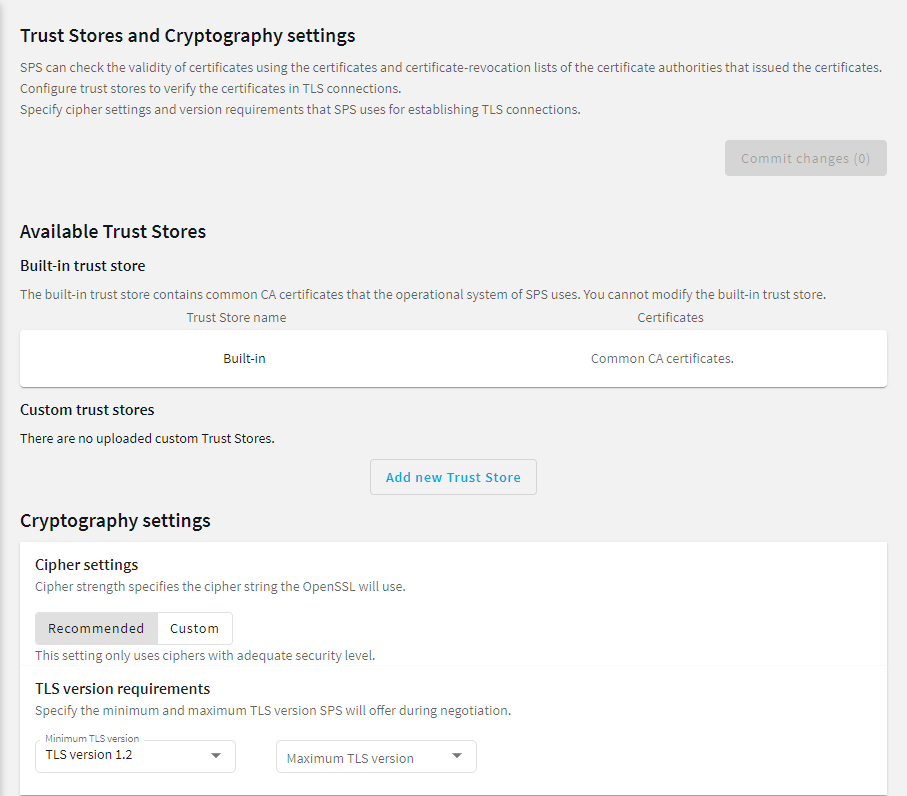
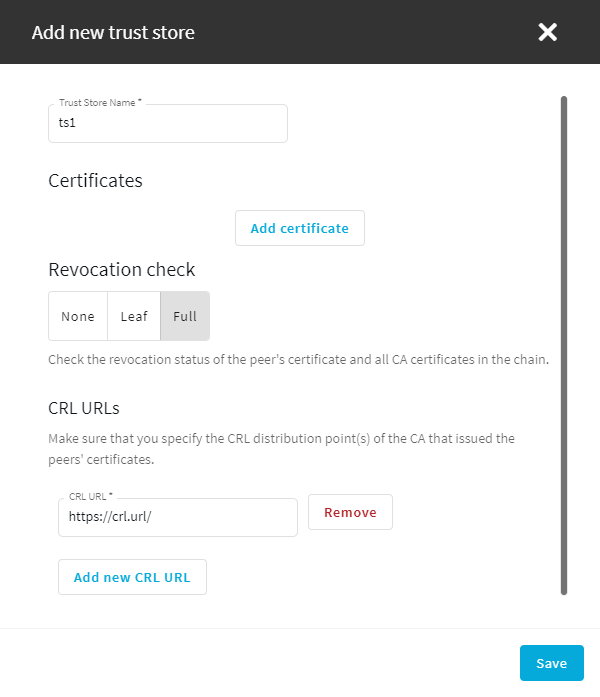
To create a custom trust store or edit an existing custom trust store
-
Navigate to Basic Settings > Trust Stores.
Figure 181: Basic Settings > Trust Stores
-
In the Custom trust stores section, click Add new Trust Store. To change the settings of an existing trust store, click Edit.
The Add new trust store or Edit trust store window opens.
Figure 182: Basic Settings > Trust Stores — Add new trust store
-
In the Trust Store Name field, enter a name for the trust store. For example ts1.
-
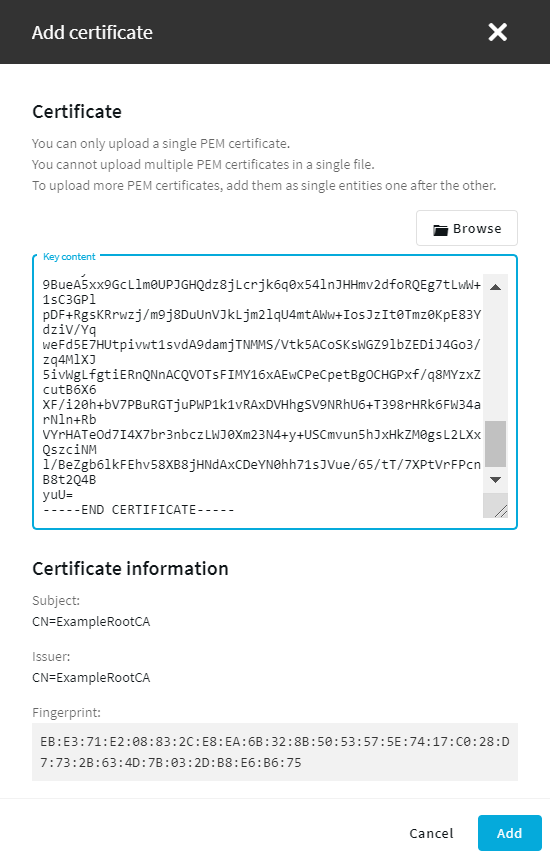
To add the certificate of the CA to the trust store that will be used to validate the certificates, click Add certificate. The Add certificate window opens.
-
Paste or drag the PEM certificate file to the Key content field. You can also click Browse to navigate to the PEM certificate file on your computer.
Figure 183: Basic Settings > Trust Stores — Add certificate
-
You will have to upload all the CA certificates from the users' certificate chains (including the root CA). Therefore, these CA certificates must be available on your computer in PEM format.
-
The certificates of the users must contain the user name used to authenticate on SPS. You must know which certificate field will contain the user names (for example, CN or UID).
-
The certificates must be imported into the browsers of the users. SPS offers the possibility to authenticate with a certificate only if a personal certificate is available in the browser.
NOTE:
You can only upload a single PEM certificate.
You cannot upload multiple PEM certificates in a single file.
To upload more PEM certificates, add them as single entities one by one.
-
-
Click Add.
-
Set the revocation check type for the trust store.
-
None: Do not check certificate revocation status.
-
Leaf: Check the revocation status of the peer's certificate, but do not check the revocation status of the CA certificates in the chain.
-
Full: Check the revocation status of the peer's certificate and all CA certificates in the chain.
-
-
If you set the revocation check type to Leaf or Full, click Add new CRL URL to specify the CRL distribution point(s) of the CA that issued the peers' certificates.
-
Enter the URL of the Certificate Revocation List (CRL) of the CA into the CRL URL field. Certificates appearing on the CRL list will be automatically rejected.
-
Click Remove to remove a CRL distribution point from the trust store.
-
-
Click Save and close the window.
- To delete a certificate from a trust store, click Edit to open the Edit trust store window, click on the certificate, and click Delete.
- To delete a trust store, click Edit to open the Edit trust store window, and click Delete.
-
Click
.