To create logstores
-
Navigate to Log > Logspaces and click
.
-
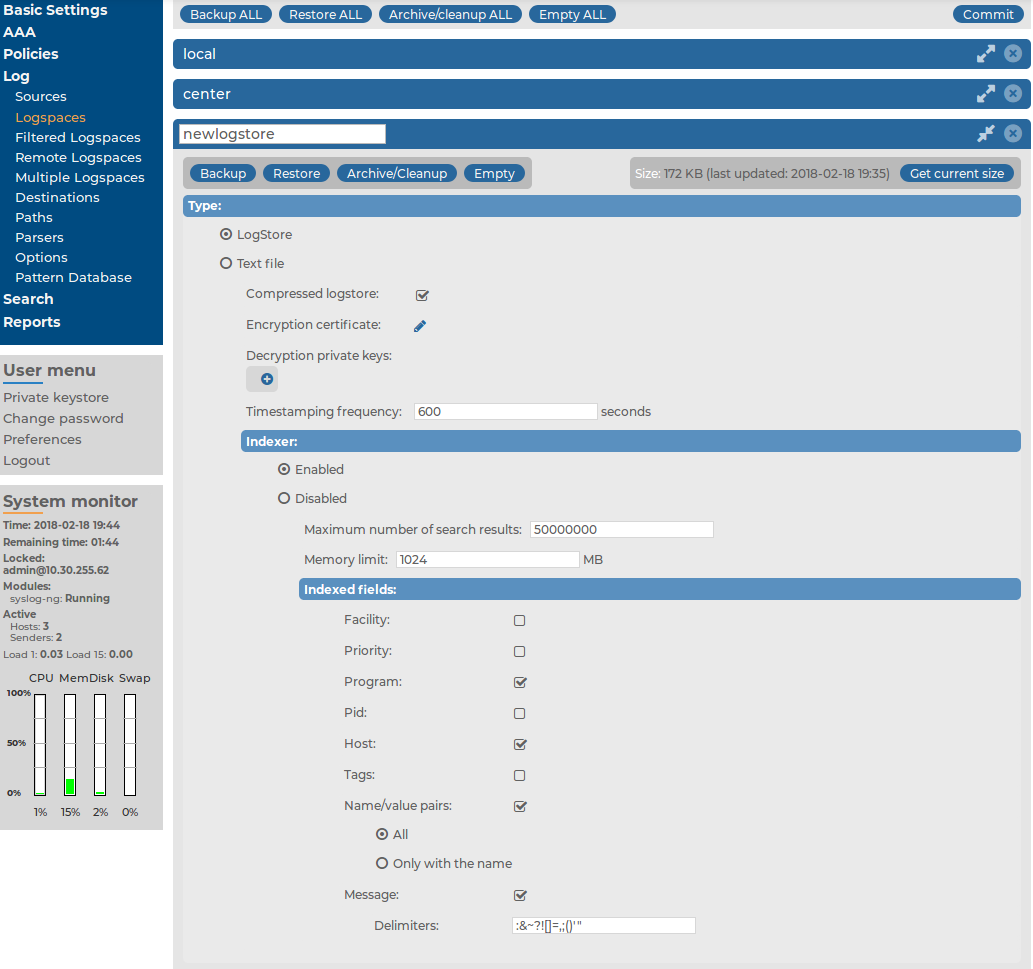
Enter a name for the logspace into the top field. Use descriptive names that help you to identify the source easily. Note that the name of the logspace must begin with a number or a letter.
Figure 139: Log > Logspaces — Creating a new logstore
-
Select LogStore from the Type field.
-
To encrypt the log files using public-key encryption, click
in the Encryption certificate field.
A pop-up window is displayed.
Click Browse, select the certificate you want to use to encrypt the log files, then click Upload. Alternatively, you can paste the certificate into the Certificate field and click Upload.
NOTE: To view encrypted log messages, you will need the private key of this certificate. For details on browsing encrypted logstores online on the syslog-ng Store Box (SSB) web interface, see Browsing encrypted logspaces. Encrypted log files can be displayed using the logcat command-line tool as well. The logcat application is currently available only for UNIX-based systems.
One Identity recommends:
-
Using 2048-bit RSA keys (or stronger).
-
Using the SHA-256 hash algorithm (or stronger) when creating the public key fingerprint.
NOTE: Each certificate or encryption-related setting described above only takes effect from the next day.
However, if you use decryption private keys, you can search in the encrypted logstores immediately after the private keys are uploaded. For more information, see Assigning decryption keys to a logstore.
-
-
By default, SSB requests a time stamp every ten minutes from the internal Time Stamping Authority. Adjust the frequency of time stamping requests in the Timestamping frequency field if needed. For details on how to request time stamps from an external provider, see Time stamping configuration on SSB.
-
Indexing is enabled by default. For detailed instructions on configuring indexing, see Configuring the indexer service.
-
Logstore files are compressed by default. If you do not want to use compression, uncheck the Compressed logstore option.
-
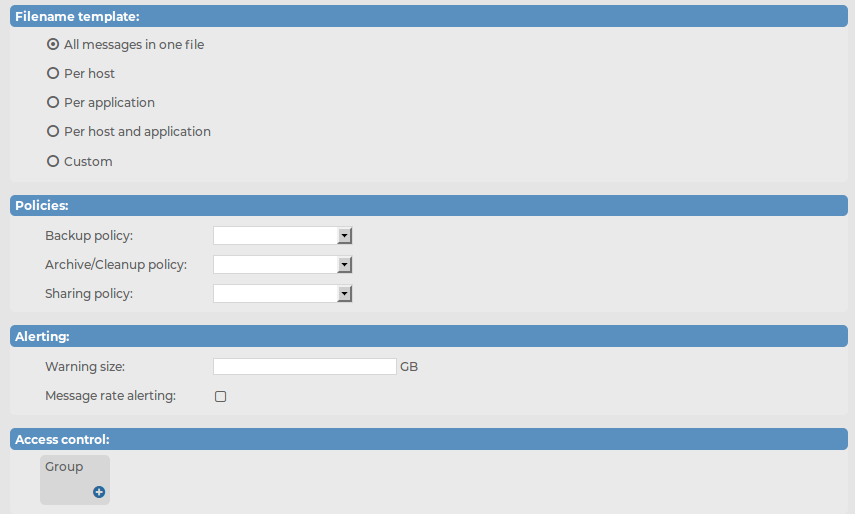
Select how to organize the log files of this logspace from the Filename template field.
-
To save every message received during a day into a single file, select All messages in one file.
-
To create a separate log file for every peer (IP address or hostname) that sends messages, select the Per host option. This option corresponds to using the ${HOST} macro of syslog-ng.
-
To create a separate log file for every application that sends messages, select the Per application option. This option corresponds to using the ${PROGRAM} macro of syslog-ng.
-
To create a separate log file for every application of every peer (IP address or hostname) that sends messages, select Per host and application option. This option corresponds to using the ${HOST}-${PROGRAM} macros of syslog-ng.
-
To specify a custom template for naming the log files, select the Custom option and enter the template into the appearing Template field.
-
-
To create automatic daily backups of the logspace to a remote server, create a backup policy and select it from the Backup policy field. For details on creating backup policies, see Data and configuration backups.
-
To archive the logspace automatically daily, create an archiving policy and select it from the Archive/Cleanup policy field. For details on creating archiving policies, see Archiving and cleanup.
Caution: Use archiving and cleanup policies to remove older logfiles from SSB, otherwise the hard disk of SSB may become full.
-
To make the log files of this logspace available via the network, create a sharing policy and select it from the Sharing policy field. For details on creating sharing policies, see Accessing log files across the network.
-
Set a size for the logspace in the Warning size field: SSB will send an alert if the size of this logspace exceeds the limit.
Caution: Make sure that the Logspace exceeded warning size alert is enabled in Basic Settings > Alerting > syslog-ng traps, and that the mail settings of Basic Settings > Management, and the SNMP settings of Basic Settings > Alerting are correct. Otherwise, you will not receive any alert when the logspace exceeds the size limit. For details on alerting and monitoring, see also Configuring system monitoring on SSB.
-
By default, members of the search group can view the stored messages online. Use the Access control option to control which usergroups can access the logspace. For details, see also Managing user rights and usergroups.
-
Click
.