
Add a Search
Searches are treated in a similar way to Bookmarks, in that they are stored for future use. When performing a search, you can click on the branch within the Directory Tree to help limit the base DN for the search. You can initiate a search by clicking on the Add Search button in the Control Toolbar, or by clicking on the Add Search option in the Search Menu. This will cause the Add Search dialog to open.
Fig-22: The Add Search Dialog
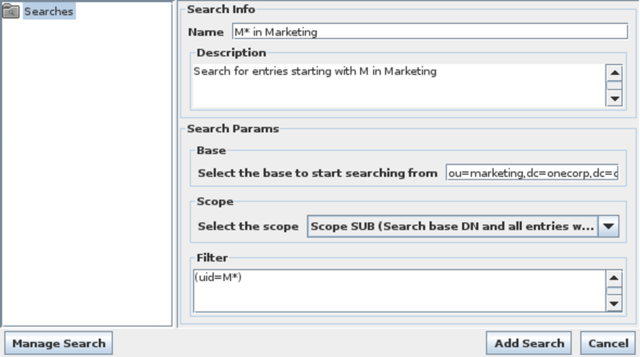
The Add Search dialog will require you to enter a Name and Description for the Search request that will be added to the Search Menu. You will also need to specify the base DN or suffix that should be used within the search. By default, this will be populated with the DN for the branch or entry that was last selected in the Navigation Panel, although the field can be edited manually to specify an alternate branch if required.
You can specify one of three alternative Scope settings for the search. The scope defines how deep the search request will go. The scope options are as follows:
-
Scope Base: Only searches the Base DN specified for the search.
-
Scope One: Searches for entries stored one level beneath the specified Base DN.
-
Scope Sub: Searches recursively through all levels beneath the specified Base DN.
In general, within the browser, you are likely to select a Scope of either One or Sub.
Finally, you will need to specify a filter for the search criteria. Search filters follow a standard format as specified by RFC2254 and are discussed in more detail in the previous section on New Searches.
When you have constructed your search filter, you will need to click on the Add Search button to store your search query. The search will then be saved under the folder that is selected in the panel on the right. You will then be able to select your search from the Search Menu listed under the connection name for which the search was created. You will be able to use this search whenever you want, as it will be stored within the connection configuration. If you wish to edit it for some other purpose, or remove it you will need to open the Manage Searches dialog.
It is very important to understand that Bookmarks and Searches are stored in memory while LB is open. If you would like to store them permanently within a configuration for use next time you open the Browser, you will need to save the entire configuration file by clicking on the Save option in the File Menu. Note that you will be prompted to save a configuration when you close it, just in case you forget to save your existing Bookmarks and Searches.
Search Results
Each Search will display its results within its own view. These views are presented as labelled buttons running along the bottom of the GUI. The global view, or the view of the Directory Tree with no LDAP filters applied, is accessible using the button marked with an icon of the globe, on the far left at the bottom of the GUI.
Note that the RootDSE Info and the Show Schema options are also treated as Search views and are opened within the Search Button Bar. Each of these views will be represented with a button displaying their respective icons.
Fig-23: The Search results button bar with the Global view, RootDSE view, Show Schema view and a search button illustrated

Managing Searches
Searches for each connection are stored individually within a single configuration file. For any connection, you are able to manage the Searches that you have stored by clicking on the Manage Searches option in the Search Menu. This will open the Search Management dialog.
Fig-24: The Search Management dialog
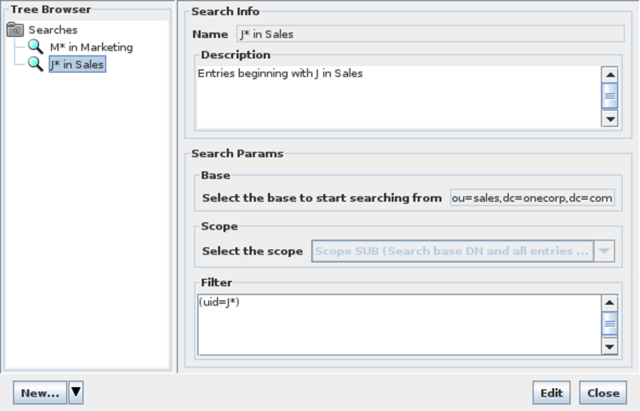
In the Search Management dialog, the panel on the left provides a Tree Browser that allows you to navigate through the different Searches that you have stored. You can Add Folders in order to store your Searches in a more organized fashion, and you can expand these folders in the Tree Browser. You can click on any Search entry in the Tree Browser to view the details for the Search Query within the information panel on the right side of the screen.
To add a new folder, simply click on the node in the Tree Browser that you want to create a folder under, and then click on the New Folder button at the bottom of the dialog window. You will be prompted for a name for the folder and a description. The description is only for information purposes, and is not mandatory. Once you have entered a name for the folder, you can click Save to save the changes.
You can move search entries and folders around within the tree by cutting and pasting them. To do so, right click on any search entry or folder in the Tree Browser, and select the Cut option from the context menu. Then navigate to the folder that you wish to contain the entry, right click, and select the paste option. You can use the 'copy' option in the context menu to duplicate searches in a similar way. Once a search has been duplicated, you can edit it to provide any modifications that you require.
To delete any Search entry, simply right click on the entry in the Tree Browser and then select the Remove option. This will delete the entry and any reference to it stored in the configuration file. You can also Remove folders, but they cannot be deleted if they contain any entries, as a safety precaution.
Any Search Entry or Folder can be edited by clicking on it to select it in the Tree Browser, and then clicking on the Edit button. All of the fields available for the configuration of a search entry will become editable. Once you have made your changes, you will be able to click on the Save button to store your changes. You are able to click the Cancel button to exit out of Edit mode without writing changes.
The Search Management dialog also provides a New Search button which gives you the option of adding a new search from within the dialog. Clicking on this button will present all of the fields required to add a search, as discussed in the previous section.
Finally, double clicking on any Search entry in the Tree Browser will execute the search request.
Bookmarks
Bookmarks offer shortcut functionality to allow you to navigate quickly to a particular point in a Directory Tree or schema. As you add Bookmarks, they will be listed in the Bookmarks menu in the Menu Toolbar. Bookmarks are organized according to connection name, and you are able to create your own folders to store them according to your own particular organizational preference.
When you click on a Bookmark the focus will switch to the entry contained in the bookmark, and any parent container for the entry will be expanded. It is important to note that if you are in a particular Search view, the view will switch back to display the entire Directory Tree, as bookmarks cannot function within Search views.
It is also possible to create a Bookmark for a schema entry, when browsing the schema view. If you click on a Bookmark for a schema entry, the view will switch to the Schema view automatically. Schema Bookmarks are useful when editing entries, as they allow you to quickly check things like an attribute's syntax before committing a change.