The Password Manager for AD LDS Administration Site offers several security options under General Settings > Search and Logon Options > Security Settings. Use these options to:
By default, the toolbar and the logout pop-up of the Self-Service Site display both the display name and the AD LDS domain name where the user is logged in (in the <User Display Name> (<AD LDS domain>) format). For example:
Sam Smith (ADLDS-domain)
If the security policies of your organization require hiding personally identifiable information (PII) on the user interface, you can configure Password Manager for AD LDS to truncate PII on the Self-Service Site, for example as:
S** S**** (ADLDS-domain)
To hide PII on the Self-Service Site for the logged-in users
-
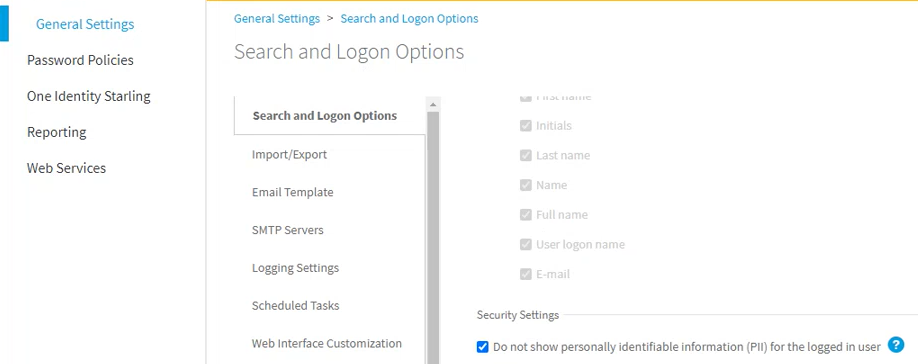
In the Password Manager Administration Site, navigate to General Settings > Search and Logon Options.
-
Scroll down to Security Settings.
-
Enable Do not show personally identifiable information (PII) for the logged in user.
-
To apply the changes, click Save.
Once you are ready, logging in next time to the Self-Service Site with any user will display truncated PII for the logged-in user.
NOTE: The amount of user information truncated by the Do not show personally identifiable information (PII) for the logged in user setting is affected by the configured user account search options described in Configuring Search Options for the Self-Service Site
-
Truncating PII with the Do not allow users to search for their accounts option also selected will truncate the entire expanded PII. For example, setting the Users must enter the following user account attribute... > Self-Service Site sub-setting to mail will result in both the user display name and their email address being truncated. For example, Sam Smith (sam.smith@example.com) will be truncated as:
S** S**** (s********************)
-
Truncating PII with the Allow users to search for their accounts option also selected will truncate only the user name of the logged-in user, but not the name of the AD LDS instance they are connected to. For example:
S** S**** (adlds-instance)
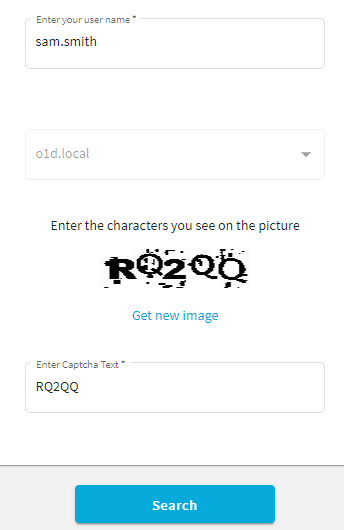
To prevent bot attacks against your Password Manager deployment, you can configure anti-bot security measures for the Find User page of the Self-Service Site. Password Manager supports configuring CAPTCHA images and reCAPTCHA v2 or v3 security solutions.
You can configure the Password Manager for AD LDS Self-Service Site to display CAPTCHA images on the Find User page as an anti-bot security measure.
To configure CAPTCHA images for the Self-Service Site
-
In the Password Manager Administration Site, navigate to General Settings > Search and Logon Options.
-
Scroll down to Security Settings.
-
To enable the CAPTCHA or reCAPTCHA settings, enable Show a security image to prevent bot attacks.
-
To configure the CAPTCHA settings, select Display CAPTCHA and click Settings.
-
In the CAPTCHA Settings dialog, configure the following options:
-
Number of characters: Specify the number of characters (1–15) to display on the generated CAPTCHA image. The default value is 5.
-
Noise level: Specify the number and size of noise artifacts on the generated CAPTCHA image. Higher levels mean more difficult readability.
When ready, click OK.
-
Under Security Settings, select Show a security image every time the search is performed to perform the configured anti-bot protection check each time a search is performed on the Find User page of the Self-Service Site.
TIP: Enable this setting for an increased protection against bot attacks.
-
To apply your settings, click Save.
