
Proxy-less form fill authentication
In proxy-less form fill, Cloud Access Manager attempts to emulate the application's login form with an unsolicited post to the action URL within the login form. Configuring an application in this way involves fewer steps than the form fill authentication method described in Form fill authentication. This example guides you through the steps required to configure single sign-on to an application using the proxy-less form fill authentication method.
Log in to the Administration Console using the desktop shortcut Cloud Access Manager Application Portal, and select Add New from the Applications section on the home page. Cloud Access Manager provides a set of application templates to automatically configure common applications. This example describes how to configure an application manually, rather than using a template.
To configure single sign-on using proxy-less form-fill authentication
- Click Configure Manually.
- Select Form Fill, then click Next.
- If you have not already done so while adding a previous form fill application, save the Inspect Login Form bookmarklet to your browser's favorites. To do this, right-click the Inspect Login Form link. Click Add to favorites.
- Enter the URL of the application into the box provided and click Go, this will take you to the application's login page. If you are taken directly to the application, check that you are not already signed in and if necessary, sign out.
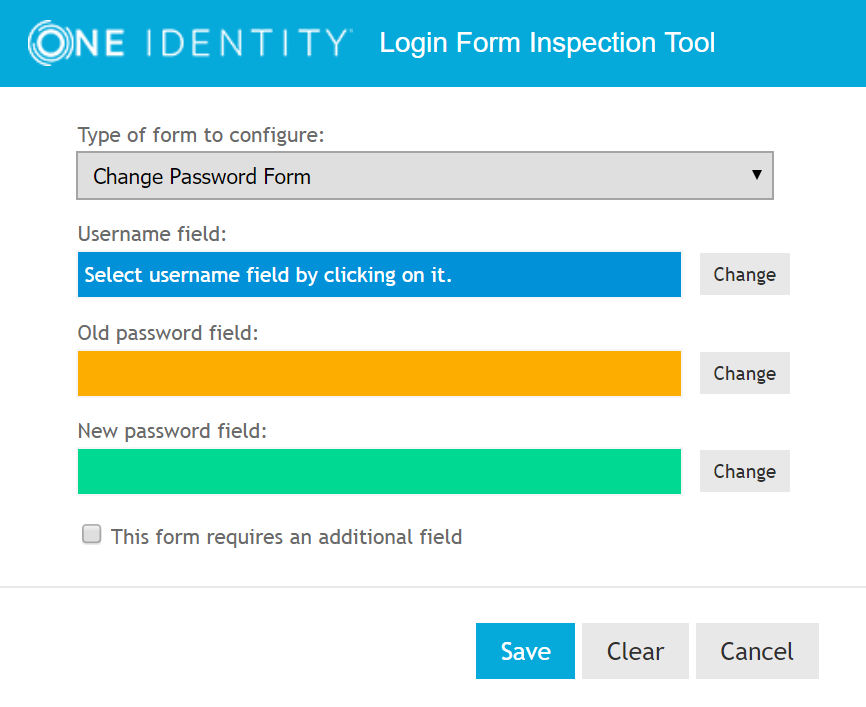
- With the application's login page displayed, click the browser's Favorites icon and click Inspect Login Form. The Cloud Access Manager Login Form Inspection Tool is now displayed in the bottom-right corner of the browser window.
-
Use the tool to obtain the field IDs for the login form. For example, click in the Username field, for example, Domain\user name, then click in the Password field, then finally, click the Submit button, for example, Sign in.
- Review the detected form IDs and click Save to save the form IDs and return to the Cloud Access Manager Configuration wizard.
-
After using the Login Form Inspection Tool to identify the username and password fields, proxy-less form fill does not use the submit button, and action URL, you are presented with the Form Fill Method configuration page, which is where you choose whether or not to proxy the application with Cloud Access Manager.
NOTE: Proxy-less form fill only emulates basic elements of login forms, it is therefore not compatible with login forms that rely on cookies, dynamic hidden variables, session handling functions or view states.
- The next page contains the form fill details (the Username Field ID/Name and Password Field ID/Name) and the Login Form Action URL (the login form’s action URL) configuration detected by the Login Form Inspection Tool.
- The next page enables you to customize permissions for the new application by configuring which Cloud Access Manager Roles have access, by default all users have access.
- Enter a name for the application.
- Choose whether or not to Use primary credentials to log into this application. If selected, this feature will use Active Directory domain credentials rather than a different username or password unique to the application. For example, the same credentials that the user used to authenticate to Cloud Access Manager. For applications that require different credentials make sure this option is left clear.
-
You can now configure how the application is displayed on the Cloud Access Manager Portal. Enter the Title and Description you want to display on the Cloud Access Manager Portal. Many applications will require you to configure a particular entry point, for example for One Identity Active Roles you need to add ARServerAdmin in the URL field of the application portal page.
NOTE: Take care to ensure that the URL entered is unaltered, even down to subtle changes such as character case, in the example for Active Roles Server the URL must be ARServerAdmin.
NOTE: The Add application to application portal home and Allow user to remove application from application portal home options allow you to specify whether the application should appear automatically on each user's portal page, and how the user can manage the application from the application portal. The options are shown in the table below.
Table 4: Application portal options Add application to application portal home Allow users to remove application from application portal home Functionality application is added to the portal and it cannot be removed by the user through the Application Catalog.
application is added to the portal and it can be removed by the user through the Application Catalog.
application is not automatically added to the portal. The user can add or remove the application to/from the portal through the Application Catalog.
To access the application catalog from the application portal, the user simply clicks their username, then selects Application Catalog. Depending on the settings in the Add application to application portal home and Allow user to remove application from application portal home options, the user can add or remove applications to/from the application portal.
- Configuration of the application is now complete. Click Finish.


To verify that the application is configured correctly
- Close Internet Explorer to end your Cloud Access Manager session.
- Open the Cloud Access Manager Portal using the desktop shortcut Cloud Access Manager Application Portal.
-
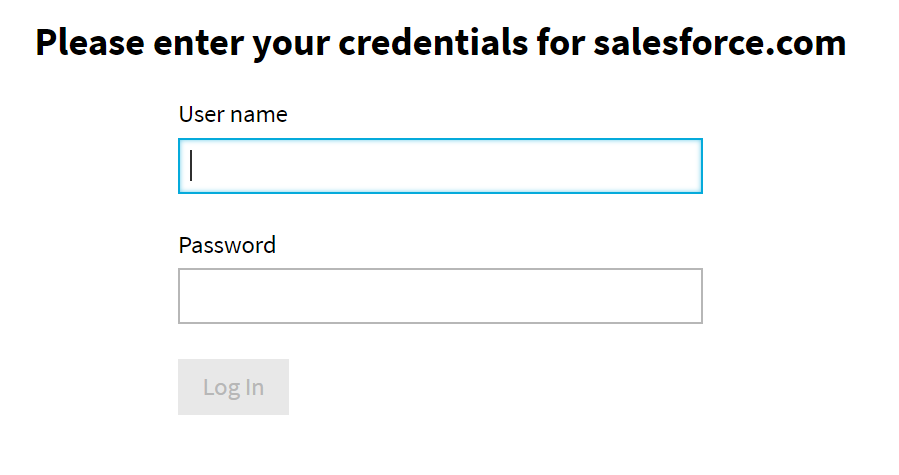
Log in to the Cloud Access Manager Portal and click the application. When a user first accesses an application configured for proxy-less form fill they are presented with a pop-up to enter their login credentials. Cloud Access Manager will then pass the credentials to the application's target URL and store them in the user's Password Wallet for future access.
NOTE: If the user enters invalid credentials, they must be edited in Cloud Access Manager's Password Wallet. The user can access the Password Wallet from the Application Portal with their user ID.
- Enter your credentials into the login page as normal and click Save.
- From the application, click Sign Out and close Internet Explorer.
- Re-open the Cloud Access Manager Portal and log in as the same user.
- Click the application and you are signed in automatically.

Configuration of an application for proxy-less form fill is now complete.
Further considerations
When you have added an application to Cloud Access Manager, you may want to ensure users only access the application using Cloud Access Manager. This may be required if you use Cloud Access Manager to enforce strong authentication for the application, or want to use Cloud Access Manager’s auditing features to monitor application usage. For further information on how to ensure that users access the application using Cloud Access Manager, please refer to Preventing direct access to applications protected by Cloud Access Manager in the One Identity Cloud Access Manager Security and Best Practices Guide.
SAML federation
This example will guide you through the steps required to configure single sign-on for Google Apps service which uses SAML Authentication.
To configure single sign-on for Google Apps service using SAML authentication
-
Log in to the Administration Console using the desktop shortcut Cloud Access Manager Application Portal and select Add New from the Applications section on the home page.
Cloud Access Manager provides a set of application templates to automatically configure common applications. The following example describes how to configure an application manually, rather than using a template.
- Click Configure Manually.
- Select SAML, then click Next.
-
If your service provider provides metadata for configuration, follow the instructions in this step to automatically configure the federation settings in Cloud Access Manager. Otherwise proceed to Step 5 to manually configure the federation settings.
In the Federation Metadata URL field enter the federation metadata URL provided by your service provider. Alternatively, click Browse to locate the file containing federation metadata. Please refer to your service provider’s configuration interface for assistance locating this information.
-
Enter the Recipient value for your SAML application, for example:
https://www.google.com/a/<your_google_domain>/acs for Google Apps service
If your service provider provides multiple Assertion Consumer Service (ACS) endpoints then you can add multiple entries by supplying an Index and Recipient for each entry. Click Add ACS Entry to add a new entry. Select the Default check box for the entry that will be the default if no Assertion Consumer Service URL or Index is specified in the SAML Authentication request.
- Enter the Audience / SP Identity value for your SAML application, for example, google.com for Google Apps™ service.
-
If your service provider supports SAML logout enter the logout URL in the Application Logout URL field.
NOTE: For logout requests to be sent to federated applications you must enable the Log out of federated applications on session termination option in Settings | Configuration Settings.
-
Some service providers sign their SAML Authentication requests or require that SAML Authentication Responses are encrypted. Both of these scenarios require Cloud Access Manager to be configured with a public certificate supplied by the service provider. These certificates can be uploaded using the controls at the bottom of the Federation Settings page.
- If your service provider signs their SAML Authentication requests, click the first Choose File button to upload the certificate used to sign the request. This certificate will then be used by Cloud Access Manager to verify the SAML Authentication requests have come from a trusted source.
- If your service provider requires SAML Authentication responses to be encrypted, click the second Choose File button to upload the certificate used to encrypt the response. This certificate will be used by Cloud Access Manager to encrypt the assertion element of the SAML response. To proceed, click Next.
NOTE: Consult your documentation, or application administrative interface for the values to enter.
- Select Do not proxy this application, then click Next.
-
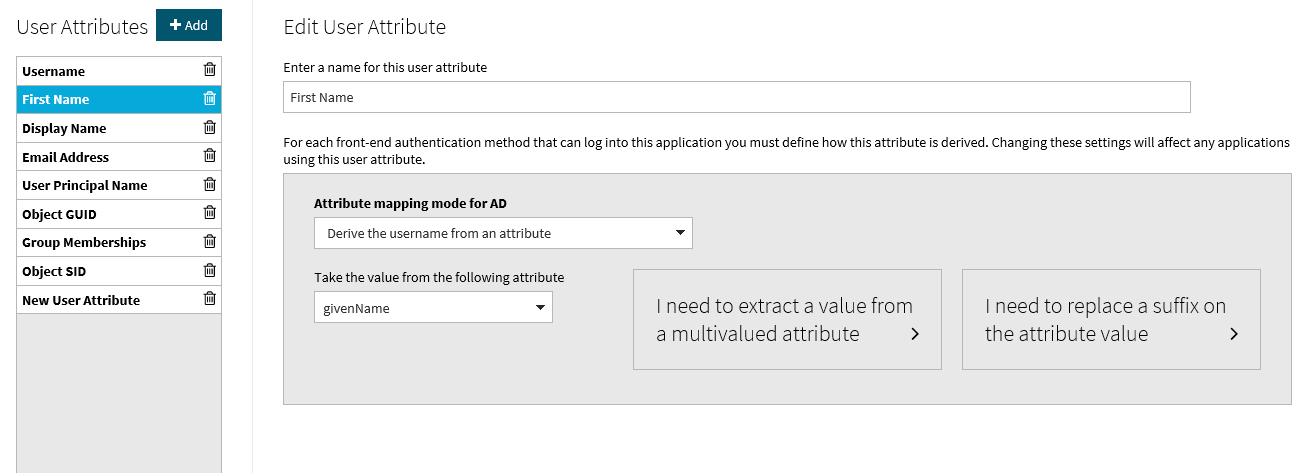
Select the Derive the username from an attribute option and enter an attribute name of mail, then click Next.
NOTE: This option uses the user’s email address stored in Active Directory as their application username, known as the user’s SAML subject. You can change the suffix if required to match your Google domain.
NOTE: Cloud Access Manager allows users to request their own application accounts. If the user is in a group that is authorized to access a particular application, the user can have a user account automatically created for them as they select it from their application catalog and add it to their portal page.
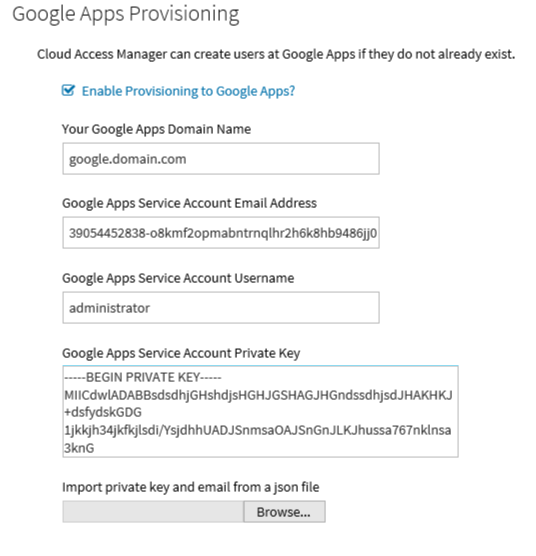
Cloud Access Manager includes directory connectors, which allow user accounts to be provisioned from Cloud Access Manager into Google Apps service, Salesforce.com and Microsoft Office 365. When a user adds an application to their portal page by selecting it from their application catalog, Cloud Access Manager automatically checks whether they already have a user account in that application’s directory. If the user does not, then an account is created for him or her through one of its directory connectors.
The following three steps are for just-in-time provisioning of users and will only be displayed for applications for which Cloud Access Manager can provision users, such as Google Apps and Salesforce.
-
Enter the credentials of a user account to provision new user accounts. Use the Test Connection button to validate the credentials before clicking Next.
-
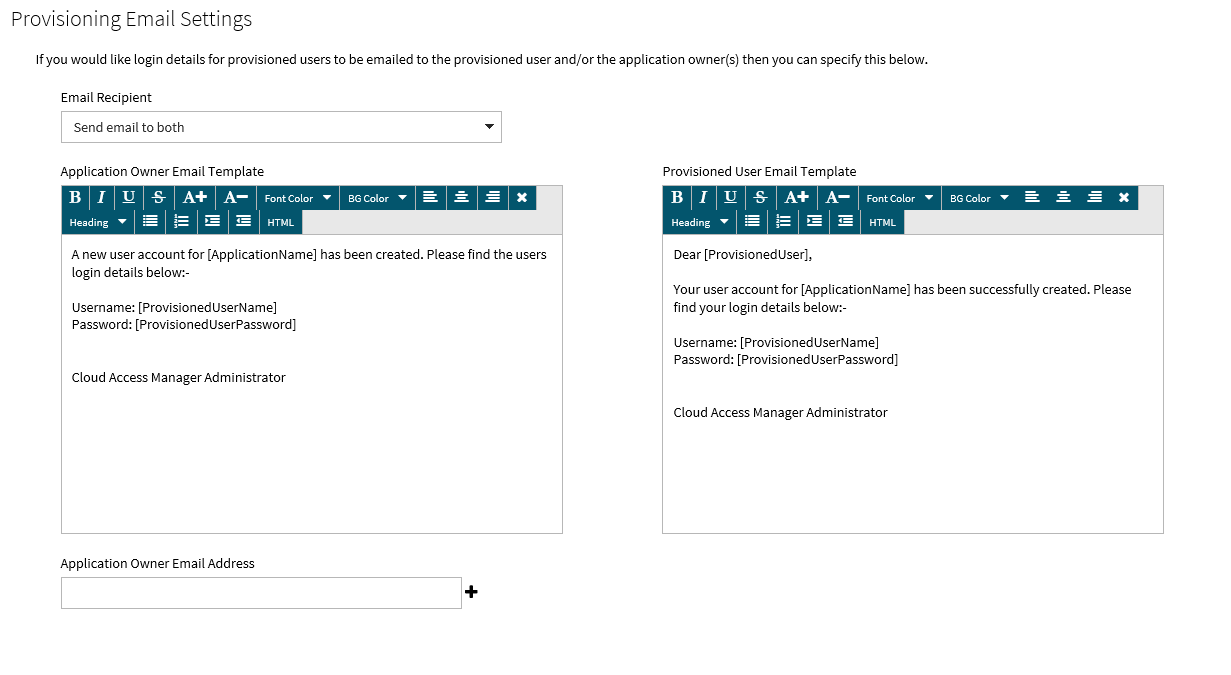
Select who will receive an email when a new account is provisioned and enter the text to include in the email.
-
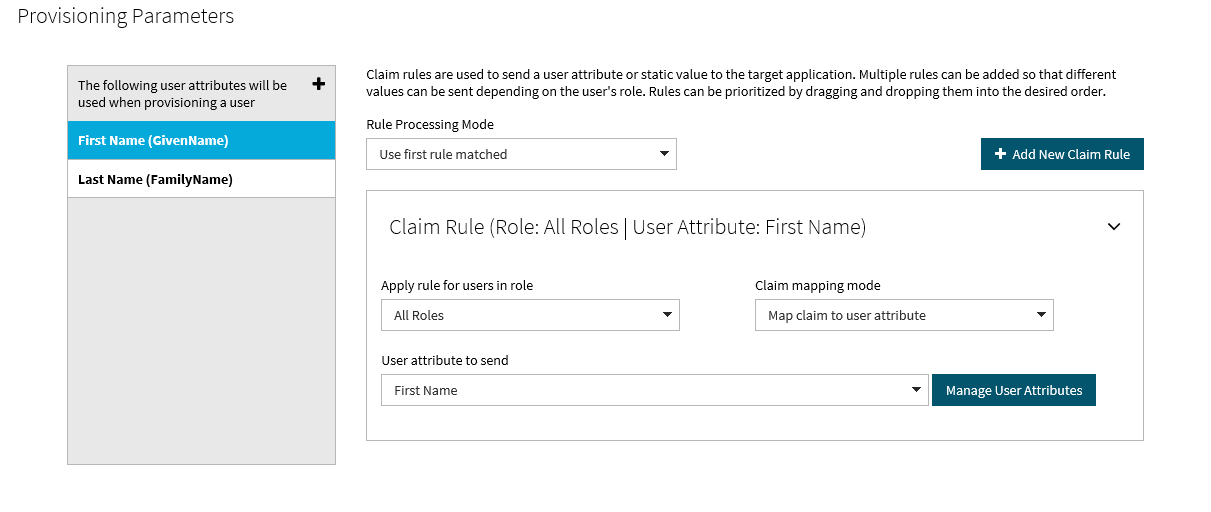
In order to provision a user, the application will typically require a number of provisioning parameters to be defined. For example, Google Apps requires the user’s first and last name. For each parameter, configure a claim rule to map the provisioning parameter to a user attribute containing the required value. For example, add a claim called Last Name, where its value is derived from the Active Directory user attribute sn.
NOTE: There is an 8 character limit on the Alias provisioning parameter. However, there is no such limit on the sAMAccountName attribute that the Salesforce template maps Alias to by default. This results in a failure to provision any user who has a sAMAccountName of greater than 8 characters.
We recommend that either your Salesforce users are limited to a sAMAccountName of 8 characters or less, or the mapping of the Alias field is changed to use a different attribute that does meet this criteria. This is not limited to Salesforce, and can occur for any application that uses the Alias parameter for provisioning. In addition, using mapped attributes with NULL values will also result in a provisioning failure.
NOTE: If the application you are provisioning provides a user provisioning API, please refer to Manual user provisioning.
- Click Next to continue.
- You will now see the Permissions page, which enables you to control the users who can access the application. By default, all Active Directory users have access to the application. You can restrict access to the application to users who belong to a specific Active Directory security group, but for this demonstration deployment, simply click Next to allow all Active Directory users access to the application.
- Enter an Application Name, for example, Google Apps, then click Next.
- You can now configure how the application is displayed on the Cloud Access Manager Portal. Enter the Title and Description you want to display on the Cloud Access Manager Portal.
- Enter the URL that you want your users to be initially logged in to, for example https://mail.google.com/a/<your_google_domain>
- Click Fetch icon from application to locate and display the icon of the application.
- Click Finish to complete the configuration of the application.
-
Click Download Certificate to download the certificate created by Cloud Access Manager to import into your SAML application. In addition, make a note of the Issuer/IDP Service URL as this may be required by your SAML application. Click Close.
NOTE: The Add application to application portal home and Allow user to remove application from application portal home options allow you to specify whether the application should appear automatically on each user’s portal page, and how the user can manage the application from the application portal. The options are shown in the table below.
Table 5: Application portal options Add application to application portal home Allow users to remove application from application portal home Functionality application is added to the portal and it cannot be removed by the user through the application catalog.
application is added to the portal and it can be removed by the user through the application catalog.
application is not automatically added to the portal. The user can add or remove the application to/from the portal through the application catalog.
To access the application catalog from the application portal, the user simply needs to click their username, then select Application Catalog. Depending on the settings in the Add application to application portal home and Allow user to remove application from application portal home options, the user can add or remove applications to/from the application portal.
Cloud Access Manager configuration is now complete.
To configure your Google Apps account to authenticate your users using SAML
- Log in to your Google account using your Google administrator credentials. For example, log in using the following URL: https://www.google.com/a/<your_google_domain>
- Click Advanced Tools.
- Click Set up Single Sign-on (SSO).
- Select Enable Single-Sign-on.
-
Enter the Cloud Access Manager Issuer/IDP Service URL that you noted in Step 21, into the Sign-in page URL and Change password URL fields. For example, enter:
https://CloudAccessManager.democorp.local/CloudAccessManager/RPSTS/Saml2/ Default.aspx
-
In the Sign-out page field, enter the URL:
https://CloudAccessManager.democorp.local/CloudAccessManager
- From the Verification certificate section, click Browse. Navigate to the Cloud Access Manager certificate obtained in the previous section, then click Upload.
- Click Save Change.
For information on how to use the user mapping tool, please refer to the guide entitled One Identity Cloud Access Manager How To Configure User Mapping.
To verify that the application is configured correctly
- Close Internet Explorer to end your Cloud Access Manager session.
- Use the desktop shortcut Cloud Access Manager Application Portal to open the Cloud Access Manager portal.
- Browse to the Application Catalog and add the Google Apps application to the application portal.
- Browse to the Application Portal and click the Google Apps application. You are signed in automatically.
Configuration of Google Apps for SSO is now complete.
Configuring advanced SAML token settings
In most situations the SAML token produced by Cloud Access Manager in response to an authentication request is accepted by the service provider. If the service provider has special requirements for the way the token is configured then you may modify the token options on the SAML Token Settings tab for the application.
Any settings changed on this page will only affect the selected application.
|
|
NOTE: To change the settings for all SAML applications, follow these steps:
|
For a description of the available configuration options, please refer to the table below.
|
|
NOTE: The settings for an individual application take precedence over global settings. |
| Name | Description | Default |
|---|---|---|
|
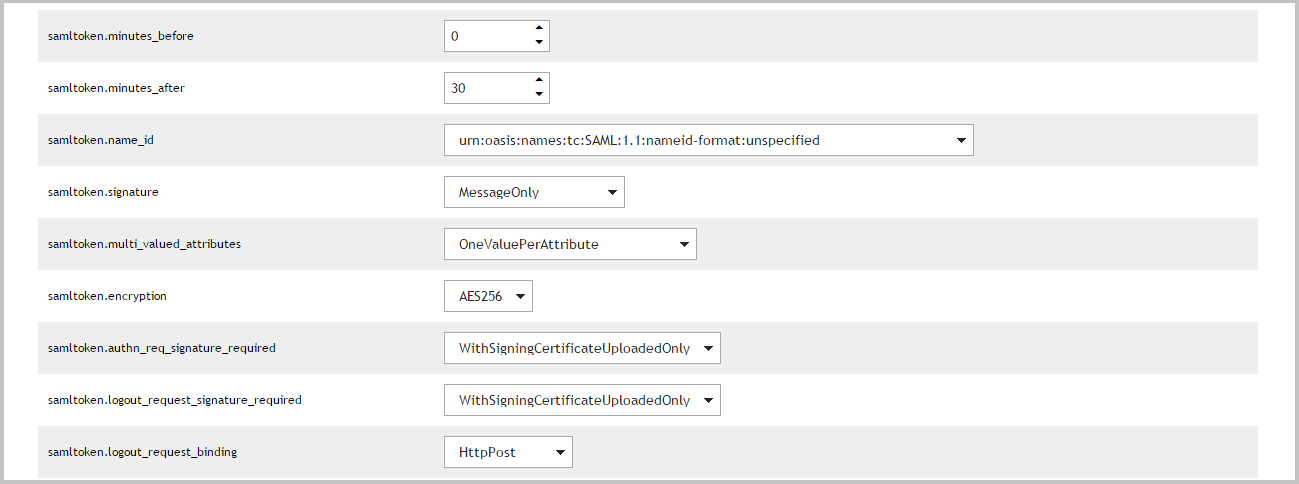
samltoken.minutes_before |
The number of minutes before the token IssueInstant to set the NotBefore attribute in the Conditions element. |
0 minutes |
|
samltoken.minutes_after |
The number of minutes after the token IssueInstant to set the NotOnOrAfter attribute in the Conditions and SubjectConfirmationData elements. |
30 minutes |
|
samltoken.name_id |
The value of the Format attribute of the NameID element in the Subject. |
urn:oasis:names:tc:SAML:1.1:nameid-format:unspecified |
|
samltoken.signature |
How the SAML token is signed. There are three options:
|
MessageOnly |
|
samltoken.multi_valued_attributes |
How attributes with multiple values are output in the SAML token. There are two options:
<Attribute Name="urn:example/role" NameFormat="urn:oasis:names:tc:SAML:2.0:attrname-format:uri"> <AttributeValue>CN=Staff,CN=Users,DC=democorp,DC=co,DC=uk</AttributeValue> </Attribute> <Attribute Name="urn:example/role" NameFormat="urn:oasis:names:tc:SAML:2.0:attrname-format:uri"> <AttributeValue>CN=Administrators,CN=Users,DC=democorp,DC=co,DC=uk</AttributeValue><AttributeValue> </Attribute>
<Attribute Name="urn:example/role" NameFormat="urn:oasis:names:tc:SAML:2.0:attrname-format:uri"> <AttributeValue>CN=Staff,CN=Users,DC=democorp,DC=co,DC=uk</AttributeValue> <AttributeValue>CN=Administrators,CN=Users,DC=democorp,DC=co,DC=uk</AttributeValue><AttributeValue> </Attribute> |
OneValuePerAttribute |
|
samltoken.encryption |
How the Assertion element is encrypted, there are two options: AES256 - Encryption algorithm: AES256, encryption key: RSA-OAEP AES128 - Encryption algorithm: AES128, encryption key: RSAES-PKCS1-v1_5, key length: 128 |
AES256 |
|
samltoken.authn_req_signature_required |
When the authentication request is expected to be signed. There are two options:
|
WithSigningCertificateUploadedOnly |
|
samltoken.logout_request_signature_required |
When the logout request is expected to be signed. There are two options:
|
WithSigningCertificateUploadedOnly |
|
samltoken.logout_request_binding |
The binding that will be used when sending logout requests to the application. Select Disabled to not send logout requests. |
HttpPost |