Use the Send on behalf of send permission to specify which users can send messages on behalf of the distribution group.
To customize send permissions for dynamic distribution groups
-
In the Manager, select the Active Directory > Exchange system administration > <Organization> > Recipient configuration > Dynamic distribution groups category.
-
Select the dynamic distribution list in the result list.
-
Select the Assign send authorizations task.
-
Select the table which contains the user from the menu at the top of the form. You have the following options:
-
In the Add assignments pane, assign users.
TIP: In the Remove assignments pane, you can remove assigned users.
To remove an assignment
-
Save the changes.
You can add dynamic distribution groups to mail-enabled distribution groups.
To add a dynamic distribution group to mail-enabled distribution groups
-
In the Manager, select the Active Directory > Exchange system administration > <Organization> > Recipient configuration > Dynamic distribution groups category.
-
Select the dynamic distribution group in the result list and run the Assign distribution groups task.
-
In the Add assignments pane, assign the distribution groups.
TIP: In the Remove assignments pane, you can remove distribution groups assignments.
To remove an assignment
- Save the changes.
Related topics
Mail-enabled public folders are loaded into the One Identity Manager database by synchronization and cannot be edited in One Identity Manager.
To display mail-enabled public folders
-
In the Manager, select the Active Directory > Exchange system administration > <Organization> > Recipient configuration > Mail-enabled public folders category.
-
Select the mail-enabled distribution group in the result list.
-
Select the Change main data task.
To display mail acceptance for mail-enabled public folders
-
In the Manager, select the Active Directory > Exchange system administration > <Organization> > Recipient configuration > Mail-enabled public folders category.
-
Select the mail-enabled distribution group in the result list.
-
Select the Assign mail acceptance task to display recipients whose messages are accepted.
- OR -
Select the Assign mail rejection task to display recipients whose messages are rejected.
To display the sent permission for a mail-enabled public folder
-
In the Manager, select the Active Directory > Exchange system administration > <Organization> > Recipient configuration > Mail-enabled public folders category.
-
Select the mail-enabled distribution group in the result list.
-
Select the Assign send permissions task.
Table 40: Mail-enabled public folder main data
|
Exchange organization |
Name of the organization. |
|
Public Folder |
Connected public folder. |
|
Name |
Name of the mail-enabled public folder. |
|
Alias |
Unique alias for further identification of the mail-enabled public folder. |
|
Display name |
Display name of the mail-enabled public folder. |
|
Simple display |
Simple display name for systems that cannot interpret all the characters of normal display names. |
|
Domain |
Active Directory domain of the mail-enabled public folder. |
|
Container |
Active Directory container of the mail-enabled public folder. |
|
Proxy addresses |
Other email addresses for the mail-enabled public folder. |
|
Email address |
Email address of the mail-enabled public folder. |
|
Alternative recipient |
Alternative recipient to which messages from this mail-enabled public folder are forwarded. |
|
Do not display in address list |
Specifies whether the mail-enabled public folder is visible in address books. Set this option if you want to prevent the mail-enabled public folder from being displayed in address books. This option applies to all address books. |
|
Max. send size [KB] |
Maximum size of message in KB that a mail-enabled public folder can send. The Microsoft Exchange organization global settings in the Exchange System Manager come into effect for message delivery if there are no limitations. |
|
Max. send size [KB] |
Maximum size of message in KB that a mail-enabled public folder can receive. The Microsoft Exchange organization global settings in the Exchange System Manager come into effect for message delivery if there are no limitations. |
|
Send and forward |
Specifies whether to send and forward messages. If this option is set, messages are sent to alternative recipients and mailbox owners. |
NOTE: The following modules must be installed to support Exchange hybrid:
NOTE: You cannot move mailboxes between local Microsoft Exchange and Exchange Online with One Identity Manager. Microsoft offers migration scenarios for moving mailboxes. For more information, see your Microsoft documentation.
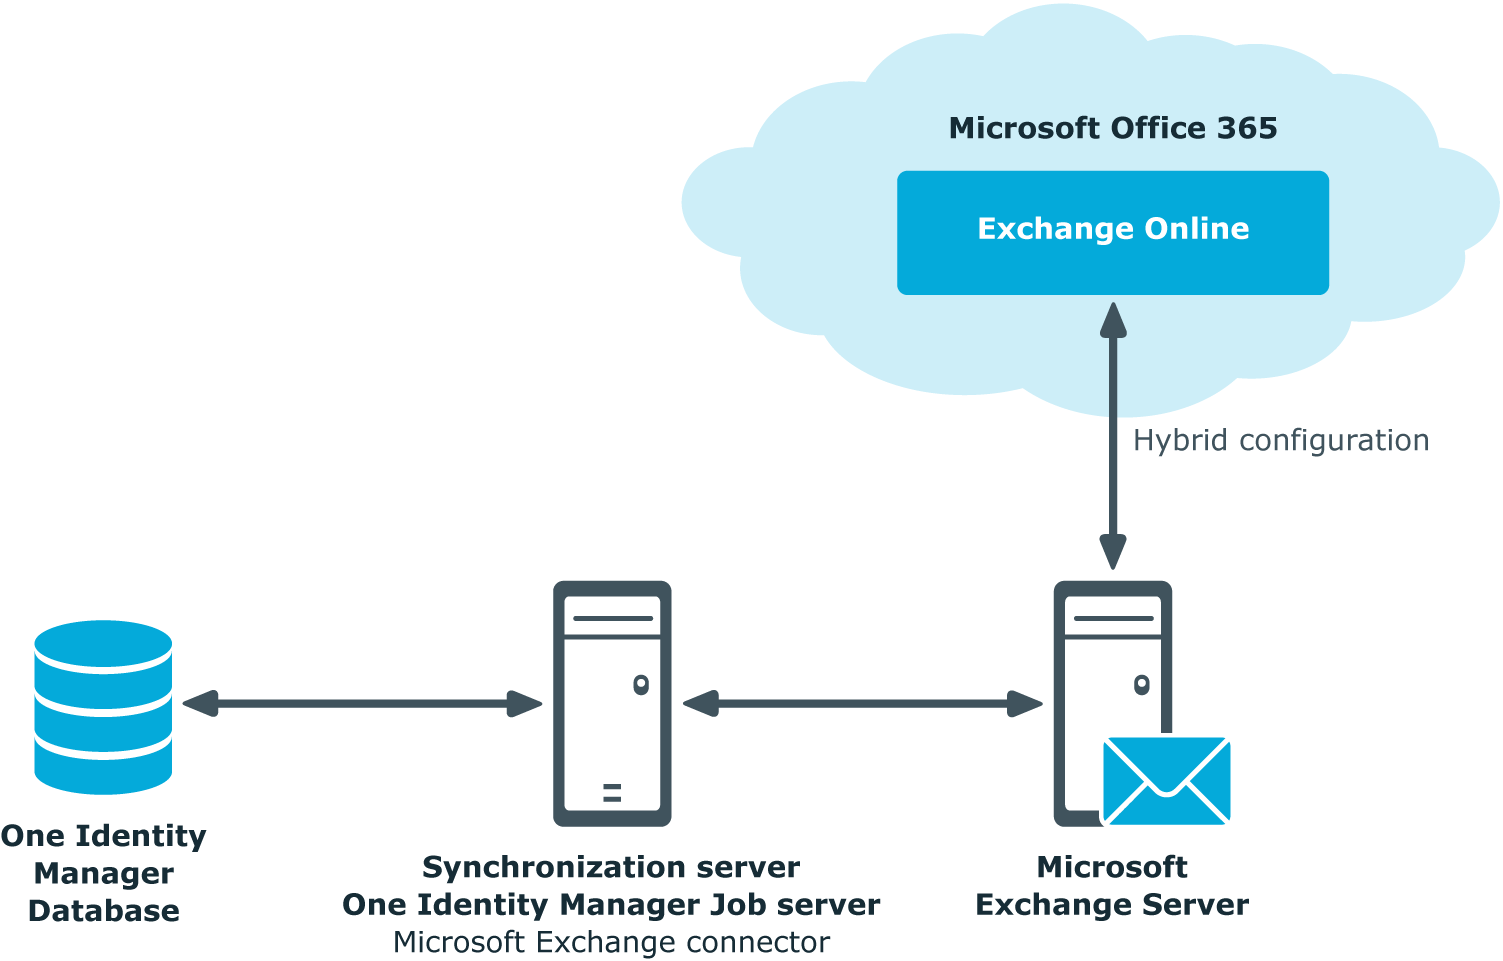
One Identity Manager support creating, editing, and deleting of remote mailboxes in Exchange hybrid. Remote mailboxes are mailboxes that are declared in the local Microsoft Exchange environment but were added in an Exchange Online environment.
There are the following different types of remote mailboxes:
-
Remote mailbox
-
Remote room mailbox
-
Remote equipment mailbox
-
Remote shared mailbox
These mailboxes can be added to distribution lists or be given sending limits in the local Microsoft Exchange environment, for example.
The synchronization server running the Microsoft Exchange connector is responsible for synchronizing remote mailboxes. The other target system involved (Active Directory, Microsoft Exchange, Azure Active Directory, and Exchange Online) must be synchronized in order to access remote mailboxes.
Figure 2: Architecture for synchronization

Detailed information about this topic
.

