-
Título
How to Run the Delegation Wizard and Delegate Defender Permissions -
Descripción
What are the correct steps that can be used to Delegate Defender permissions or roles out to Users or Groups in Active Directory? -
Resolución
To delegate Defender control to user accounts or groups within Active Directory, please follow the below steps:
1. Open Active Directory Users and Computers on a workstation that has the Defender Administration Console installed.
a. If the Defender Administration Console is not installed, please download the latest software here.
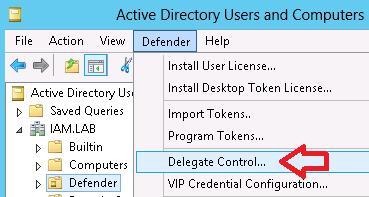
2. Select the “Defender” Organizational Unit (OU) to activate the “Defender” Menu item.
3. Click “Defender” | “Delegate Control…” from the Menu bar.
4. The “Defender Delegated Administration Wizard” should now be displayed.
5. On the “Users and Groups” page, select the Users or Groups that Defender control is to be delegated for, and click “Next”.
a. For example, this could be Helpdesk Users, Defender Administrators or Service Accounts.6. On the “Tasks to Delegate” page, select the Roles or Permissions that are to be delegated to the user accounts, and click “Next”.
a. Please note you can only delegate one set or Roles or Permissions at a time.
i. For example, Administrators and Helpdesks would need to be delegated by running the wizard twice, once for each type of delegation.7. The “User Locations” page of the wizard is now displayed. Select the locations containing the user accounts or specific user account that will be managed, and click “Next”.
8. The “Defender Object Locations” page is now displayed. The Default location for the object is selected, if during the initial install this was changed (or the location was moved) select the correct location and click “Next”.
9. A summary is displayed to confirm the changes that have been made. If correct, click “Finish”.
10. Wait for, or force replication between Active Directory Domain Controllers, so that the changes are correctly propagated within the domain.
