Chatee ahora con Soporte
Chat con el soporte

syslog-ng Premium Edition 7.0.31 - Windows Event Collector Administration Guide

Installing the Windows Event Collector

The Windows Event Collector (WEC) is bundled into the syslog-ng PE installers from version 7.0.6 onward and is installed automatically. By installing syslog-ng PE, you also install WEC. A systemd service file is provided, however, syslog-ng-wec is not registered to start at boot.

To install the Windows Event Collector

To start syslog-ng-wec at boot, register the init script using the systemctl enable syslog-ng-wec command.

For details on how to start syslog-ng-wec manually, see Starting/stopping Windows Event Collector.

Generating SSL certificates for Windows Event Collector

NOTE: Perform the procedure described in this section only if you want to use certificate-based authentication between Windows Event Forwarding (WEF) and Windows Event Collector (WEC).

When the Windows-based host and WEC start communicating for the first time, they authenticate each other by exchanging and verifying each other's certificates. The process begins with the Windows host requesting and verifying the WEC tool's certificates. After successful verification, the Windows host sends its own certificates for verification to WEC.

NOTE: If the Windows host fails to authenticate the WEC tool's certificates for some reason, check the Windows event logs for details.

For details on which event logs to look at, see Troubleshooting Windows Event Collector.

The example described in this section uses OpenSSL for certificate generation. Note, however, that you can generate certificates using the Windows Public Key Infrastructure (PKI).

Caution:

The examples in this section illustrate the creation of certificates with a default value of 365 days for expiration. However, most deployments remain operational for several years, so refreshing your certificates every 365 days is unnecessary. To avoid refreshing your certificates every year, One Identity recommends that you setup your host certificates with an expiration time longer than the default value of 365 days (as seen in the examples).

To generate the SSL certificates for WEC, complete the following steps:

NOTE: The following configuration example works only if you have a functioning DNS server in your network. If you want to test WEC without a properly working DNS server, instead of host names, work with IP addresses in certificates and configurations. For an example configuration, see Creating certificates/Collecting Windows EventLog without installing extra software on Windows.

To generate SSL certificates for Windows Event Collector

  1. Create two certificate template files for both the server and the clients.

    NOTE: The templates shown here are examples only. Not all elements of the example *opts.cnf files are mandatory, for example, you do not need to define two DNS instances.

    The contents of server-certopts.cnf:

    [req]
    default_bits = 4096
    default_md = sha256
    req_extensions = req_ext
    keyUsage = keyEncipherment,dataEncipherment
    basicConstraints = CA:FALSE
    distinguished_name = dn
    
    [ req_ext ]
    subjectAltName = @alt_names
    extendedKeyUsage = serverAuth,clientAuth
    
    [ alt_names ]
    DNS.1 = <1st DNS hostname of server (preferably FQDN)>
    ...
    DNS.<N> = <Nth DNS hostname of server (preferably FQDN)>
    IP.1 = <1st IP of server>
    ...
    IP.<N> = <Nth IP of server>
    
    [dn]
    Example: Contents of server-certopts.cnf
    [req]
    default_bits = 4096
    default_md = sha256
    req_extensions = req_ext
    keyUsage = keyEncipherment,dataEncipherment
    basicConstraints = CA:FALSE
    distinguished_name = dn
    
    [ req_ext ]
    subjectAltName = @alt_names
    extendedKeyUsage = serverAuth,clientAuth
    
    [ alt_names ]
    DNS.1 = windowseventcollector.widgits
    DNS.2 = wec.widgits
    IP.1 = 10.64.10.2
    
    [dn]

    The contents of client-certopts.cnf:

    [req]
    default_bits = 4096
    default_md = sha256
    req_extensions = req_ext
    keyUsage = keyEncipherment,dataEncipherment
    basicConstraints = CA:FALSE
    distinguished_name = dn
    
    [ req_ext ]
    subjectAltName = @alt_names
    extendedKeyUsage = serverAuth,clientAuth
    
    [ alt_names ]
    DNS.1 = <1st DNS hostname of client (preferably FQDN)>
    ...
    DNS.<N> = <Nth DNS hostname of client (preferably FQDN)>
    IP.1 = <1st IP of client>
    ...
    IP.<N> = <Nth IP of client>
    
    [dn]
    Example: Contents of client-certopts.cnf
    [req]
    default_bits = 4096
    default_md = sha256
    req_extensions = req_ext
    keyUsage = keyEncipherment,dataEncipherment
    basicConstraints = CA:FALSE
    distinguished_name = dn
    
    [ req_ext ]
    subjectAltName = @alt_names
    extendedKeyUsage = serverAuth,clientAuth
    
    [ alt_names ]
    DNS.1 = windowsclient01.widgits
    DNS.2 = client01.widgits
    IP.1 = 10.64.10.11
    
    [dn]
  2. Generate the certificate authority (CA):

    $ openssl genrsa -out ca.key 4096
    
    $ openssl req -x509 -new -nodes -key ca.key -days 3650 -out ca.crt -subj '<subject name for CA cert (must be formatted as /type0=value0/type1=value1/type2=..., characters may be escaped by \ (backslash), no spaces are skipped)>'
    Example: Generating certificate authority (CA)
    $ openssl genrsa -out ca.key 4096
    
    $ openssl req -x509 -new -nodes -key ca.key -days 3650 -out ca.crt -subj '/C=AU/ST=Victoria/L=Melbourne/O=Internet Widgits Pty Ltd/OU=Operations/CN=Operations Root CA'

    Place a copy of the ca.crt file in a directory of your choice. Take a note of the directory because you need to reference it in the cadir option of the WEC configuration file. For more information, see Configuring Windows Event Collector.

  3. Save the thumbprint of the CA:

    $ openssl x509 -in ca.crt -fingerprint -sha1 -noout | sed -e 's/\://g'

    You will need the fingerprint to configure the event source computers that send log messages to Windows Event Collector. For details, see Configuring certificate-based authentication on event source computers.

  4. Create the server certificate:

    NOTE: The Common Name must be the FQDN (or IP address) of the Windows Event Collector server.

    $ openssl req -new -newkey rsa:4096 -nodes -out server.csr -keyout server.key -subj '<subject name for server cert (must be formatted as /type0=value0/type1=value1/type2=..., characters may be escaped by \ (backslash), no spaces are skipped)>'
    
    $ openssl x509 -req -in server.csr -out server.crt -CA ca.crt -CAkey ca.key -CAcreateserial -extfile server-certopts.cnf -extensions req_ext -days 365
    Example: Creating the server certificate
    $ openssl req -new -newkey rsa:4096 -nodes -out server.csr -keyout server.key -subj '/C=AU/ST=Victoria/L=Melbourne/O=Internet Widgits Pty Ltd/OU=Operations/CN=windowseventcollector.widgits'
    
    $ openssl x509 -req -in server.csr -out server.crt -CA ca.crt -CAkey ca.key -CAcreateserial -extfile server-certopts.cnf -extensions req_ext -days 365
  5. Create the certificates for the clients:

    NOTE: The Common Name must be the FQDN (or IP address) of the client.

    $ openssl req -new -newkey rsa:4096 -nodes -out client.csr -keyout client.key -subj '<subject name for client cert (must be formatted as /type0=value0/type1=value1/type2=..., characters may be escaped by \ (backslash), no spaces are skipped)>'
    
    $ openssl x509 -req -in client.csr -out client.crt -CA ca.crt -CAkey ca.key -CAcreateserial -extfile client-certopts.cnf -extensions req_ext -days 365
    Example: Creating the certificates for the clients
    $ openssl req -new -newkey rsa:4096 -nodes -out client.csr -keyout client.key -subj '/C=AU/ST=Victoria/L=Melbourne/O=Internet Widgits Pty Ltd/OU=Operations/CN=windowsclient01.widgits'
    
    $ openssl x509 -req -in client.csr -out client.crt -CA ca.crt -CAkey ca.key -CAcreateserial -extfile client-certopts.cnf -extensions req_ext -days 365
  6. Export the certificates of the clients to the format recognized by the Windows Certificate Manager tool.

    $ openssl pkcs12 -export  -inkey client.key -in client.crt -certfile ca.crt -out client.p12

Configuring certificate-based authentication on event source computers

NOTE: Perform the procedure described in this section only if you want to use certificate-based authentication between Windows Event Forwarding (WEF) and Windows Event Collector (WEC).

Prerequisites

Microsoft Windows 8 or newer, up to Windows Server 2022

When collecting event logs from Windows hosts, the Windows clients sending logs act as the event source computers. The WEC tool collects and forwards messages from the standard Windows eventlog containers.

There is no restriction on the number of Windows hosts that can connect to the Windows Event Collector.

To configure your event sources, complete the following steps.

To configure event source computers

  1. Open the Microsoft Management Console (mmc.exe), select File > Add/Remove Snap-ins, and add the Certificates snap-in.

  2. Select Computer Account.

  3. Right-click the Personal node, and select All Tasks > Import.

  4. Find and select the client certificate (client*.p12) and import this file.

  5. The PKCS #12 archive contains the CA certificate as well. Move the CA certificate to the Trusted Root Certification Authorities node after the import.

    NOTE: Make sure that you only move the CA certificate and not the client certificate.

  6. Give NETWORK SERVICE access to the private key file of the client authentication certificate:

    NOTE: Make sure that you modify the access rights of only the private key file of the client certificate and not the CA certificate.

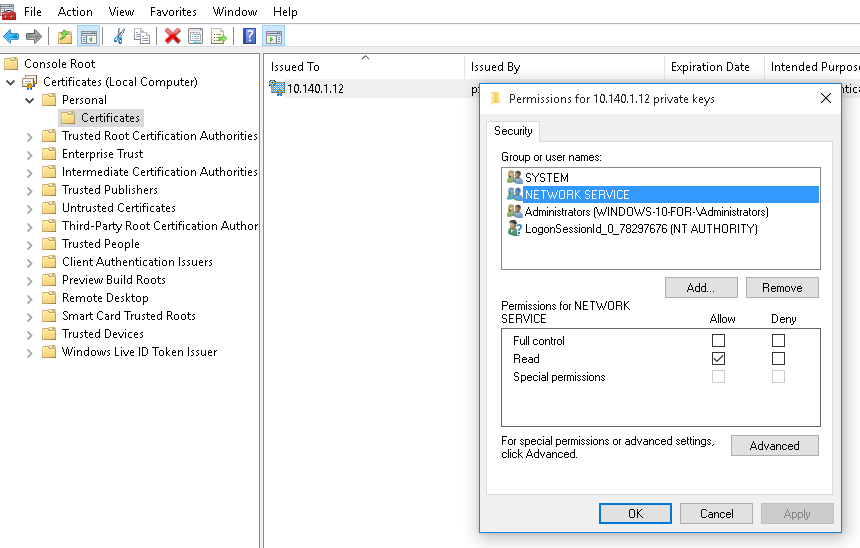
    1. In certmgr, right-click the client certificate, select All Tasks > Manage Private Keys....

    2. Add read permission to NETWORK SERVICE.

      Figure 2: Adding read permission to NETWORK SERVICE

  7. To forward security logs:

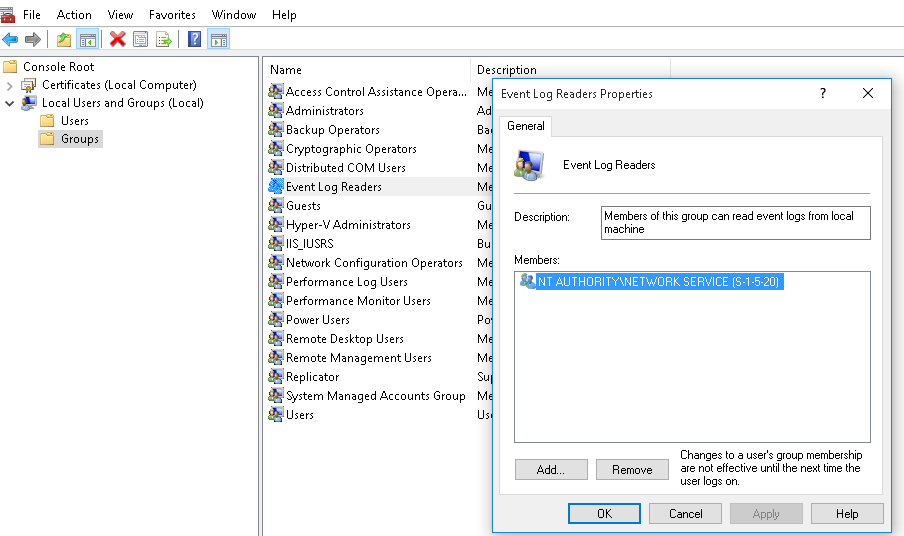
    1. In CompMgmt.msc, under Local Users and Groups, click Groups > Event Log Readers to open Event Log Readers Properties.

      NOTE: If the Windows host is a domain controller, the Local Users and Groups option does not work. In this case, use Active Directory Users and Computers, select the name of your domain, and after that, select Builtin. In the right-side panel, you can modify the Event Log Reader group.

    2. Add the NETWORK SERVICE account to the Event Log Readers group.

      Figure 3: Adding the NETWORK SERVICE account to the Event Log Readers group.

    3. Reboot the client computer.

  8. Run the following commands from an elevated privilege command prompt:

    winrm qc -q
    winrm set winrm/config/client/auth @{Certificate="true"}
    
  9. Open gpedit.msc.

  10. Under the Computer Configuration node, expand the Administrative Templates node, then expand the Windows Components node, and then select the Event Forwarding node.

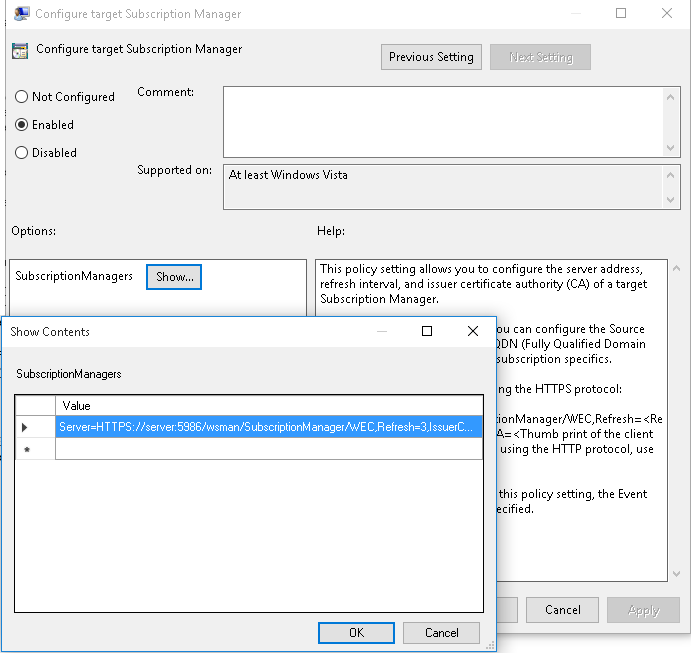
  11. Select the SubscriptionManagers setting and enable it. Click the Show button to add a subscription (Generating SSL certificates for Windows Event Collector).

    Use the FQDN of your WEC server in the URL, or, you can also use the IP address. Make sure that the name or the IP address that you use matches the common name in the certificate of the WEC server.

    Server=https://<FQDN of the collector>:5986/wsman/SubscriptionManager/WEC,Refresh=<Refresh interval in seconds>,IssuerCA=<Thumbprint of the root CA>
    Example: Subscription using the FQDN of the WEC server
    Server=HTTPS://wec.balabit:5986/wsman/SubscriptionManager/WEC,Refresh=60,IssuerCA=A814E609311FD3A89FFD0297974524E4F2D2BA9D
    

    Figure 4: Adding the subscription in SubscriptionManagers

    NOTE: If you want to configure multiple subscriptions because you want to forward Windows events to multiple event collectors (such as WEC), then you can do that here.

Configuring Kerberos authentication on Windows Server (DC) hosts

This section describes the prerequisites and the configuration procedure for Windows Server (DC) hosts to use Kerberos-based authentication between Windows Event Forwarding (WEF) and WEC.

To configure Windows Server (DC) hosts for Kerberos authentication
  1. Install Active Directory Domain Services.

    For more information, see Install Active Directory Domain Services (Level 100)/docs.microsoft.com.

  2. If Windows domain clients do not exist yet, join them to the domain.

    For more information, see Join a Computer to a Domain/docs.microsoft.com.

  3. To make the Linux host reachable from all Windows hosts, register the configured FQDN for the Linux host in the Active Directory DNS Manager.

  4. To communicate with Kerberos, in Windows Domain Controller, create a domain user whose password never expires.

  5. In User properties, in Account tab > Account options, set Kerberos AES-128 bit and Kerberos AES-256 bit encryption support for the domain user that you created in the previous step.

  6. From the console, run the following command to map the Service Principal Name (SPN) with a domain user and to generate a keytable file (also called keytab file) output to communicate with Kerberos. Run it as an administrator, or as a user with elevated rights, for example, as root.

    Example: Mapping SPN with a domain user and generating a keytab file

    This command maps the SPN with the root domain user and generates a keytab at C:\kerberos_shared\linux_service_account.keytab to communicate with Kerberos.

    Command:

    ktpass.exe -out C:\kerberos_shared\linux_service_account.keytab -princ http/<linux_host_fqdn>@<kerberos_realm> -mapUser <DOMAIN_NETBIOS_NAME_in_UPPER_CASE>\<domain_user> -pType KRB5_NT_PRINCIPAL -crypto AES256-SHA1 -pass '<domain-user-password-as-string>'

    Example:

    ktpass.exe -out C:\kerberos_shared\linux_service_account.keytab -princ http/testlinuxhost.testdomain.com@TESTDOMAIN.COM -mapUser TESTDOMAIN\root -pType KRB5_NT_PRINCIPAL -crypto AES256-SHA1 -pass 'Passw@rD123'

    For more information on the ktpass command, see ktpass/docs.microsoft.com.

    For more information on the setspn command, see Setspn/docs.microsoft.com.

    For more information on the keytab file, see keytab/MIT Kerberos Documentation.

  7. Check whether the command ran successfully.

    • Verify if the output keytab file is generated.

    • Verify if the SPN is mapped with the domain user.

      Example: Checking whether the SPN is mapped with the domain user

      The following command lists the SPN that is mapped to the root user in testdomain.

      Command:

      setspn.exe -L <DOMAIN_NETBIOS_NAME_in_UPPER_CASE>\<domain_username>

      Example:

      setspn.exe -L TESTDOMAIN\root

  8. Copy the generated keytab file from the Windows Domain Controller to the Linux host.

    CAUTION:

    Risk of unauthorized access!

    Protect the keytab file with proper file permissions, as anyone with read permissions can use the credentials in the network to access other services. Give administrators all permissions (6) to the keytab file, but do not give read or any other permissions (0) to users.

Documentos relacionados

The document was helpful.

Seleccionar calificación

I easily found the information I needed.

Seleccionar calificación