
Defender Setup Wizard reference
| Wizard step | Options |
|---|---|
| Software Transaction Agreement | Select the I accept these terms check box to accept the terms in the Software Transaction Agreement. |
| Select Features |
Select the features you want to install. Make sure you install the following required features:
You can also install the following optional features:
|
| Upgrade Installed Features |
If this step appears, it indicates that there are previous versions of Defender features installed on the computer on which you are using the Defender Setup Wizard. By default, only the features that are currently installed are selected for upgrade in this step. If necessary, you can select to install other features. For the descriptions of the Defender features you can select in this step, see the Select Features step description earlier in this table. |
| Connect to Active Directory |
Use the following options to specify parameters for connecting to Active Directory:
|
| Prepare Active Directory | Make sure that all check boxes provided in this step are selected. |
| Specify Port |
This step only shows up if you have selected to install the Defender Management Portal (Web interface). Specify a communication port to be used by the Defender Management Portal. The default port is 8080. |
| Assign Administrator Role |
This step only shows up if you have selected to install the Defender Management Portal (Web interface). In this step, you can assign the Defender Management Portal Administrator role to an Active Directory group. As a result, members of that group will have full administrative access to the Defender Management Portal. Note that members of the Domain Admins group always have the Administrator role assigned by default. To select the group to which you want to assign the Administrator role, click the Change button. If you specify an Active Directory group other than Domain Admins, ensure you delegate sufficient permissions to that group. You can delegate permissions by using the Defender Delegated Administration Wizard. For more information, see “Delegating Defender roles, tasks, or functions” in the Defender Administration Guide. |
| Completed the Setup Wizard |
You can select the Start Defender Security Server Configuration tool check box to start the configuration tool after you complete the Defender Setup Wizard. For instructions on how to configure the Defender Security Server, see Configure Defender Security Server. |
Defender Security Server Configuration tool reference
For the Defender Security Server to work properly, you need to connect it to Active Directory. To do that, you need to use the Defender Security Server Configuration tool.
To open the Defender Security Server Configuration tool, complete the steps related to your version of Windows in the following table:
|
Windows Server 2012 R2 and Windows Server 2012 |
|---|
| On the Apps screen, click the Defender Security Server Configuration tile. |
| Windows Server 2016 and Windows Server 2019 |
|---|
|
Click the Windows Start button, and then scroll through the alphabetical list on the left. Click One Identity to expand the list of components of Defender products installed, on the system. Click Defender Security Server Configuration. |
The Defender Security Server Configuration tool looks similar to the following:
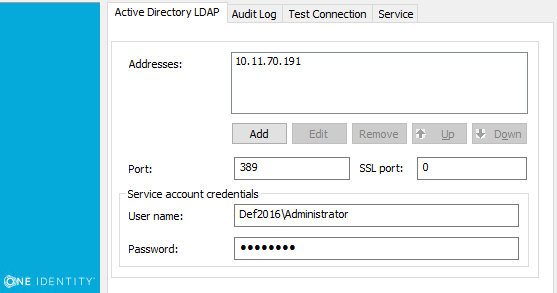
The Defender Security Server Configuration tool has the following tabs:
|
Tab |
Description |
|---|---|
|
Active Directory LDAP |
Use this tab to configure Active Directory connection settings. The Defender Security Server uses these settings to read data in Active Directory.
|
| Audit Log |
Use this tab to configure Defender logging information. To specify a different log path for the Defender Security Server log file, click Browse and navigate to the required location. To change the size of the Defender Security Server log file, enter the required size in the Log size field. To create a duplicate copy of the current Defender Security Server log, select the Create additional log with fixed name check box, and then enter the name of the log file in the Log name field. If you want to save Defender Security Server logging information to a syslog server, as well as to the Defender Security Server log, select the Enable syslog check box and click Add. In the IP Address or DNS Name field, enter the name or the IP address of the host computer where the syslog server is running. In the Port field, enter the port number used by the computer specified in the IP Address or DNS Name field. |
| Test Connection |
Use this tab to test the Active Directory connection settings specified on the Active Directory LDAP tab. Click the Test button to check if the specified connection settings are correct. You can select the Test connection automatically check box to automatically test the specified connection settings. |
| Service |
Use this tab to check the Defender Security Server service status and manage the service. To restart the Defender Security Server service, click Restart Service. To stop the Defender Security Server service, click Stop Service. |
Communication ports
Defender uses the following communication ports:
| Port | Protocol | Type of traffic |
|---|---|---|
| 389 | LDAP, TCP/IP | Defender Security Server, Active Directory connections |
| 636 | LDAP | Active Directory password changes (only if Defender is configured to handle Active Directory passwords). |
| 1812/1813 or 1645/1646 | UDP | RADIUS protocol |
| 2626 | TCP | Communications between Defender agents and the Defender Security Server. |
Upgrading Defender
This section provides information on how to upgrade the Defender components. Defender is upgradeable from version 5.9.3 and later.
To upgrade a Defender component, install the new version of that component on the computer where an earlier version of the component is installed and follow the instructions mentioned on the screen to complete the upgrade process.
NOTE: If your current Defender version is lower than version 5.9.3, it is recommended to upgrade to version 5.9.3 or later.