Tchater maintenant avec le support
Tchattez avec un ingénieur du support

One Identity Safeguard for Privileged Sessions 7.5 - Administration Guide

Preface Introduction The concepts of One Identity Safeguard for Privileged Sessions (SPS)
The philosophy of One Identity Safeguard for Privileged Sessions (SPS) Policies Credential Stores Plugin framework Indexing Supported protocols and client applications Modes of operation Connecting to a server through One Identity Safeguard for Privileged Sessions (SPS) Archive and backup concepts Maximizing the scope of auditing IPv6 in One Identity Safeguard for Privileged Sessions (SPS) SSH host keys Authenticating clients using public-key authentication in SSH The gateway authentication process Four-eyes authorization Network interfaces High Availability support in One Identity Safeguard for Privileged Sessions (SPS) Versions and releases of One Identity Safeguard for Privileged Sessions (SPS) Accessing and configuring One Identity Safeguard for Privileged Sessions (SPS)
Cloud deployment considerations The Welcome Wizard and the first login Basic settings
Supported web browsers The structure of the web interface Network settings Configuring date and time System logging, SNMP and e-mail alerts Configuring system monitoring on SPS Data and configuration backups Archiving Cleaning up audit data Using plugins Forwarding data to third-party systems Starling integration
User management and access control
Login settings Managing One Identity Safeguard for Privileged Sessions (SPS) users locally Setting password policies for local users Managing local user groups Managing One Identity Safeguard for Privileged Sessions (SPS) users from an LDAP database Authenticating users to a RADIUS server Authenticating users with X.509 certificates Authenticating users with SAML2 Managing user rights and usergroups Creating rules for restricting access to search audit data Displaying the privileges of users and user groups Listing and searching configuration changes
Managing One Identity Safeguard for Privileged Sessions (SPS)
Controlling One Identity Safeguard for Privileged Sessions (SPS): reboot, shutdown Managing One Identity Safeguard for Privileged Sessions (SPS) clusters Managing a High Availability One Identity Safeguard for Privileged Sessions (SPS) cluster Upgrading One Identity Safeguard for Privileged Sessions (SPS) Managing the One Identity Safeguard for Privileged Sessions (SPS) license Accessing the One Identity Safeguard for Privileged Sessions (SPS) console Sealed mode Out-of-band management of One Identity Safeguard for Privileged Sessions (SPS) Managing the certificates used on One Identity Safeguard for Privileged Sessions (SPS)
General connection settings HTTP-specific settings ICA-specific settings MSSQL-specific settings RDP-specific settings SSH-specific settings Using Sudo with SPS Telnet-specific settings VMware Horizon View connections VNC-specific settings Indexing audit trails Using the Search interface Advanced authentication and authorization techniques Reports The One Identity Safeguard for Privileged Sessions (SPS) REST API One Identity Safeguard for Privileged Sessions (SPS) scenarios Troubleshooting One Identity Safeguard for Privileged Sessions (SPS)
Network troubleshooting Gathering data about system problems Viewing logs on One Identity Safeguard for Privileged Sessions (SPS) Changing log verbosity level of One Identity Safeguard for Privileged Sessions (SPS) Collecting logs and system information for error reporting Collecting logs and system information of the boot process for error reporting Support hotfixes Status history and statistics Troubleshooting a One Identity Safeguard for Privileged Sessions (SPS) cluster Understanding One Identity Safeguard for Privileged Sessions (SPS) RAID status Restoring One Identity Safeguard for Privileged Sessions (SPS) configuration and data VNC is not working with TLS Configuring the IPMI from the BIOS after losing IPMI password Incomplete TSA response received Using UPN usernames in audited SSH connections
Using SPS with SPP Configuring external devices Using SCP with agent-forwarding Security checklist for configuring One Identity Safeguard for Privileged Sessions (SPS) Jumplists for in-product help Configuring SPS to use an LDAP backend Glossary

Audit keystore

To replay encrypted audit trails in your browser and to view encrypted screenshots, upload the necessary private keys to your audit keystore. In the audit keystore, only private keys are stored.

NOTE: Previously, the audit keystore was used to store certificates as well as private keys. From SPS version 6.10 and onwards, you must upload the certificates to Basic settings > Local services > Indexer service. For more information on how to add certificates, see Configuring the internal indexer.

Only RSA keys (in PEM-encoded X.509 certificates) can be uploaded to the private keystore.

TIP: One Identity recommends using 2048-bit RSA keys (or stronger).

NOTE: Certificates are used as a container and delivery mechanism. For encryption and decryption, only the keys are used.

Use every keypair or certificate only for one purpose. Do not reuse cryptographic keys or certificates (for example, do not use the certificate of the One Identity Safeguard for Privileged Sessions (SPS) webserver to encrypt audit trails, or the same keypair for signing and encrypting data).

To manage your audit keystore, see the following sections:

Adding the first private key to your audit keystore

To replay encrypted audit trails in your browser and to view encrypted screenshots, upload the necessary private keys to your audit keystore. In the audit keystore, only private keys are stored.

For more information on the supported key format and the certificates that correspond to the private keys, see Audit keystore.

NOTE: The private keys are stored locally, in your browser.

To add the first key to your audit keystore

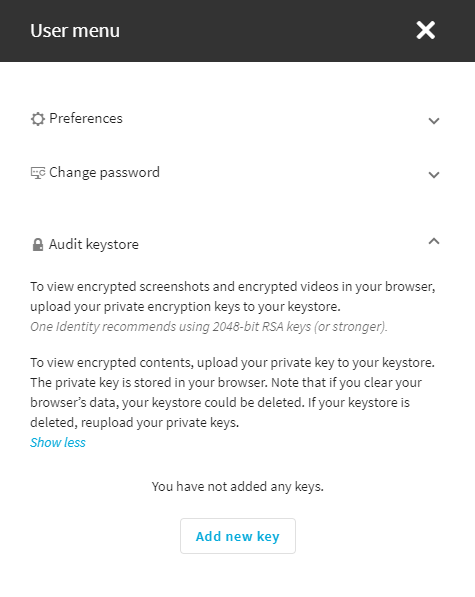
  1. Navigate to User menu > Audit keystore.

    Figure 42: User Menu > Audit keystore > — Empty audit keystore

    If you want to open an encrypted audit trail or screenshot from the Sessions interface, but you have not added the corresponding private keys yet to your audit keystore, a dialog will take you to the Audit Keystore option.

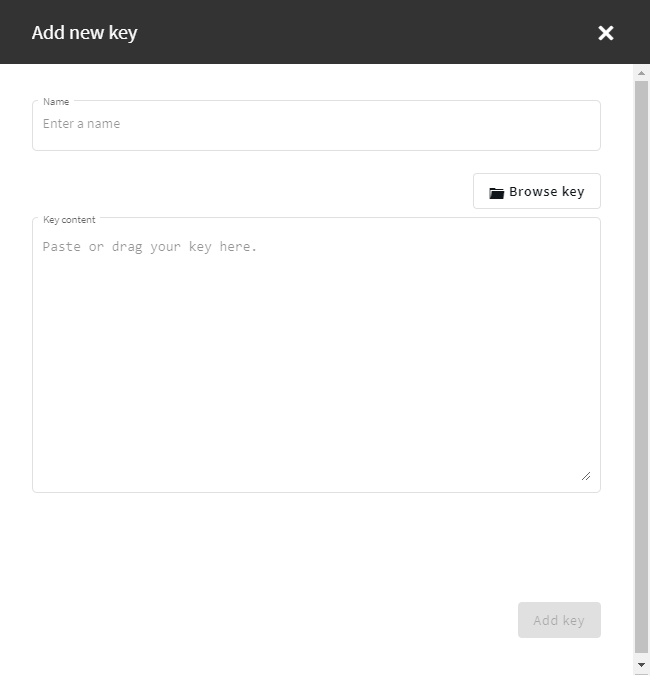
  2. Click Add new key.

    Figure 43: User Menu > Audit keystore > Add new key — Add new key

    1. In the Name field, enter a name for the key.

    2. Click Browse key, select the file containing the key in PEM format, and click Open.

      Alternatively, you can also copy-paste or drag your key into the Key content field.

    3. (Optional) If you add a private key that is encrypted, an additional field, the Key password field is displayed. In the Key password field, enter the password for the encrypted key.

    4. Click Add key.

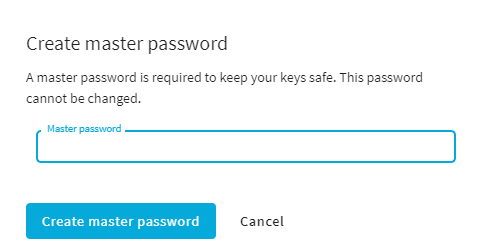
  3. In the Create master password dialog, add a master password.

    Figure 44: User Menu > Audit keystore > Add new key — Add a master password

    The private key is stored in your audit keystore that is protected by the master password that you created.

  4. (Optional) To lock your audit keystore, click Lock keystore.

    If you lock your audit keystore, you protect your private keys from unauthorized use. Your private keys can be used to decrypt content only if you unlock your audit keystore.

Adding further private keys to your audit keystore

This section describes how to add new private keys to your audit keystore.

NOTE: The private keys are stored locally, in your browser.

To add further keys to your audit keystore

  1. Navigate to User menu > Audit keystore.

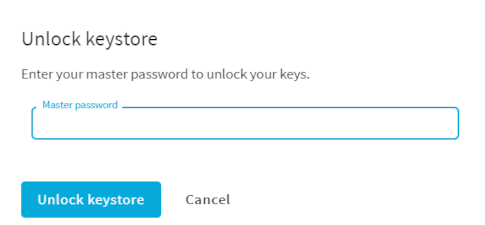
  2. Click Unlock private keystore.

    Figure 45: User Menu > Audit keystore > Unlock private keystore — Enter the master password

    Enter your master password and click Unlock keystore.

    The audit keystore is unlocked.

    If you forgot your master password, see section Unlocking your audit keystore.

  3. Click Add new key.

    Figure 46: User Menu > Audit keystore > Add new key — Add new key

    1. In the Name field, enter a name for the key.

    2. Click Browse key, select the file containing the key in PEM format, and click Open.

      Alternatively, you can also copy-paste or drag your key into the Key content field.

    3. (Optional) If you add a private key that is encrypted, an additional field, the Key password field is displayed. In the Key password field, enter the password for the encrypted key.

    4. Click Add key.

    The private key is stored in your audit keystore that is protected by the master password that you created.

  4. (Optional) To lock your audit keystore, click Lock keystore.

    If you lock your audit keystore, you protect your private keys from unauthorized use. Your private keys can be used to decrypt content only if you unlock your audit keystore.

Unlocking your audit keystore

This section provides information on:

  • How to unlock your audit keystore

  • How to reset your audit keystore if you forgot your master password

NOTE: The private keys are stored locally, in your browser.

In the audit keystore, the master password protects your private keys from unauthorized use, for example, if you share a computer with anyone.

To use the private keys that are stored in your audit keystore to decrypt audit items, you must unlock your audit keystore by providing your master password. After providing your master password, your audit keystore remains unlocked for the duration of your session, or until you click Lock keystore on User menu > Audit keystore.

To unlock your audit keystore

  1. Navigate to User menu > Audit keystore.

  2. Click Unlock private keystore.

    The Unlock keystore dialog is displayed.

    Figure 47: User Menu > Audit keystore > Unlock private keystore — Enter the master password

    Enter your master password and click Unlock keystore.

    The audit keystore is unlocked.

    You can add new keys or manage your uploaded private keys.

Resetting your audit keystore

To reset your audit keystore if you forgot your master password

NOTE: The master password cannot be changed, but if you forget your master password, you can reset your audit keystore. If you reset your audit keystore, you must upload your private keys again.

  1. Navigate to User menu > Audit keystore.

  2. If you forgot your master password, click Forget password?.

  3. In the Forget password? dialog, click Reset keystore.

  4. Click Add new key and the Create master password dialog is displayed, where you can add a new master password.

  5. Upload the necessary private keys again to your audit keystore.

Result

The audit keystore is unlocked and it remains open for the duration of your session or until you click Lock keystore.

Documents connexes

The document was helpful.

Sélectionner une évaluation

I easily found the information I needed.

Sélectionner une évaluation