
-
Titolo
How to setup RSA SecurID to work with TPAM -
Descrizione
How to setup RSA SecurID to work for authentication to TPAM.
-
Risoluzione
These instructions should be followed along with the instructions found in the TPAM Appliance System Administrator Guide. A copy of the guide may be downloaded here: TPAM Appliance - Release Notes and Guides.
Version 2.5:
The RSA Administrator must enter the host IP address of the TPAM appliance in the RSA server, making sure there are no existing node secrets, and the host is open to locally known users. The agent type must be netOS or Single Comm Trans.In TPAM 2.5.915 and above, the sdconf.rec file is applied to the TPAM Primary and will automatically replicate this file to the Replicas.
The SDOpts.rec file is unique to each appliance, it is not replicated. You will need to request a unique file per appliance from your RSA admin. A file will need to be created for the Primary, and one created for each of the Replica(s) in the cluster. These then need to be imported on to the relevant appliance separately. The replica(s) will need to be failed over for this file to apply. To force a Failover of a Replica please review the TPAM SysAdmin Guide - Chapter 7 High Availability Cluster - in the section "Force a failover"
The RSA administrator should know how to create the required SDOpts.rec. Since the SDOpts.rec is unique to each appliance, you will need one created for the Primary and one created for each of the Replica's.Each TPAM appliance needs a node secret. The RSA® Administrator needs to make sure there are no existing node secrets. If attempting to configure SecurID with TPAM again after a failed attempt or to update you will need to manually clear the node secret for all TPAM appliances on the RSA configuration page. This will clear SecurID Node Secret on Replica appliance(s) when it is cleared on Primary appliance. During replication the Replica(s) will be updated. TPAM/RSA will negotiate a new secret during the initial connection.
1. Select System Status/Settings | External Authentication | SecurID Config from the menu (/admin interface).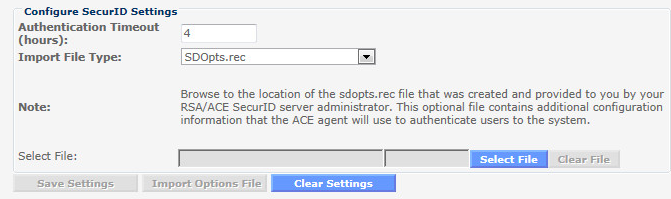
2. Enter the max number of hours a session can persist in the "Authentication Timeout" field.
3. Select SDOpts.rec from the "Import File Type" list.
4. Click the Select File button.
5. Click the Browse button. Select the file.
6. Click the Upload button.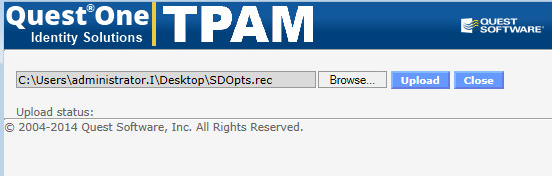
7. Click the Import Options File button.
8. Click the OK button on the confirmation window.Note: The SDconf.rec file on the Primary will replicate over to the other appliances at the next replication cycle.9. Select SDConf.rec from the Import File Type list.
10. Click the Select File button.
11. Click the Browse button. Select the file.
12. Click the Upload button.
13. Click the Import Config File button.
14. Click the OK button on the confirmation window.
Click the Clear Settings button to remove all previously configured ACE server files and references, including node secrets.
Version 2.4 and earlier:
Steps to configure RSA SecurID on /paradmin | System Settings / Status | External Authentication | Securid Auth1. RSA Admin to enter the host IP Address of the TPAM server in the RSA server, making sure that there are no existing node secrets, and the host is open to locally known users. The agent type has to be either netOS or Single Comm Trans., the reason for these types is to prevent next Token mode or new Pin mode.
2. Once the host has been entered, generate a new SDConf.rec file.
3. Log into /Paradmin System Status/Settings - External Auth - Securid - Click "Clear Settings"
4. Upload the new SDConf.rec file to the appliance and Import Config file. Change the timeout value to something different in order to activate the save settings button.
5. Attempt to authenticate using SecurID as a secondary authentication message.
6. Verify from the RSA server that the node secret has been exchanged. -
Informazioni aggiuntive
For further reference please review the TPAM SysAdmin Guide - Chapter 20 - External Authentication - Section RSA SecurID https://support.quest.com/download/downloads?id=6061224