지금 지원 담당자와 채팅
지원 담당자와 채팅

Safeguard Authentication Services 5.1.1 - SSO for SAP Integration Guide

Unix installation and join

Note: For more details on installing and joining the Safeguard Authentication Services client, please see the Safeguard Authentication Services Administration Guide. Commands prefixed with $ must be run by the SAP instance owner account. Commands prefixed with # must be run by root.

To install the Safeguard Authentication Services client and join the Unix system to Active Directory

  1. Mount the product media or extract the product archive, and change directory to the base directory. For example:
    # mount /mnt/cdrom; cd /mnt/cdrom
  2. Run the preflight program to check for proper connectivity and patch requirements. If failures are reported, see the Safeguard Authentication Services Administration Guide for requirements and troubleshooting instructions.
    # ./preflight example.com

    Replace example.com with your Active Directory domain name.

  3. Install the Safeguard Authentication Services client.
    # ./install.sh vasclnt
  4. Join the system to Active Directory.
    # /opt/quest/bin/vastool -u Administrator join --skip-config example.com

    Where Administrator is an Active Directory user with rights to join and example.com is your Active Directory domain name.

    Note: Ignore any license warnings reported from the join process. These are not relevant to SSO for SAP.

Unix configuration

To configure the SAP server on Unix to use Single Sign-on for SAP

  1. Change the group ownership and permissions of the host.keytab file.
    # chgrp sapsys /etc/opt/quest/vas/host.keytab; chmod 550 /etc/opt/quest/vas/host.keytab
  2. List the keytab and note the Principal name containing a $.
    $ /opt/quest/bin/vastool ktutil list
    /etc/opt/quest/vas/host.keytab:
    
    Vno  Type                     Principal
      2  aes128-cts-hmac-sha1-96  host/alvlabu22.example.com@EXAMPLE.COM
      2  aes128-cts-hmac-sha1-96  ALVLABU22$@EXAMPLE.COM
      2  aes128-cts-hmac-sha1-96  cifs/alvlabu22.example.com@EXAMPLE.COM
      2  aes128-cts-hmac-sha1-96  host/ALVLABU22@EXAMPLE.COM
      2  aes256-cts-hmac-sha1-96  host/alvlabu22.example.com@EXAMPLE.COM
      2  aes256-cts-hmac-sha1-96  ALVLABU22$@EXAMPLE.COM
      2  aes256-cts-hmac-sha1-96  cifs/alvlabu22.example.com@EXAMPLE.COM
      2  aes256-cts-hmac-sha1-96  host/ALVLABU22@EXAMPLE.COM
      2  arcfour-hmac-md5         host/alvlabu22.example.com@EXAMPLE.COM
      2  arcfour-hmac-md5         ALVLABU22$@EXAMPLE.COM            <-- Take note of this $ name to use in the next step.
      2  arcfour-hmac-md5         cifs/alvlabu22.example.com@EXAMPLE.COM
      2  arcfour-hmac-md5         host/ALVLABU22@EXAMPLE.COM 
  3. Edit the SAP instance profile by adding the following SNC parameters:
    snc/enable = 1
    snc/data_protection/min = 1
    snc/data_protection/max = 3
    snc/data_protection/use = 3
    snc/accept_insecure_gui = 1
    snc/accept_insecure_cpic = 1
    snc/accept_insecure_rfc = 1
    snc/accept_insecure_r3int_rfc = 1
    snc/r3int_rfc_insecure = 0
    snc/r3int_rfc_qop = 3
    snc/permit_insecure_start = 1
    snc/identity/as = p:ALVLABU22$@EXAMPLE.COM
    snc/gssapi_lib = /opt/quest/lib/libvas-gssapi64.so

    Note: Set snc/identity/as to the value collected above, prefixed with p:.

    Use the following table to determine the proper value for the snc/gssapi_lib setting.

    Table 1: SNC library paths
    Platform Path Filename
    Any 32-bit (except HP-UX) /opt/quest/lib libvas-gssapi.so
    HPUX 32-bit /opt/quest/lib libvas-gssap.sl
    AIX 64 /opt/quest/lib libvas-gssapi64.so
    Linux-x86_64 /opt/quest/lib64 libvas-gssapi.so
    Oracle Solaris-SPARC 64 /opt/quest/lib/sparcv9 libvas-gssapi.so
    Oracle Solaris-x86_64 /opt/quest/lib/64 libvas-gssapi.so
    HP-UX pa-risc 64 /opt/quest/lib/pa20_64 libvas-gssapi.sl
    HP-UX ia64 /opt/quest/lib/hpux64 libvas-gssapi.so
  4. Restart SAP.
    $ stopsap
    $ startsap

    Note: If the SAP services fail to start, check the /usr/sap/<SID>/DVEBMGS00/work/dev_w0 file for errors.

Windows installation

Perform the following tasks as a user with Administrative rights.

  1. In WindowsExplorer, browse to \add-ons\qas-sso-for-sap on the installation media and run the qas-sso-for-sap-*.msi installer.
  2. On the Welcome screen, click Next 
  3. On the License File screen, click Browse to locate the Single Sign-on for SAP license file.

    Select the file and click Open.

    Back on the License File screen, click Next.

  4. Read the license agreement, select I accept the terms in the license agreement and click Next.
  5. On the Destination Folder screen, click Next to use the default installation location.
  6. On the Setup Type screen, click Next to use the default (Complete) setup type.
  7. On the Ready to Install the Program screen, click Install.
  8. When the installer is complete, click Finish.

Windows SAP GUI configuration

Configure SAP GUI for use with Single Sign-on for SAP.

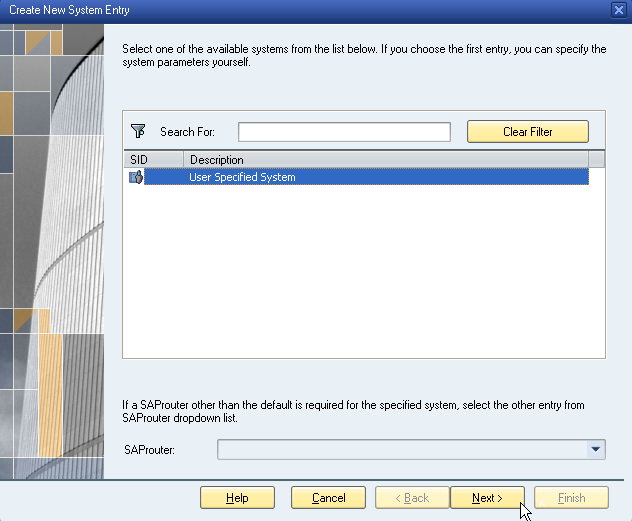
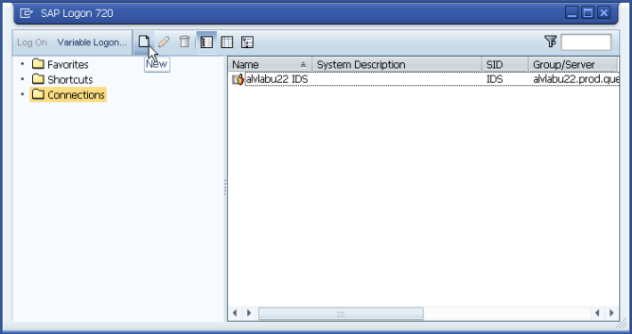
  1. Open SAP Logon and click New in Connections.

  2. Click Next.

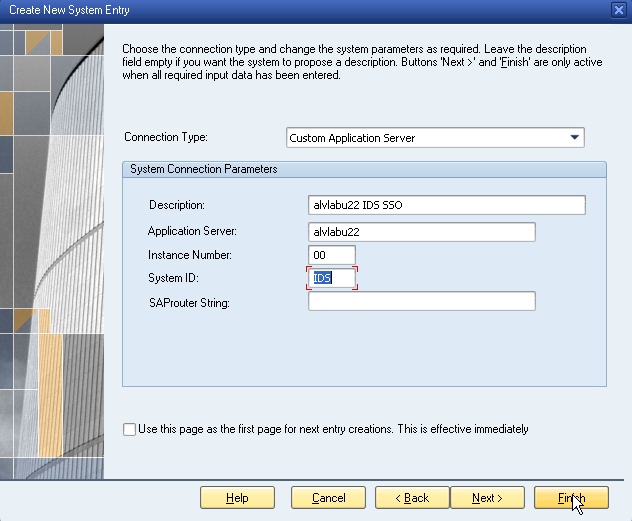
  3. Enter a Description, Application Server address, Instance Number, and System ID, then click Finish.

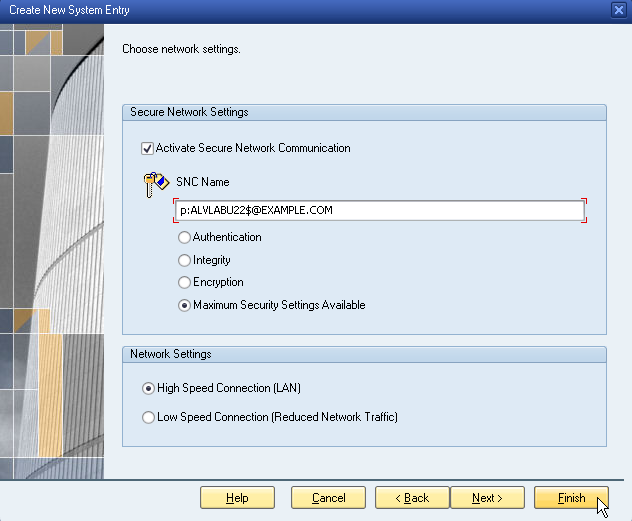
  4. Select Activate Secure Network Communication and enter the SNC Name derived from the Unix SAP Configuration, then click Finish.

관련 문서

The document was helpful.

평가 결과 선택

I easily found the information I needed.

평가 결과 선택