After upgrading Active Roles to 8.2 and restarting the operating system, the Configuration Center opens automatically. Use the Upgrade configuration wizard to configure Active Roles.
NOTE: If the Active Roles Configuration Center does not open automatically, open it from the Windows Start menu.
To configure Active Roles 8.2 during in-place upgrade
-
As part of the upgrade, Active Roles creates new databases with default names. The Upgrade configuration wizard displays the new databases information.
NOTE: During Active Roles upgrade, if the Active Roles database is not split into Configuration and Management History databases, the upgrade process creates a Management History database by default.
NOTE: The names of the new databases must be unique. If a database with the same name already exists, you will get a Verification failed error message. To resolve the issue, rename the new database.
IMPORTANT: Active Roles does not support pre-creating databases for in-place upgrade. If you pre-create the new Active Roles databases, then perform an in-place upgrade with those pre-created databases, the initial configuration will fail with a Process instantly failed with the message Invalid object name 'Settings' error message.
|

|
CAUTION: When creating a new configuration database, you might encounter a Verification failed error message due to an Active Roles version mismatch. To resolve the issue, you must clear the existing Active Roles configuration. For more information, see Knowledge Base Article 4340880. |
-
(Optional) To change the default names of the new databases, click Click here to change or provide existing database names.
-
Select the check box to confirm that you have read the instructions in this document about the in-place upgrade process, and click Next.
-
The Reauthenticate Tenants page lists the configured Azure tenants in the source database. To reauthenticate a tenant, click Reauthenticate next to its name.
|
|
CAUTION: You must reauthenticate the tenant(s). Otherwise, Active Roles does not receive the required permissions to manage existing tenants, and tenant administration will not work correctly. |
NOTE: After a successful upgrade, in the Configuration Center, under Azure AD Configuration, you must consent the Azure tenants manually.
- Click Next.
-
In the Services association page, configure the Administration Service instances for running the following:
-
Dynamic groups
-
Group families
-
Scheduled tasks
-
Select This server or Other. Selecting Other allows you to specify another Administration Service instance in a fully qualified domain name (FQDN) format. If the value is empty, the current Administration Service is used.
NOTE: Services association does not update certain scheduled tasks. For example, scheduled tasks that cannot be edited (Managed Object Counter) or scheduled tasks that are set to All servers.
-
Select Run Services association immediately or Schedule Services association.
NOTE: If Services association is scheduled to a specific time, but the upgrade or import operation is still in progress or completes after the scheduled Services association time, then the services will not be associated. In such cases, you must associate the Services manually by running the template workflow Update Services To Execute On available in the built-in workflow container.
To ensure dynamic groups, group families, and scheduled tasks continue to function after an import, the installation configures the new Active Roles server as the initiating server for the listed tasks. This configuration runs after an upgrade.
NOTE: Alternatively, you can perform Services association any time using the template workflow Update Services To Execute On available in the built-in workflow container. You can configure the parameters in the script that the workflow uses to the required Administration Service instances, such as, Dynamic Group Service, Group Family Service, Scheduled Task Service. You can select the Administration Service instance to use from the drop-down list. The drop-down list displays all the currently running Administration Service instances connected to the current configuration database. If the parameter value is not selected, then the current Administration Service instance will be used.
-
Click Next.
-
In the Review upgrade page, review your settings and click Upgrade.
-
(Optional) In case of any errors during the in-place upgrade, you must resolve the errors and re-open the Configuration Center to continue the in-place upgrade. For more information on the errors, click View log or navigate to C:\ProgramData\One Identity\Active Roles\Logs\Configuration Center.
-
Click Finish.
NOTE: Multiple Active Roles Service instances must be upgraded one by one.
Starting from version 8.2, Active Roles supports (and its installer is shipped with) Microsoft OLE DB Driver 19.x for SQL Server. However, Active Roles still supports earlier OLE DB Driver versions as well (18.4 or newer).
If you have previously used an earlier supported version of Microsoft OLE DB Driver for SQL Server (18.4 or newer) with Active Roles, but you want to upgrade to 19.x due to security reasons, then perform the following steps after completing the in-place upgrade of Active Roles as described in Upgrading to Active Roles 8.2 using in-place upgrade.
IMPORTANT: Not completing these steps after performing the in-place upgrade might result in the Active Roles Administration Service not starting when using Microsoft OLE DB Driver 19.x for SQL Server.
To upgrade your Active Roles environment to be compatible with Microsoft OLE DB Driver 19.x for SQL Server
-
Stop the Active Roles Administration Service. To do so, in the Active Roles Configuration Center, navigate to Administration Service, then click Stop.
-
To use SSL with your SQL Server, configure a valid certificate. For more information on installing or viewing certificates for SQL Server via SQL Server Configuration Manager, see Certificate management in the Microsoft SQL Server documentation.
For general information about the encryption and certificate requirements of Microsoft OLE DB Driver 19.x, see Encryption and certificate validation in OLE DB and Certificate requirements for SQL Server in the Microsoft SQL Server documentation.
When configuring the SSL connection, consider the following:
-
Microsoft OLE DB Driver 19.x for SQL Server requires a certificate from a Certificate Authority and no longer accepts self-signed certificates. For more information on how to access a Certificate Authority, see Certification Authority Guidance in the Microsoft Windows Server documentation.
-
The Service Account running the SQL Server service must have permission to view the private key from the server certificate. For more information, see Configure SQL Server Database Engine for encrypting connections in the Microsoft SQL Server documentation.
-
Microsoft OLE DB Driver 19.x for SQL Server requires specifying the Service Principal Names (SPNs). For more information, see the following Microsoft SQL Server documentation resources:
-
You might need to change your SQL connection string to match the certificate and the SPN. For more information, see Using Connection String Keywords with OLE DB Driver for SQL Server in the Microsoft SQL Server documentation.
-
To commit your SSL configuration changes, restart the SQL service/instance.
-
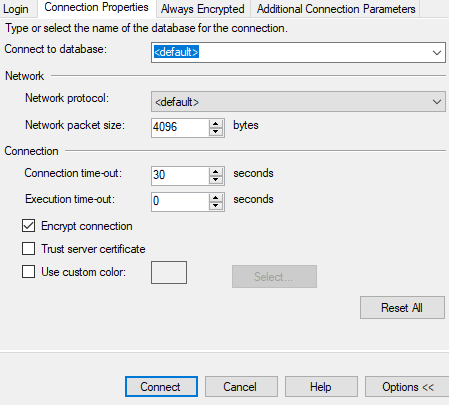
In SQL Server Management Studio, under the Connection Properties tab, make sure that Encrypt connection is selected and Trust server certificate is cleared.
Figure 2: Checking the correct SSL settings in SQL Server Management Studio
-
In the Server name field, make sure that you specify the SQL Server by using its FQDN instead of its short name.
-
Test your connection in SQL Server Management Studio. If it connects to your database instance, then SSL is configured correctly.
-
Change your existing database names in Active Roles so that they use their FQDN instead of their short names. To do so:
-
In the Active Roles Configuration Center, navigate to Administration Service > Active Roles databases > Change.
-
In the Change Active Roles Database wizard, in the Configuration Database Options step, select Existing Active Roles database, then click Next.
-
In the Connection to Configuration Database step, in the Database name field, change the short name of the server to its FQDN. To continue, click Next.
-
In the Management History Database Options step, select Existing Active Roles database, then click Next.
-
In the Connection to Management History Database step, in the Database name field, change the short name of the server to its FQDN. To continue, click Next.
-
In the Ready to Change step, to apply your changes, click Change.
-
Start the Active Roles Administration Service. To do so, in the Active Roles Configuration Center, navigate to Administration Service, then click Start.
Upgrading the Administration Service implies creating a new Administration Service instance of the latest version, with the configuration and management history data imported from your Administration Service of an earlier version. As a result, the new Administration Service instance inherits all of your existing Active Roles configuration settings, such as managed domains, managed units, permission assignments, policies, workflows, virtual attributes and so on. By importing management history data, you transfer change history, approval tasks, and temporal group membership tasks from your Administration Service of an earlier version to the new Administration Service instance.
The new Administration Service is only compatible with the Active Roles 8.2 components. Earlier versions of the components might not work with the new Administration Service. Before upgrading the other components, upgrade the Administration Service first.
|
|
CAUTION: If you no longer need the earlier version of an Active Roles component and want to uninstall it using the appwiz.cpl command, make sure that you uninstall the earlier version (for example, Active Roles 6.9). In the uninstaller, select Modify, and select the components you want to uninstall. |
After configuring the Administration Service of the new version, import the configuration data from the database used by the earlier version of your Administration Service. To import configurations, you must identify that database.
To identify the database
-
Open the Active Roles Console and connect to the older-version instance of the Administration Service (see Connecting to the Administration Service in the Active Roles Administration Guide).
-
Select the Console tree root, and on the page in the details pane, expand the Configuration Databases and Replication area.
You can identify the database name, SQL Server name, and database type from the first string in the Configuration Databases and Replication area that has the following format: Database <name> on SQL Server <name> Database Type <type>. You can also find this information in the Administration Service pane of the Configuration Center.
NOTE: When an import configuration is performed from Active Roles version 7.5 to 8.2, the Web Interface does not get upgraded. However, the Configuration Center or any client reports the Active Roles Web Interface version incorrectly as 8.2. To upgrade the Web Interface to the latest version, see Creating Web Interface sites and importing configuration.
