
Installing Cloud Access Manager for SharePoint
To install Cloud Access Manager for SharePoint
- Copy the appropriate version of the Cloud Access Managerfor SharePoint installer (2010 or 2013) to a server in your Microsoft SharePoint farm.
-
Run the installer, which will install the software in its default location and add a link to your Windows Start menu.
NOTE: Cloud Access Manager for SharePoint requires Microsoft .NET framework version 4.5 installed on your host.
- Click the link on the Start menu to open the application.

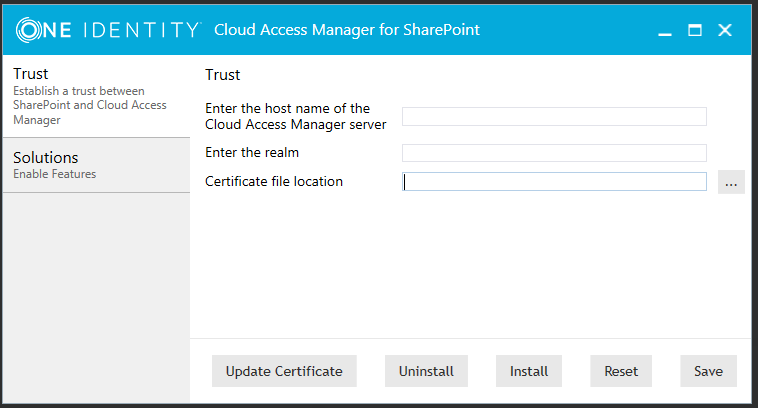
Establishing a trust between Cloud Access Manager and SharePoint
To establish a trust between Cloud Access Manager and SharePoint
- Download the certificate from your SharePoint application in Cloud Access Manager, then copy it to the SharePoint server where Cloud Access Manager for SharePoint is running.
- Complete the fields on the Trust tab. You can obtain the realm value from the Cloud Access Manager SharePoint application configuration, Federation Settings | Relying Party Realm / Identity.
-
Browse to the location of the Cloud Access Manager trust certificate file, and click Install.
The trust has now been established between Cloud Access Manager and SharePoint Server 2013. Next you will need to enable it to protect your sites.
Manual configuration of a SharePoint 2013 Server WS-Federation Trust
This section guides you through the steps required to manually configure your SharePoint 2013 server for claims-based authentication using WS-Federation.
|
|
NOTE: These steps are an alternative method to using the Cloud Access Manager for Microsoft SharePoint utility described in Configuring a SharePoint 2010 or 2013 WS-Federation Trust using the Cloud Access Manager for Microsoft SharePoint utility. For instructions on how to configure SharePoint 2010, please refer to Manual configuration of a SharePoint 2010 Server WS-Federation Trust. |
To configure your SharePoint 2013 Server for claims-based authentication
-
On the SharePoint server, open the SharePoint 2013 Management Shell and enter the following commands to set up a new claims-based WS-Federated authenticator:
$cert=New-Object System.Security.Cryptography.X509Certificates.X509Certificate2("<location of certificate>"
New-SPTrustedRootAuthority -Name "<Name of Certificate>" -Certificate $cert
$email=New-SPClaimTypeMapping -IncomingClaimType "http://schemas.xmlsoap.org/ws/2005/05/identity/claims/emailaddress" -Incoming ClaimTypeDisplayName "EmailAddress" –SameAsIncoming
$realm = "<realm as defined in Cloud Access Manager template>"
$x=New-SPTrustedIdentityTokenIssuer -Name "<Name for authenticator>" -Description "Cloud Access Manager" -realm $realm -ImportTrustCertificate $cert -ClaimsMappings $email -SignInUrl "<Endpoint URL>" -IdentifierClaim http://schemas.xmlsoap.org/ws/2005/05/identity/claims/emailaddress
NOTE: If you have added extra claims to the Claim Mapping page in the Cloud Access Manager SharePoint template, then you will need to add mappings for each extra claim here.
To do this:
- use extra New-SPClaimTypeMapping commands, as for the EmailAddress default shown above.
- then use the -ClaimsMappings parameter in the New-SPTrustedIdentityTokenIssuer command to create them in the Trust.
The trust has been established between Cloud Access Manager and SharePoint Server 2013. Next you need to enable it to protect your sites.
Manual configuration of a SharePoint 2010 Server WS-Federation Trust
This section guides you through the steps required to manually configure your SharePoint 2010 server for claims-based authentication. Configuring SharePoint 2010 is similar to configuring SharePoint 2013, with additional steps to enable the claims-based authentication mode.
|
|
NOTE: These steps are an alternative method to using the Cloud Access Manager for Microsoft SharePoint utility described in Configuring a SharePoint 2010 or 2013 WS-Federation Trust using the Cloud Access Manager for Microsoft SharePoint utility. |
To configure your SharePoint 2010 Server for claims-based authentication
-
On the SharePoint server, open the SharePoint 2010 Management Shell, and enter the following commands to change SharePoint 2010 from classic-mode to claims-based authentication:
$WebAppName = "http://SharePoint WebApp URL"
$wa = get-SPWebApplication $WebAppName
$wa.UseClaimsAuthentication = $true
$wa.Update()
For example, the SharePoint WebApp URL would be, http://share.point2010.local:8
-
Configure the policy to enable the current logged on user to have Full Control, for example, the account being used to make these changes to SharePoint:
$account = "yourDomain\yourUser"
$account = (New-SPClaimsPrincipal -identity $account -identitytype 1).ToEncodedString()
$wa = get-SPWebApplication $WebAppName
$zp = $wa.ZonePolicies("Default")
$p = $zp.Add($account,"PSPolicy")
$fc=$wa.PolicyRoles.GetSpecialRole("FullControl")
$p.PolicyRoleBindings.Add($fc)
$wa.Update()
-
Perform user migration:
$wa.MigrateUsers($true)
-
Perform user provisioning:
$wa.ProvisionGlobally()
-
Set up a new claims-based WS-Federated authenticator, as for SharePoint 2013:
$cert=New-Object System.Security.Cryptography.X509Certificates.X509Certificate2("<location of certificate>")
New-SPTrustedRootAuthority -Name "<Name of Certificate>" -Certificate $cert
$email=New-SPClaimTypeMapping -IncomingClaimType "http://schemas.xmlsoap.org/ws/2005/05/identity/claims/emailaddress" -IncomingClaimTypeDisplayName "EmailAddress" -SameAsIncoming
$realm = "<realm as defined in Cloud Access Manager template>"
$x=New-SPTrustedIdentityTokenIssuer -Name "<Name for authenticator>" -Description "Cloud Access Manager" -realm $realm -ImportTrustCertificate $cert -ClaimsMappings $email -SignInUrl "<Endpoint URL>" -IdentifierClaim http://schemas.xmlsoap.org/ws/2005/05/identity/claims/emailaddress
NOTE: If you have added extra claims to the Claim Mapping page in the Cloud Access Manager SharePoint template, then you will need to add mappings for each extra claim here.
To do this:
- use extra New-SPClaimTypeMapping commands, as for the EmailAddress default shown above.
- then use the -ClaimsMappings parameter in the New-SPTrustedIdentityTokenIssuer command to create them in the Trust.
The trust has now been established between Cloud Access Manager and SharePoint Server. Next you will need to enable it to protect your sites.