This scenario describes how to configure a policy that forces the user telephone number to conform to the following format:
-
The first character must be +.
-
The second character(s) must be the country code. For example, 1 in the United States and Canada, and 61 in Australia.
-
Use spaces (instead of dashes or braces) to separate the area code.
-
Use spaces (instead of dashes) to separate the telephone number.
-
Optionally, use a lowercase x to indicate an extension.
-
Use spaces (instead of dashes or braces) to separate the area code.
-
Use spaces (instead of dashes) to separate the telephone number.
-
Optionally, use a lowercase x to indicate an extension.
The following table provides some examples to clarify how the phone number should look in accordance with these formatting requirements.
Table 6: Phone number format
|
+1 949 754 8515 |
949-754-8515 |
The incorrect entry does not begin with + and country code, and uses dashes instead of space. |
|
+44 1628 606699 x1199 |
+44 1628 606699 X1199 |
The incorrect entry uses uppercase X. |
As a result, when creating or modifying a user object in the container that you selected, Active Roles validates the telephone number against the defined format. If it does not conform to the defined format, the policy does not allow creating or editing the user object.
For the steps of creating this policy, see Creating and configuring a Property Generation and Validation Policy Object with a regular expression.
You can create the Property Generation and Validation policy that is described in Example: Using regular expressions to control telephone number format with the New Provisioning Policy Object Wizard.
To create and configure a Property Generation and Validation Policy Object with a regular expression
-
In the Console tree, navigate to Configuration > Policies > Administration.
-
To open the New Provisioning Policy Object Wizard dialog, right-click Administration, then select New > Provisioning Policy.
-
On the Name and Description page, provide a unique Name for the new Policy Object. Optionally, also provide a Description. To continue, click Next.
-
Select the Property Generation and Validation policy type for configuration. Click Next.
For more information, see Configuring a Property Generation and Validation policy.
-
On the Controlled Property page, click Select.
-
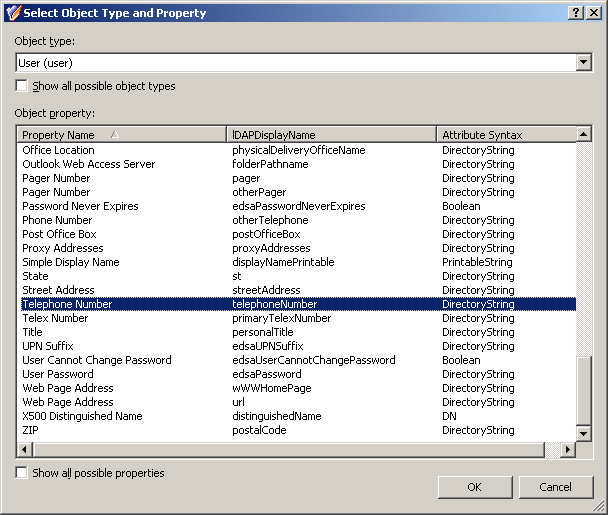
In the Select Object Type and Property dialog, from the Object type list, select User.
-
In the Object property list, select Telephone number.
Figure 36: Select Object Type and Property
-
After you selected the Object type and Object property, to continue, click OK.
-
After you validated on the Controlled Property page that you selected the correct Object type and Object property, click Next.
-
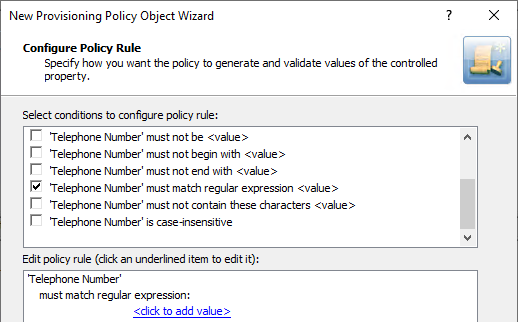
On the Configure Policy Rule page, select the following:
‘Telephone Number’ must match regular expression <value>: This condition requires the telephone number to match a certain regular expression.
Figure 37: Configure Policy Rule: Telephone Number must be specified and must be <value>
-
Add the regular expressions to the policy.
The following table briefly describes the elements that are used in the two above syntax. For more information about regular expressions, see Using regular expressions.
Table 7: Regular expressions
|
^ |
The beginning of the input string to validate. |
|
\+ |
The escape sequence to represent the plus (+) character. |
|
([0-9]+ )+ |
Concatenation of one or more substrings, with each substring consisting of one or more digit characters followed by a space character. |
|
[0-9]+ |
One or more digit characters. |
|
x[0-9]+ |
A lowercase x followed by one or more digit characters. |
|
$ |
The end of the input string to validate. |
You will configure the policy to only allow the telephone numbers that match ^\+([0-9]+ )+[0-9]+$ (telephone numbers without extensions) or ^\+([0-9]+ )+x[0-9]+$ (telephone numbers that include extensions). Proceed with configuring the policy as follows:
-
Click the <click to add value> link.
-
In the Add Value dialog, enter ^\+([0-9]+ )+[0-9]+$
To apply the value setting for the entry, click OK.
-
Click the <click to add value> link.
-
In the Add Value dialog, enter ^\+([0-9]+ )+x[0-9]+$.
To apply the value setting for the entry, click OK.
-
Click Next, then follow the instructions in the wizard to create (and optionally, immediately apply) the Policy Object.
-
To apply the Policy Object:
-
Use the Enforce Policy page in the New Policy Object Wizard.
-
Alternatively, complete the New Policy Object Wizard, then use the Enforce Policy command on the domain, OU, or Managed Unit where you want to apply the policy.
For more information on how to apply a Policy Object, see Linking Policy Objects to directory objects.
TIP: When provisioning cloud-only Azure users or guest users, you can either select the respective object category (such as the Azure user or Azure guest user node) in this step, or the Azure tenant that contains the Azure objects.
Script execution policies help you to run supplementary PowerShell, or other script modules in Active Roles during or after performing certain administrative operations. When linking a custom script to an administrative operation via a Script Execution policy, the script will receive control in Active Roles either when the operation is requested or when it is completed.
Use Script Execution policies to set up custom scripts (residing in Script Modules in the Active Roles Console) to:
-
Trigger additional actions when performing directory object provisioning.
-
Regulate object data format and requirements (such as for generating user passwords).
-
Further automate administrative tasks.
NOTE: Policy Object settings that are specific to Azure cloud-only objects (such as cloud-only Azure users, guest users, or contacts) are available only if your Active Roles deployment is licensed for managing cloud-only Azure objects. Contact One Identity support for more information.
Also, Policy Objects that are specific to Azure cloud-only objects will work correctly only if an Azure tenant is already configured in the AD of the organization, and Active Roles is already set as a consented Azure application for that Azure tenant. For more information on these settings, see Configuring a new Azure tenant and consenting Active Roles as an Azure application.
For more information about this policy, see Concept: Script Execution in the Active Roles Feature Guide.
To configure a Script Execution policy via the Active RolesConsole (also known as the MMC interface), perform the following procedure.
IMPORTANT: You must select a script module during this procedure. You can choose to either configure a script module before performing these steps, or create an empty script module while configuring the Script Execution policy, then configure the script module later.
To configure a Script Execution policy
-
In the Console tree, navigate to Configuration > Policies > Administration.
-
To open the New Policy Object Wizard dialog, choose one of the following:
-
To add a provisioning policy, right-click Administration, then select New > Provisioning Policy.
-
To add a deprovisioning policy, right-click Administration, then select New > Deprovisioning Policy.
-
On the Name and Description page, provide a unique Name for the new Policy Object. Optionally, also provide a Description. To continue, click Next.
-
On the Policy to Configure page, select Script Execution, then click Next.
-
On the Script Module page, do one of the following:
-
To create new script module, click Create a new script module, then click Next. Specify a name for the script module, and click Next, then select the event handlers for the script module.
-
To use an existing script module, click Select a script module, and select the script module from the list, then click Next.
-
(Optional) If you selected an existing script module, on the Policy Parameters page, edit the policy parameters:
-
In the Function to declare parameters drop-down, choose the function that defines the parameters for the policy.
The list contains the names of all script functions found in the selected script module.
-
To view and change the values of policy parameters, under Parameter values, select the name of the parameter and click Edit.
-
On the Edit Parameter page, modify the value of the parameter.
NOTE: A list of possible values might be predefined for the selected parameter. In such cases, you can only select values from this list.
-
Click Next, then follow the instructions in the wizard to create (and optionally, immediately apply) the Policy Object.
-
To apply the Policy Object:
-
Use the Enforce Policy page in the New Policy Object Wizard.
-
Alternatively, complete the New Policy Object Wizard, then use the Enforce Policy command on the domain, OU, or Managed Unit where you want to apply the policy.
For more information on how to apply a Policy Object, see Linking Policy Objects to directory objects.
