Use the Analyzer to perform the following steps:
-
Specify the analysis method.
-
Selecting analysis data using the wizard: The initial data is collected using a wizard.
-
Active Directory Identity Permissions: The permissions of all identities with Active Directory group memberships are analyzed.
NOTE: Analysis methods are available if the Active Directory Module is installed.
-
Active Directory Identity Permissions and Departments: The permissions of all identities with Active Directory group memberships are analyzed. Departments with Active Directory groups are also included in the analysis.
NOTE: Analysis methods are available if the Active Directory Module is installed.
-
LDAP Identity Permissions: The permissions of all identities with LDAP group memberships are analyzed.
NOTE: Analysis methods are available if the LDAP Module is installed.
-
Verify the analysis results.
-
Create a new business role if required and assign the identities. Add the suggested changes to the One Identity Manager database.
Detailed information about this topic
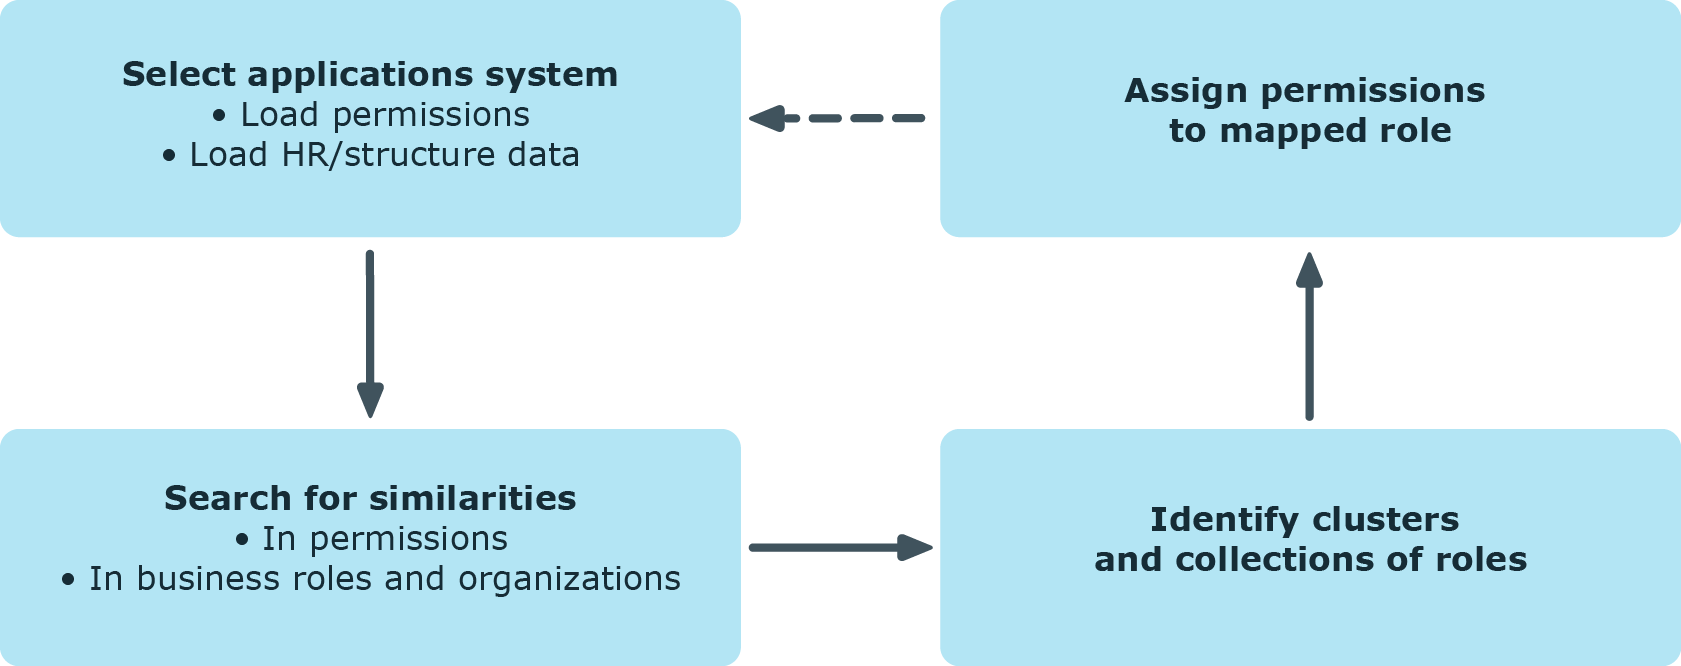
Before you start the analysis, you collect your initial data. The Analyzer accesses all permissions information in its own database and creates a mapping table with identities and their permissions. The result can be suggestions for single roles from analyzing a single application but also cross-system roles from analyzing permissions in several systems.
To select initial data with the wizard
-
Start the Launchpad and log in to the One Identity Manager database.
-
Open the Launchpad and select Analyze business roles in the Manage section. This starts the Analyzer program.
-
On the Analyzer’s start page, select the Select data with wizard analysis method and click Start.
This starts the wizard.
-
On the start page, you specify the identities for analysis. Select one of the following selection categories and click Next.
-
Structures: Identities can be selected through organizations and business roles contained in One Identity Manager.
-
In the Structures list, select the organization or business role for analysis.
-
The identities assigned to this structure are displayed in the Identities list. Use the Show directly/indirectly assigned identities buttons in the title bar to filter the identities.
Table 19: Icons for filtering identities
|

|
Show indirectly assigned identities. |
|

|
Show directly assigned identities. |
|

|
Show identities from child nodes. |
-
Query wizard: Define the condition used to find the identities in the database. The wizard helps you to formulate a condition (where clause) for database queries. The complete database query is composed internally. The database query references the Person table.
For more information about using the wizard, see the One Identity Manager User Guide for One Identity Manager Tools User Interface.
-
Menu: The list displays all the identities in the One Identity Manager database. Use Shift + select or Ctrl + select to select several identities for analysis.
-
Load wizard template: Load an existing configuration. Select the template file and click Open.
-
On the Select user accounts page, select the target system whose user accounts and permissions will be included in the analysis. User Ctrl + select to multi-select target systems.
-
On the Select analysis method page, you specify the analysis method. The following methods are available.
Table 20: Analysis methods
|
Simple cluster analysis/Complex cluster analysis |
Permissions are grouped into new business roles using cluster analysis methods and identities are assigned.
The Analyzer supports automatic role mining by two different cluster analysis methods, which differ in terms of how they calculate the distances between individual clusters. |
|
Decision hierarchy |
Permissions are grouped into new business roles in a decision hierarchy and the identities are assigned. The number of group members is taken as the decision criteria. |
|
Structure assignment |
The permissions are assigned to an existing structure hierarchy. The use of existing structures, for example, organizational structure from ERP systems, is possible. |
|
Permissions analysis |
Identity permissions are analyzed with the help of permissions analysis. Business roles are freely defined and assignments of permissions and identities are evaluated manually based on the existing permissions. |
-
On the last page you start the analysis.
-
(Optional) To reuse the configuration at a later time, set the Save configuration as template option. Select the directory path for saving the file using the file browser and click Save.
-
On the last page, click Finish to start the analysis.
This loads the analysis data and starts the analysis. The results of the analysis are then displayed in the Analyzer.
-
Verify the analysis results.
-
Create a new business role if required and assign the identities. Add the suggested changes to the One Identity Manager database.
Related topics
The following predefined analyses are provided:
-
Active Directory Identity Permissions: The permissions of all identities with Active Directory group memberships are analyzed.
NOTE: Analysis methods are available if the Active Directory Module is installed.
-
Active Directory Identity Permissions and Departments: The permissions of all identities with Active Directory group memberships are analyzed. Departments with Active Directory groups are also included in the analysis.
NOTE: Analysis methods are available if the Active Directory Module is installed.
-
LDAP Identity Permissions: The permissions of all identities with LDAP group memberships are analyzed.
NOTE: Analysis methods are available if the LDAP Module is installed.
To start a predefined analysis
-
Start the Launchpad and log in to the One Identity Manager database.
-
Open the Launchpad and select Analyze business roles in the Manage section. This starts the Analyzer program.
-
On the Analyzer's start page, select the predefined analysis procedure and click Start.
This loads the analysis data and starts analysis immediately. This may take some time, depending on the amount of data. The results of the analysis are then displayed in the Analyzer.
NOTE: If you have disabled the Automatically close analysis information window on completion program setting, information about the analysis is displayed in the Cluster analysis window. Click Expand to see detailed information. Click Finish to close the dialog.
-
Verify the analysis results.
-
Create a new business role if required and assign the identities. Add the suggested changes to the One Identity Manager database.
Related topics
You should always compare the business roles with the custom structures in the case of role mining, because the mathematical methods of cluster analysis only forecast a trend. Apart from renaming nodes, you can also edit identity assignments and business role permissions directly. You can create new business roles with the Analyzer and assign them directly to identities. This makes adding and moving identities into a certain business role very simple.
View the results of the analysis in a window with various panes in the Analyzer.
Figure 15: Presentation of analysis results
On the left, the clusters found by the analysis are displayed hierarchically on a tab. The nodes mapped here are named through the first identity found when analysis data is selected with wizards. The naming of predefined analysis methods follows specified rules in the program settings. You can change names using F2 or Rename in the context menu.
The number of occurrences is displayed graphically in the columns <Identities> and <Permissions>. The display is normed in both columns, which means the group with the highest number of identities or permissions assigned to it corresponds to 100 percent and is represented with maximized bars.
Table 21: Meaning of items in the context menu in view 1
|
Paste |
Marks the business role for transfer into the database. |
|
Add recursively |
Marks the business role and its child roles for transfer into the database. |
|
Delete |
Removes the business role from the data transfer set. |
|
Create |
Defines a new business role. |
|
Delete |
Deletes the business role. |
|
Rename |
Renames the business role. |
|
Generate business roles names |
Generates business role names according to the rules specified (Database> > Settings menu). |
|
Optimize business roles |
Optimizes the business roles. Empty business roles are deleted. |
|
Properties |
Displays other properties of the business role such as user accounts and permissions. |
When a structure node is selected the identities (above) and permissions (below) contained in it are listed in view (2). You can use the color similarity bar to help identify where permissions overlap with each other and how far the user’s actual permissions situation fits to the permissions assignment of the selected role. Matching group memberships are green, but non-matching, additional group memberships are red. Directly below this, you see each of the identity’s permissions for the analyzed target systems separately. A permissions weighting is displayed depending on the program settings.
Table 22: Meaning of items in the context menu in view 2
|
Add to business role |
Adds identity/permissions to the hierarchy of the selected business role. |
|
Remove from business role |
Removes identity/permissions from the hierarchy of the selected business role. |
|
Compare |
Compares identities with each other. The result is displayed in view 3. |
|
Mark assignments |
Marks identity/permissions assignments in the hierarchy. |
|
Properties |
Shows other properties of active objects. |
You can analyze permissions memberships of individual identities by multi-selecting in the list of identities and running a direct comparison.
To compare identity memberships
TIP: When you click on an identity in this list, they become the reference identity. The colored similarity bars are aligned to this identity.
