In addition to the monitoring tools in Safeguard for Privileged Passwords (SPP), you can use the SPP to SPS link issues during the linking process. Several SPS tools are described below.
Link process fails and real-time monitoring
If the linking process fails for any reason, consult the system logs.
To view the Safeguard for Privileged Sessions logs, navigate to Basic Settings > Troubleshooting > View log files.
To show only the logs for the linking process:
- Select a Logtype of syslog.
- Select the Day; today is the default.
- In the Show only messages containing text box, enter SPP-join.
Use the buttons at the bottom of the dialog to perform the following tasks:
- To download the log file, click Download.
- To follow the current log messages real-time, click Tail. The latest logs will update in a browser window while you interact with the linking process.
- To display the log messages, click View.
To increase the level of detail in the log, enable debug level logging:
- Navigate to Basic Settings > Troubleshooting > Create support bundle.
- Click Start.
Linking successful but connections do not work
When SPP and SPS report a successful linking, but the connections do not work, view the SPS connection logs.
In Safeguard for Privileged Sessions, navigate to Basic Settings > Troubleshooting > View log files.
To show only the logs for the linking process:
- Select a Logtype of ssh or rdp.
- Select the Day (today is the default).
- In the Show only messages containing text box, enter SPP-join.
To change the verbosity level of SPS, complete the following steps in Safeguard for Privileged Sessions:
- Navigate to the Global Options page of the traffic for which you want to change the log level. For example, go to SSH Control > Global Options to change the log level of SSH traffic, RDP Control > Global Options for remote desktop traffic, and so on.
-
Select the desired log level from the Verbosity level field. The verbosity level ranges from 1 (no logging) to 10 (extremely detailed), with level 4 being the default normal level.
|

|
CAUTION: High verbosity levels generate a very large amount of log messages and might result in a very high load on the machine. Log levels set around 9 to 10, may result in logs with highly sensitive data, for example, passwords in plain text format. |
Testing network issues
You can use the Diagnostics tools of SPP and SPS to test network issues. The following commands are available:
- ping: Sends a simple message to the specified host to test network connectivity.
- traceroute: Sends a simple message from SPS to the specified host and displays all hosts on the path of the message. It is used to trace the path the message travels between the hosts.
- connect: Attempts to connect the specified host using the specified port. It is used to test the availability or status of an application on the target host.
To execute one of the above commands on SPS, see Network troubleshooting.
To execute one of the above commands on SPP, see Diagnostics tools of SPP.
Creating an SPS Support Bundle
If you have an issue which needs Support assistance, you may be asked to provide an SPS Support Bundle. To collect system-state information (also known as a debug bundle) in One Identity Safeguard for Privileged Sessions, see Collecting logs and system information for error reporting.
Configuring external devices
This section describes scenarios about configuring external devices to redirect selected traffic to One Identity Safeguard for Privileged Sessions (SPS).
Topics:
The following describes how to configure a Linux-based router to redirect selected traffic to One Identity Safeguard for Privileged Sessions (SPS) instead of its original destination. This procedure should work on most modern Linux-based routers, including Check Point firewalls.
Prerequisites
The router must have the iptables and ip tools installed.
To configure a Linux-based router to redirect selected traffic to SPS instead of its original destination
-
Create the packet filter rules that will mark the connections to be sent to SPS using the CONNMARK feature of iptables. Mark only those connections that must be redirected to SPS.
# iptables -t mangle -I PREROUTING -i <interface-facing-the-clients> -p tcp -d <network-of-the-servers> --dport <port-to-access> -j CONNMARK --set-mark 1
Example: Setting up a connection mark for Linux policy routing
For example, if the network interface of the router that faces the clients is called eth0, the servers are located in the 10.0.0.0/24 subnet, and the clients access the servers using port 3389 (the default port of the RDP protocol), then this command looks like:
# iptables -t mangle -I PREROUTING -i eth0 -p tcp -d 10.0.0.0/24 --dport 3389 -j CONNMARK --set-mark 1
-
Create a rule that redirects the answers of the servers to SPS. That way both the client-to-server and the server-to-client traffic is routed to SPS.
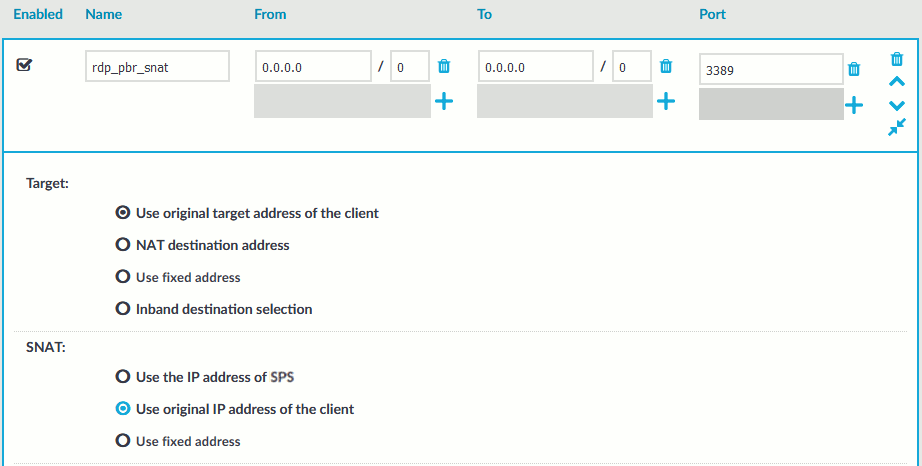
NOTE: This step is only required if you want to use Source NAT (IP Spoofing) instead of SPS’s address towards the monitored servers.
Figure 392: Control > Connections — Using SNAT
# iptables -t mangle -I PREROUTING -i <interface-facing-the-servers> -p tcp -s <network-of-the-servers> --sport <port-to-access> -j CONNMARK --set-mark 1
-
Convert the CONNMARK marks to MARK:
# iptables -t mangle -A PREROUTING ! -i <interface-facing-the-scb> -m connmark --mark 1 -j MARK --set-mark 1
|
|
Caution:
This rule must be placed after the CONNMARK rules. |
-
Add the table name to the /etc/iproute2/rt_tables of the router. Use the following format (for details on routing tables, see for example the Guide to IP Layer Network Administration with Linux):
103 scb
-
Create a routing table that has a single entry with a default route to SPS:
# /sbin/ip route add default via <ip-address-of-SPS> table scb
-
Create a routing rule that selects the routing table called scb, if the connection is marked.
# /sbin/ip rule add from all fwmark 1 table scb
-
If SPS is configured to spoof the IP address of the clients on the server side (that is, the SNAT > Use original IP address of the client option of the connection policies is selected), enable spoofing on the router for the interface connected to SPS.
# echo 0 > /proc/sys/net/ipv4/conf/<interface-facing-SPS>/rp_filter
# echo 0 > /proc/sys/net/ipv4/conf/all/rp_filter
Expected result
The traffic from the clients targeting the specified port of the servers is redirected to SPS. Therefore, SPS can be configured to control and audit this traffic.
The following describes how to configure a Cisco router to redirect selected traffic to One Identity Safeguard for Privileged Sessions (SPS) instead of its original destination. This procedure should work on most modern Cisco IOS releases but was specifically tested on IOS version 12.3.
To configure a Cisco router to redirect selected traffic to SPS instead of its original destination
-
Create an ACL (Access Control List) entry that matches the client and server subnets and the to-be-audited port. Keep in mind that whatever is permitted by this ACL is what will be matched, so make sure that the scope of the ACL entry is narrowed down as much as possible.
#(config) ip access-list extended ssh-inbound
#(config-ext-nacl) permit tcp <src net> <src mask> <dst net> <dst mask> eq <dst port>
Example: Configuring an ACL entry for Cisco policy routing
For example, if the clients are in the 192.168.0.0/24 subnet, the servers are located in the 10.0.0.0/24 subnet, and the clients access the servers using port 22 (the default port of the SSH protocol), then the permit clause should be:
#(config-ext-nacl) permit tcp 192.168.0.0 0.0.0.255 10.0.0.0 0.0.0.255 eq 22
TIP: Cisco ACLs use inverse netmasks for defining network addresses. To calculate an inverse mask given a subnet mask, simply subtract each octet value from 255.
-
Create an ACL entry that matches the reply packets coming from the server zone and targeted at the client zone to make sure that replies are reaching the SPS.
#(config) ip access-list extended ssh-outbound
#(config-ext-nacl) permit tcp <dst net> <dst mask> eq <dst port> <src net> <src mask>
NOTE: This step is only required if you want to use Source NAT (IP Spoofing) instead of SPS’s address towards the monitored servers.
Figure 393: Control > Connections — Using SNAT
Example: Configuring an ACL entry for reply packets with Cisco policy routing
In case of the example in step 1, the permit clause should be:
#(config-ext-nacl) permit tcp 10.0.0.0 0.0.0.255 eq 22 192.168.0.0 0.0.0.255
-
Create a route-map entry. It controls which packets are affected by policy routing and where they should be forwarded to. The match commands specify the conditions under which policy routing occurs. The set commands specify the routing actions to perform if the criteria enforced by the match commands are met. A new route-map can be defined as follows:
#(config) route-map scb-inbound
-
Set your route-map to match the traffic in ACL ssh-inbound:
#(config-route-map) match ip address ssh-inbound
-
Set an action on the matching traffic. Define a next-hop entry to redirect the traffic to the SPS.
#(config-route-map) set ip next-hop <SPS IP address>
-
Create another route-map that controls the reply packet flow.
#(config) route-map scb-outbound
#(config-route-map) match ip address ssh-outbound
#(config-route-map) set ip next-hop <SPS IP address>
NOTE: This step is only required if you want to use Source NAT (IP Spoofing) instead of SPS’s address towards the monitored servers.
Figure 394: Control > Connections — Using SNAT
-
Apply the route-map to the appropriate interfaces.
-
First, add the ssh-inbound route-map entry to the interface facing the clients:
#(config) interface <interface-facing-the-clients>
#(config-if) ip policy route-map scb-inbound
-
Then add the ssh-outbound route-map entry to the interface facing the servers:
#(config) interface <interface-facing-the-servers>
#(config-if) ip policy route-map scb-outbound
Expected result
The traffic from the clients targeting the specified port of the servers is redirected to SPS. Therefore, SPS can be configured to control and audit this traffic.
The full configuration for the above topology:
! interface facing the clients
interface FastEthernet0/0
 ip address 192.168.0.254 255.255.255.0
 ip policy route-map scb-inbound
 duplex full
 speed auto
 no mop enabled

! interface facing the SCB
interface FastEthernet0/1
 ip address 172.16.0.254 255.255.255.0
 duplex full
 speed auto
 no mop enabled

! interface facing the servers
interface FastEthernet1/0
 ip address 10.0.0.254 255.255.255.0
 ip policy route-map scb-outbound
 duplex full
 speed auto
 no mop enabled

! access lists matching the server and client subnets and the SSH port - incoming packets
ip access-list extended ssh-inbound
 permit tcp 192.168.0.0 0.0.0.255 10.0.0.0 0.0.0.255 eq 22
! access lists matching the server and client subnets and the SSH port - reply packets
ip access-list extended ssh-outbound
 permit tcp 10.0.0.0 0.0.0.255 eq 22 192.168.0.0 0.0.0.255

! policy routing entry matching on the incoming SSH connections and
! redirecting them to the SCB external interface
route-map scb-inbound permit 10
 match ip address ssh-inbound
 set ip next-hop 172.16.0.1

! the following part is only required for SNAT-based SCB configuration
! policy routing entry matching on the SSH reply packets and
! redirecting them to the SCB external interface
route-map scb-outbound permit 10
 match ip address ssh-outbound
 set ip next-hop 172.16.0.1
