Converse agora com nosso suporte
Chat com o suporte

One Identity Safeguard for Privileged Sessions 7.4 - Administration Guide

Preface Introduction The concepts of One Identity Safeguard for Privileged Sessions (SPS)
The philosophy of One Identity Safeguard for Privileged Sessions (SPS) Policies Credential Stores Plugin framework Indexing Supported protocols and client applications Modes of operation Connecting to a server through One Identity Safeguard for Privileged Sessions (SPS) Archive and backup concepts Maximizing the scope of auditing IPv6 in One Identity Safeguard for Privileged Sessions (SPS) SSH host keys Authenticating clients using public-key authentication in SSH The gateway authentication process Four-eyes authorization Network interfaces High Availability support in One Identity Safeguard for Privileged Sessions (SPS) Versions and releases of One Identity Safeguard for Privileged Sessions (SPS) Accessing and configuring One Identity Safeguard for Privileged Sessions (SPS)
Cloud deployment considerations The Welcome Wizard and the first login Basic settings
Supported web browsers The structure of the web interface Network settings Configuring date and time System logging, SNMP and e-mail alerts Configuring system monitoring on SPS Data and configuration backups Archiving Cleaning up audit data Using plugins Forwarding data to third-party systems Starling integration
User management and access control
Login settings Managing One Identity Safeguard for Privileged Sessions (SPS) users locally Setting password policies for local users Managing local user groups Managing One Identity Safeguard for Privileged Sessions (SPS) users from an LDAP database Authenticating users to a RADIUS server Authenticating users with X.509 certificates Authenticating users with SAML2 Managing user rights and usergroups Creating rules for restricting access to search audit data Displaying the privileges of users and user groups Listing and searching configuration changes
Managing One Identity Safeguard for Privileged Sessions (SPS)
Controlling One Identity Safeguard for Privileged Sessions (SPS): reboot, shutdown Managing One Identity Safeguard for Privileged Sessions (SPS) clusters Managing a High Availability One Identity Safeguard for Privileged Sessions (SPS) cluster Upgrading One Identity Safeguard for Privileged Sessions (SPS) Managing the One Identity Safeguard for Privileged Sessions (SPS) license Accessing the One Identity Safeguard for Privileged Sessions (SPS) console Sealed mode Out-of-band management of One Identity Safeguard for Privileged Sessions (SPS) Managing the certificates used on One Identity Safeguard for Privileged Sessions (SPS)
General connection settings HTTP-specific settings ICA-specific settings MSSQL-specific settings RDP-specific settings SSH-specific settings Using Sudo with SPS Telnet-specific settings VMware Horizon View connections VNC-specific settings Indexing audit trails Using the Search interface Advanced authentication and authorization techniques Reports The One Identity Safeguard for Privileged Sessions (SPS) REST API One Identity Safeguard for Privileged Sessions (SPS) scenarios Troubleshooting One Identity Safeguard for Privileged Sessions (SPS)
Network troubleshooting Gathering data about system problems Viewing logs on One Identity Safeguard for Privileged Sessions (SPS) Changing log verbosity level of One Identity Safeguard for Privileged Sessions (SPS) Collecting logs and system information for error reporting Collecting logs and system information of the boot process for error reporting Support hotfixes Status history and statistics Troubleshooting a One Identity Safeguard for Privileged Sessions (SPS) cluster Understanding One Identity Safeguard for Privileged Sessions (SPS) RAID status Restoring One Identity Safeguard for Privileged Sessions (SPS) configuration and data VNC is not working with TLS Configuring the IPMI from the BIOS after losing IPMI password Incomplete TSA response received Using UPN usernames in audited SSH connections
Using SPS with SPP Configuring external devices Using SCP with agent-forwarding Security checklist for configuring One Identity Safeguard for Privileged Sessions (SPS) Jumplists for in-product help Configuring SPS to use an LDAP backend Glossary

Customize system logging in One Identity Safeguard for Privileged Sessions (SPS)

One Identity Safeguard for Privileged Sessions (SPS) uses the syslog-ng Open Source Edition application (version 3.16) for system logging. Starting with SPS 5 LTS, you can customize its configuration to better integrate SPS into your logging infrastructure. If you are not familiar with syslog-ng Open Source Edition, read how syslog-ng OSE works. Customizing the configuration of syslog-ng Open Source Edition allows you to better integrate the log messages of SPS into your environment, for example, to:

  • change the message format or rename message fields,

  • send the messages to multiple logservers or SIEMs, or to

  • select (filter) which messages to send to your logserver.

Limitations

Note that not every feature described in the syslog-ng Open Source Edition documentation is available on SPS. Typically, features that are only rarely used on logging clients are not available (for example, Java-based destinations like HDFS and Elasticsearch). For a detailed list of available modules, execute the syslog-ng --module-registry command.

Customize the syslog-ng configuration

Do not change the syslog configuration of SPS unless you know exactly what you are doing. Incorrect changes can decrease the performance of SPS, deactivate system logging, or cause message loss.

While customizing the syslog-ng configuration, note the following points in particular:

  1. Create a SPS configuration snippet in a file. Make sure that the filename ends with .conf. Note that syslog-ng OSE uses the configuration objects defined in these files only if they are used in a log path as well, so make sure to include a log path.

    Do not loop messages. That is, make sure that the destination does not send a message back to the original source of the message (doing so would cause an infinite loop).

  2. Copy it to the /etc/syslog-ng/conf.d/ directory of the core firmware. (If you are using a high-availability SPS cluster, SPS automatically copies the file to the secondary node as well.)

    Files located in this directory do not taint the SPS configuration and SPS automatically includes them in the configuration of syslog-ng Open Source Edition.

    Do not modify the original configuration files (for example, /etc/syslog-ng/syslog-ng.conf or /etc/syslog-ng/conf.d/message-queue-client.conf).

  3. Verify that the resulting syslog-ng OSE configuration file is syntactically valid. The configuration is valid if executing the following command does not show any syntax errors: syslog-ng --syntax-only --no-caps

  4. Your changes will take effect only after you reload the configuration of syslog-ng Open Source Edition using the following command: syslog-ng-ctl reload

    If there are any errors in the configuration, SPS keeps on using the earlier configuration. In this case, correct the configuration, because if SPS reboots while the syslog-ng OSE configuration is invalid, SPS will not be able to log messages.

Available sources

You can use the following sources in your custom configuration. These sources are defined in the stock configuration file of syslog-ng OSE, and are in regular syslog message format (except for s_message_queue_client).

  • s_core_journal: Logs of the SPS host, including log messages about the audited sessions.

  • s_message_queue_client: Logs about the audited sessions in JSON format.

  • s_slave_boot: Logs from the boot firmware of the secondary node in a high-availability SPS cluster.

  • src: Logs messages of local SPS services.

  • src-internal: The internal logs of syslog-ng OSE running on SPS.

Certificates and encrypted connections

If you are using a custom destination that requires a certificate (either to authenticate SPS, or to verify the identity of the logserver). In this case, copy the certificates to SPS into the /etc/syslog-ng/conf.d/ directory. In the custom syslog configuration you cannot use the certificates uploaded to SPS using the web interface.

SIEM integration

Customizing the syslog configuration of SPS allows you to send log messages directly to your SIEM (for example, Splunk) in a format that your SIEM can understand.

One Identity can provide you the configuration files needed to send the log messages of SPS to Splunk in the Splunk Common Information Model (CIM) format. If you are interested, contact our Support Team.

If you need assistance to use another SIEM format, contact professionalservices@balabit.com.

Examples

The following configuration snippet reads the messages from the built-in s_message_queue_client source, parses the JSON message, and sends the messages to a remote destination using the RFC5424 message format (the body of the message remains in JSON).

parser json {
    json-parser(
        prefix(".scb.")
        template("$MSG")
    );
};

destination d_custom_remote {
    syslog(
        "192.168.1.1"
        transport(tcp)
        port(6514)
        template("$(format-json --key .scb.*)\n")
    );
};

log {
    source(s_message_queue_client);
    parser(json);
    destination(d_custom_remote);
};

A sample log message using the above configuration is the following (line-breaks added for clarity):

{"_scb":
  {
    "username":"frobert",
        "timestamp":"1499673286.380022",
        "session_id":"svc/hm4soFrNYeAmkyzLVkzi1o/ssh_demo:4",
        "server_port":"22",
        "server_ip":"10.30.255.70",
        "protocol":"ssh",
        "event_type":"server_authentication_success",
        "connection_name":"ssh_demo",
        "client_port":"50830",
        "client_ip":"10.30.255.70"
    }
}

To use this configuration snippet on your SPS, copy it to a file (make sure that the filename ends with .conf), change the IP address and port number to match your environment, copy it to the core firmware of your SPS into the /etc/syslog-ng/conf.d directory, then reload the syslog-ng configuration using syslog-ng-ctl reload.

Configuring system monitoring on SPS

SPS supports the SNMPv2c and SNMPv3 protocols. The SNMP server set on the Management tab can query status information from SPS.

NOTE: In order to have your central monitoring system to recognize the SNMP alerts sent by SPS, import the SPS-specific Management Information Base (MIB) into your monitoring system. Download all MIBs by navigating to Basic Settings > Alerting & Monitoring and clicking Download MIBs and import them into your monitoring system. For details, see the documentation of your monitoring system.

Topics:

Configuring monitoring

The following describes how to configure monitoring.

To configure monitoring

  1. Navigate to Basic Settings > Alerting & Monitoring.

  2. The default threshold values of the parameters are suitable for most situations. Adjust the threshold values only if needed.

  3. Click .

  4. Navigate to Basic Settings > Management and verify that the SNMP settings and Mail settings of SPS are correct. SPS sends alerts only to the alert e-mail address and to the SNMP server.

    Caution:

    Sending alerts fails if these settings are incorrect.

The following sections describe the parameters you can receive alerts on.

Health monitoring

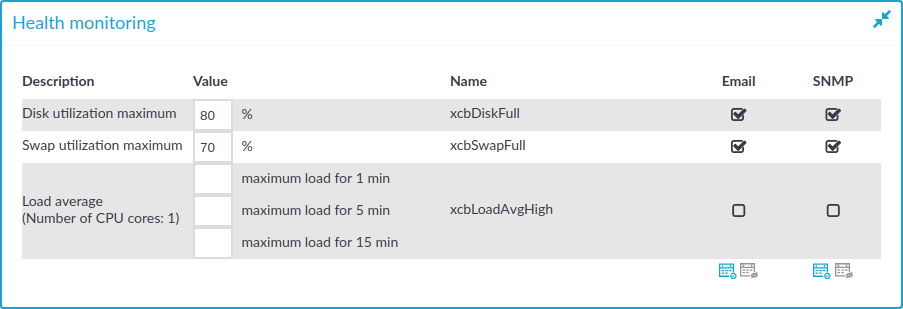
SPS continuously monitors a number of parameters of the SPS hardware and its environment. If a parameter reaches a critical level (set in its respective Maximum field), SPS sends e-mail or SNMP messages to alert the administrator.

Figure 63: Basic Settings > Alerting & Monitoring — Health monitoring

  • Disk utilization maximum: Ratio of free space available on the hard disk. SPS sends an alert if the audit trails use more space than the set value. Archive the audit trails to a backup server to free disk space. For details, see Archiving.

    NOTE: The alert message includes the actual disk usage, not the limit set on the web interface. For example, you set SPS to alert if the disk usage increases above 10 percent. If the disk usage of SPS increases above this limit (for example to 17 percent), you receive the following alert message: less than 90% free (= 17%). This means that the amount of used disk space increased above 10% (what you set as a limit, so it is less than 90%), namely to 17%.

  • Load average: The average load of SPS during the last one, five, or 15 minutes.

  • Swap utilization maximum: Ratio of the swap space used by SPS. SPS sends an alert if it uses more swap space than the set value.

Documentos relacionados

The document was helpful.

Selecione a classificação

I easily found the information I needed.

Selecione a classificação