Opening the portal
We strongly recommend using HTTPS to access the Defender Management Portal. The secure hypertext transfer protocol (HTTPS) is a communications protocol designed to transfer encrypted information between computers over the World Wide Web. For instructions on how to configure SSL in order to support HTTPS connections from client applications, see the article “Configuring Secure Sockets Layer in IIS 7” at http://technet.microsoft.com/en-us/library/cc771438%28WS.10%29.aspx.
To open the Defender Management Portal
- In your Web browser, go to the following address:
http(s)://<portal computer>:<port>
where
- <portal computer> is the fully qualified domain name of the computer on which the Defender Management Portal is installed.
- <port> is the port number at which the Defender Management Portal can be accessed. You specify this port when installing the Defender Management Portal. The default port is 8080.
- On the Defender Management Portal sign-in page, enter your user name, password, and domain, and then click Sign in.
The Defender Management Portal home page opens.
The options available to you on the Defender Management Portal home page depend on the portal role assigned to the user account with which you sign in to the portal. For more information, see Portal roles.
When you sign in to the Defender Management Portal as a portal administrator, the home page provides all available options and looks as follows:
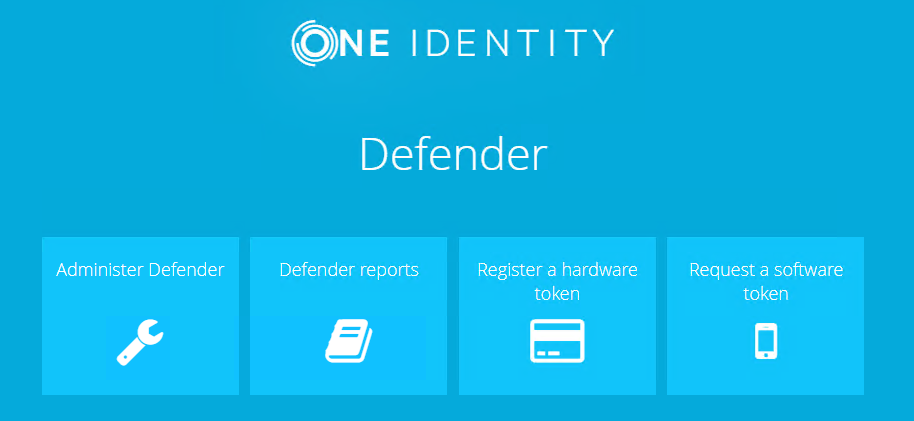
- Administer Defender Allows you to manage the Defender Management Portal configuration, configure self-service for users, manage users and security tokens, diagnose and resolve authentication issues, view authentication statistics, and view information about the Defender Security Servers deployed in your environment.
- Defender reports Allows you to schedule, generate, and view Defender reports.
- Register a hardware token Starts a wizard that guides you through registering the hardware token given to you by your system administrator.
- Request a software token Starts a wizard that helps you to request, download, and activate a software token.
To return to the Defender Management Portal home page from any other page of the portal, in the upper right corner of your current portal page, click the Home button.
Specifying a service account for the portal
After installing the Defender Management Portal, you need to specify a service account for the portal. This account must be a member of the Local Administrators group on the computer where the Management Portal is installed and a member of the Domain Users group in the corresponding domain. By default, the Defender Management Portal uses the service account to do the following:
- Program and assign software tokens requested through the Defender Self-Service Portal.
- Retrieve data for Defender reports from Active Directory.
All other operations are performed under the account used to access the Defender Management Portal.
To specify a service account
- Sign in to the Defender Management Portal as a portal administrator.
For instructions, see Opening the portal.
- On the Defender Management Portal home page, click Administer Defender:
- In the left pane, click the Configuration tab.
- In the right pane, click the Service Account tab.
- Type the credentials of the user account you want to set as a service account for the portal.
- When you are finished, click the Save button to save your changes.
If the specified account does not have the “Log on locally” right, that right is granted to the account automatically after you click the Save button.
Configuring the portal
When configuring the Defender Management Portal, you can do the following:
- Specify the service account under which the Defender Management Portal will perform operations.
- Assign portal roles to the Active Directory groups of your choice.
- Manage the configuration of the Log Receiver Service.
This service retrieves log files from the Defender Security Servers to the Defender Management Portal computer. The Defender Management Portal uses the retrieved log files to display authentication statistics and Defender Security Server warning messages and logs.
- Specify the location that holds the Defender Security Server log files.
The Defender Management Portal uses the log files in the specified location to generate Defender reports.
To configure the Defender Management Portal
- Sign in to the Defender Management Portal as a portal administrator.
- For instructions, see Opening the portal.
- Click the Administer Defender option.
- In the left pane, click the Configuration tab.
- In the right pane use the following tabs to configure the Defender Management Portal:
- Service Account tab Use this tab to specify the Defender Management Portal service account.
- Roles tab Use this tab to assign the Defender Management Portal roles to the Active Directory groups you want.
- Log Receiver Service tab Use this tab to manage the Defender Log Receiver service. This service retrieves log files from the Defender Security Servers to the Defender Management Portal computer.
- Reports tab Use this tab to specify folder for storing log files of the Defender Security Servers deployed in your environment.
Service Account tab
Use the Service Account tab to specify the Defender Management Portal service account. By default, the Defender Management Portal uses the service account to do the following:
- Program and assign the software tokens requested through the Defender Self-Service Portal.
- Retrieve Active Directory data for Defender reports.
The portal performs all other actions under the account with which the user signs in to the portal.
On the Service Account tab, you can use the following elements:
- User name Type the user name of the account you want to appoint as the Defender Management Portal service account. The account you specify must be a member of the local Administrators group on the computer where the Defender Management Portal is installed.
- Password Type the password that matches the user name you have typed in the User name text box.
- Domain Type the name of the Active Directory domain to which the user account belongs.
- Use service account for all actions Select this check box if you want the Defender Management Portal to perform all actions under the specified service account. If you select this check box, the Defender Management Portal stops providing any information about the actions that users perform through the portal.
If the account you specify does not have the “Log on locally” right, that right is granted to the account automatically after you click the Save button on this tab.
You can create a new dedicated user account and appoint it as the Defender Management Portal service account. For more information, see Delegating Defender roles, tasks, and functions.
