
SAML federated
This example uses Microsoft AD FS v2 to federate users using SAML 2.0. However, it should be possible to use any SAML 2.0 compliant IDP.
To configure SAML federated authentication
-
Log in to the Administration Console and select Add New from the Front-end Authentication section on the home page.
NOTE: If SAML federation is enabled, users primary credentials will not be populated on user login, this is because SAML tokens do not include the password. Users will need to populate their primary credentials manually in a one time task, either in the Cloud Access Manager Password Wallet, or when they first access an application that requires their primary credentials. Please note, this applies to other Front-end Authenticators that do not provide a user password on login, for example Smart card authentication or Kerberos authentication.
- Select SAML Federated, then click Next.
-
In the Federation Metadata URL field, enter the federation metadata URL provided by your IDP. The example URL shown below can be found in ADFS Management Console | Service | Endpoints | Metadata.
https://<Host FQDN>/FederationMetaData/2007-06/FederationMetaData.xml
Alternatively, click Browse to locate the file containing federation metadata. Refer to your IDP configuration interface for assistance with locating this information.
If you have entered the federation metadata URL as described above, you can optionally chose to have the metadate periodically refreshed by selecting the Periodically refresh metadata check box. If you have selected a metadata URL, click Next and skip to Step 6.
NOTE: If you configured the front-end authentication using metadata, then Cloud Access Manager can store multiple signing certificates if they are specified in the metadata file. This will allow Cloud Access Manager to handle the situation where the certificate used to sign the authentication response changes when one of the certificates expires.
- In the IDP Login URL field, enter the Issuer/IDP Service URL. For ADFS v2, this will be https://<FederationServiceName>/adfs/ls/. To find the Federation Service Name from the AD FS host, open the AD FS 2.0 management console and click Edit Federated Service Properties.
-
Click Browse to locate and upload the contents of the IDP's public signing certificate in Base-64 encoded X.509 (.CER) format.
For AD FS v2, this certificate is known as the Token-signing certificate. To obtain the certificate from the AD FS host, open the AD FS 2.0 management console, click Service | Certificates, then double-click the Token-signing certificate. From here, click Copy to file to save the certificate.
- On the User Identity Claims page, click Next.
-
In the Authenticator Name field, enter the name that will be used to identify the authenticator within Cloud Access Manager, then click Finish.
The Front-end Authentication Method Created page is now displayed. Leave this page open.
- Before you click Edit Roles, we will switch to the SAML host (AD FS v2 in this case) and configure Cloud Access Manager as a Relying Party.
- On the AD FS host, open the AD FS 2.0 management console and click Add Relying Party Trust.
- Click Start to launch the wizard.
-
It is recommended that you use the metadata produced by Cloud Access Manager to configure the trust relationship with the STS.
- To configure this in AD FS, select Import data about the relying party published on a local network and enter the metadata URL shown in the Cloud Access Manager console.
- Or download the Cloud Access Manager metadata from the console and select Import data about the relying party from a file to upload the file to AD FS and click Next.
Otherwise, select Enter data about the relying party manually and click Next.
- Enter a name for the trust, for example Cloud Access Manager. If using metadata skip to Step 18.
- Select AD FS 2.0 profile, then click Next.
- Click Next on the Optional Token Encryption page to skip this step.
- Select Enable support for the SAML 2.0 WebSSO protocol.
- Enter the Relying Party SAML 2.0 SSO service URL. To find this URL, switch back to the Cloud Access Manager console and copy the Recipient URL. For example, https://www.webapps.democorp.com/CloudAccessManager/RPSTS/Saml2/Login.aspx. Click Next.
- Enter the Relying party trust identifier. To find this information, switch back to the Cloud Access Manager console and copy the Audience/SP Identity value. For example, urn:CloudAccessManager/RPSTS. Click Add, then Next.
- Select Permit all users to access this relying party, then click Next.
- Review the configuration information, then click Next.
- Ensure that the Open the Edit Claim Rules dialog option is selected and click Close.
- Click Add Rule.
- Select Send LDAP Attributes as Claims and click Next.
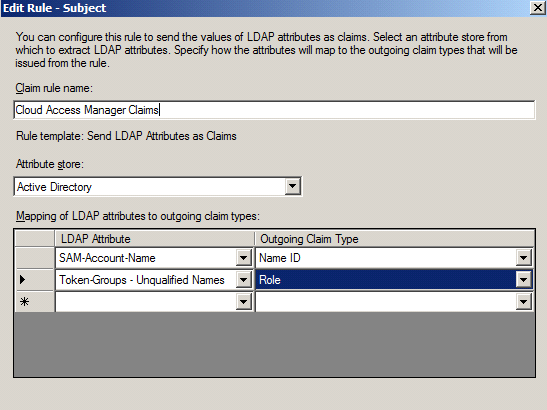
- Enter a claim rule name, for example Cloud Access Manager Claims.
- Set the Attribute store to Active Directory.
- Select an LDAP Attribute of SAM-Account-Name and an Outgoing Claim Type of Name ID for the first claim mapping. This claim is required to identify the user to Cloud Access Manager.
- On the second row, select an LDAP Attribute of Token-Groups - Unqualified Name and an Outgoing Claim Type of Role.
-
Click Finish.
NOTE: By default Cloud Access Manager will perform authorization based on claims of the type Role. If you use a different claim type you will also need to change the claim type within Cloud Access Manager during the Role Mappings configuration.
- The Edit Claim Rules for... page is displayed. Click OK.
-
To support single sign out, logout requests from Cloud Access Manager need to be signed. If you use metadata to configure AD FS then the certificate will have been loaded already.
If you are configuring manually:- Switch back to the Cloud Access Manager console and download the Signing certificate
- Copy the certificate to the computer running AD FS
- In AD FS view the Properties for the newly created Relying Party Trust and switch to the Signature tab
- Click Add… and select the Cloud Access Manager signing certificate.
-
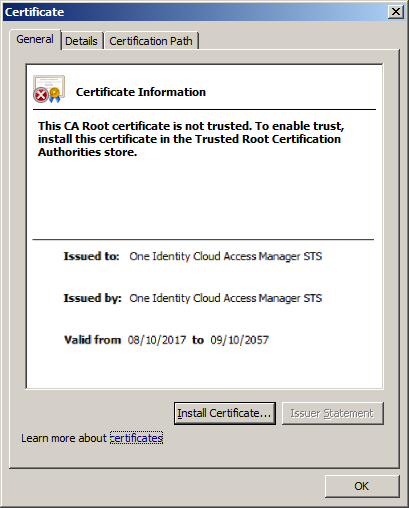
You now need to add the certificate to Trusted Root Certification Authorities so that it is trusted by ADFS. Go to the Signature tab in the ADFS Properties and click View... if the certificate is not trusted you will see a warning similar to the one below.
To allow the certificate to be trusted:
- Click Install Certificate…
- In the wizard click Next, then select Place all certificates in the following store.
- Click Browse… and select Trusted Root Certification Authorities, click OK, then Next and Finish.
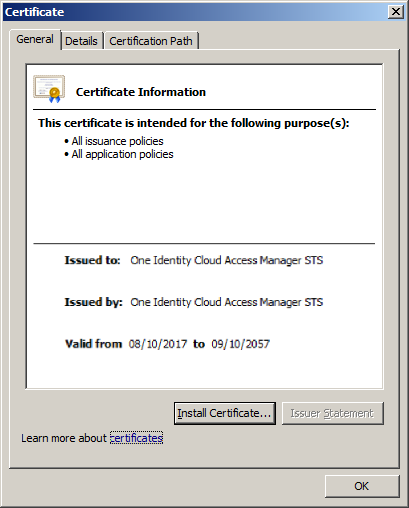
- When the Security Warning dialog is displayed, confirm that the certificate is for Cloud Access Manager STS Trust and click Yes.
The certificate is now trusted. You can confirm this by closing and re-opening the certificate dialog. The certificate will now appear as below.
- To complete the configuration you will need to set the hash algorithm for the relying party trust. In AD FS view Properties for the newly created Relying Party Trust, switch to the Advanced tab and select SHA-1 from the list of secure hash algorithms. Click OK.
- Configuration of the Relying Party Trust on the AD FS host is now complete. Switch back to the Cloud Access Manager console to complete the configuration.
- On the Front-end Authentication Method Created page, click Edit Roles.
-
Before Cloud Access Manager administrators and users can log in to Cloud Access Manager using their federated identity, you must tell Cloud Access Manager how to identify administrators and users based on their claims. For AD FS v2, the claim could be an AD group name in a role claim. For example, the Domain Admins group for Cloud Access Manager administrators and the Domain Users group for regular Cloud Access Manager users.
NOTE: By default Cloud Access Manager will look for claims of the type role. If you configured claims of a different type, update the Allow users with a claim named field with the different type.
- Click Admin.
- Click +Add User.
- Select the new SAML front-end authentication method from the list.
- Select Include selected user/group from the Rule Type list.
- Enter Domain Admins into the Having value field.
-
Click Save.
- Now repeat the process for the Cloud Access Manager users. Click User.
- Click Add User.
- Select the new SAML front-end authentication method from the list.
- Enter Domain Users into the Having value field.
- Click Save.
- Click Close to return to the Cloud Access Manager Administration Console.


The configuration is now complete. Cloud Access Manager administrators and users can now log in to Cloud Access Manager using their Active Directory federated credentials. For example, users who belong to the AD Domain Admins security group will be able to log in and configure Cloud Access Manager and all domain users will be able to log in to the Cloud Access Manager portal using their federated identity.
|
|
NOTE: To fully support logout from AD FS, you must configure AD FS to not use integrated authentication. Once an NTLM connection has been established it will be retained in the browser for its lifetime, and will be used for all connections between the browser and AD FS. Logout from AD FS will appear to work, but on the next connection to AD FS the browser will use the cached connection details and you will be logged on without requiring re-authentication. |
WS-Federated
This example uses Microsoft AD FS v2 to federate users using WS-Federation.
To configure WS-Federated authentication
- Log in to the Administration Console and select Add New from the Front-end Authentication section on the home page.
- Select WS-Federated, then click Next.
-
In the Federation Metadata URL field, enter the federation metadata URL provided by your IDP. The example URL shown below can be found in ADFS Management Console | Service | Endpoints | Metadata.
https://dc01.qctest.local/FederationMetaData/2007-06/FederationMetaData.xml
Alternatively, click Browse to locate the file containing federation metadata. Refer to your IDP configuration interface for assistance with locating this information.
If you have entered the federation metadata URL as described above, you can optionally chose to have the metadate periodically refreshed by selecting the Periodically refresh metadata check box. If you have selected a metadata URL, click Next and skip to Step 6.
NOTE: If you configured the front-end authentication using metadata, then Cloud Access Manager can store multiple signing certificates if they are specified in the metadata file. This will allow Cloud Access Manager to handle the situation where the certificate used to sign the authentication response changes when one of the certificates expires.
- Enter the Endpoint URL. For AD FS v2 this will be https://<FederationServiceName>/adfs/ls/ . To obtain the Federation Service Name from the AD FS host, open the AD FS 2.0 management console and click Edit Federated Service Properties.
-
Click Browse to locate and upload the contents of the IDP's public signing certificate in Base-64 encoded X.509 (.CER) format.
For AD FS v2 this certificate is known as the Token-signing certificate. To obtain the certificate from the AD FS host, open the AD FS 2.0 management console, click Service Certificates, then double-click the Token-signing certificate. Click Copy to file to save the certificate.
- From the WS-Federation Trust Settings page which you configured earlier, click Next.
- The User Identity Claims page is displayed. Click Next.
- In the Authenticator Name field, enter the name that will be used to identify the authenticator within Cloud Access Manager, then click Finish.
- The Front-end Authentication Method Created page is displayed. Leave this page open.
-
We will now switch to AD FS and configure Cloud Access Manager as a Relying Party.
On the ADFS host, open the AD FS 2.0 management console and click Add Relying Party Trust.
- Click Start to launch the wizard.
-
It is recommended that you use the metadata produced by Cloud Access Manager to configure the trust relationship with the STS.
- To configure this in AD FS, select Import data about the relying party published on a local network and enter the metadata URL shown in the Cloud Access Manager console
- Or download the Cloud Access Manager metadata from the console and select Import data about the relying party from a file to upload the file to AD FS, and click Next.
- Enter a name for the trust, for example Cloud Access Manager, then click Next. If using metadata skip to Step 19.
- Select AD FS 2.0 profile, then click Next.
- Click Next on the optional token encryption page to skip this step.
- Select Enable support for the WS-Federation Passive protocol.
- Enter the Relying Party WS-Federation Passive protocol URL. To find this URL, switch back to the Cloud Access Manager console and copy the Relying Party Endpoint URL. For example, https://www.webapps.democorp.com/CloudAccessManager/RPSTS/WSFed/Login.aspx . Click Next.
- Enter the Relying party trust identifier. To find this information, switch back to the Cloud Access Manager console and copy the Relying Party Realm/Identity value. For example urn:CloudAccessManager/RPSTS. Click Add, then Next.
- Select Permit all users to access this relying party and click Next.
- Review the configuration information, then click Next.
- Ensure that the Open the Edit Claim Rules dialog option is selected, then click Close.
- Click Add Rule.
- Select Send LDAP Attributes as Claims, then click Next.
- Enter a claim rule name, for example Cloud Access Manager Claims.
- Set the Attribute store to Active Directory.
- Select an LDAP Attribute of SAM-Account-Name and an Outgoing Claim Type of Name ID for the first claim mapping. This claim is required to identify the user to Cloud Access Manager.
-
On the second row, select an LDAP Attribute of Token-Groups - Unqualified Names and an Outgoing Claim Type of Role.
NOTE: By default Cloud Access Manager will perform authorization based on claims of the type Role. If you use a different claim type, you will also need to change the claim type within Cloud Access Manager during the Role Mappings configuration.
- Click Finish.
- The Edit Claims Rules for... page is displayed. Click OK.
- The Relying Party Trust configuration on the AD FS host is now complete. Switch back to the Cloud Access Manager console to complete the configuration.
- On the Front-end Authentication Method Created page, click Edit Roles.
-
Before Cloud Access Manager administrators and users can log in to Cloud Access Manager using their federated identity, you must tell Cloud Access Manager how to identify administrators and users based on their claims. For AD FS v2, the claim could be an Active Directory group name in a role claim. For example, the Domain Admins group for Cloud Access Manager administrators and the Domain Users group for regular Cloud Access Manager users.
NOTE: By default, Cloud Access Manager will look for claims of the type role. If you configured claims of a different type, update the Allow users with a claim named field with the different type.
- Click Admin.
- Click +Add User.
- Select the new WS-Federated front-end authentication method from the list.
- Select Include selected user/group from the Rule Type list.
-
Enter Domain Admins into the Having value field, then click Save.
- Now repeat the process for the Cloud Access Manager users. Click Users.
- Click Add User.
- Select the new WS-Federated front-end authentication method from the list.
- Enter Domain Users into the Having value field, then click Save.
- Click Close to return to the Cloud Access Manager Administration Console.
The configuration is now complete. Cloud Access Manager administrators and users can now log in to Cloud Access Manager using their Active Directory federated credentials. For example, users who belong to the Active Directory Domain Admins security group will be able to log in and configure Cloud Access Manager, and all domain users will be able to log in to the Cloud Access Manager portal using their federated identity.
|
|
NOTE: To fully support logout from AD FS, you must configure AD FS to not use integrated authentication. Once an NTLM connection has been established it will be retained in the browser for its lifetime, and will be used for all connections between the browser and AD FS. Logout from AD FS will appear to work, but on the next connection to AD FS the browser will use the cached connection details and you will be logged on without requiring re-authentication. |
Social authenticators
Social authenticators allow users to link third party authenticators, for example Facebook, Google, Twitter, Microsoft Live ID, and LinkedIn, with their Cloud Access Manager account.
Social authenticators are presented to users as links on the login page. The first time a user clicks one of these links they will authenticate with the third party web site. On returning to Cloud Access Manager, the user is asked to authenticate using their Cloud Access Manager credentials in order to link the two accounts together.
For future logons, the user will only need to authenticate using either third party credentials or their Cloud Access Manager credentials. The user can unlink the accounts using the Manage Links option on the Navigate Menu on the Cloud Access Manager home page. The following example uses Microsoft Live ID as the third party authenticator.
|
|
NOTE: In order to use Microsoft Live ID as a third party authenticator, a Microsoft account Developer Center application is required. |
To configure Microsoft Live ID as a social authenticator
- Log in to the Cloud Access Manager Administration Console and select Add New from the Front-end Authentication section on the home page.
- Select Microsoft Live Id under Social Authenticators, then click Next.
- On the Provider Settings page, complete the Client Id field with the client Id for your application in the Microsoft account Developer Center.
- In the Shared Secret field, enter the shared secret for your application in the Microsoft account Developer Center, then click Next.
-
In the Authenticator Name field, enter the name that will be used to identify the authenticator within Cloud Access Manager, then click Finish.
NOTE: This name will be seen by Cloud Access Manager users during authentication as an alternative authentication option.
- From the displayed Provider Settings, copy the Redirect URL and enter it as a redirect URL in the API Settings for the application in the Microsoft account Developer Center, then click Close.
Configuration of Microsoft Live ID as a social authenticator is now complete.
|
|
NOTE: Use of social authenticators must be enabled per directory authenticator, please refer to Microsoft Active Directory authentication and LDAP authentication for details on enabling social authentication for a directory authenticator. |
Integration with password management applications
When users authenticate using a directory authenticator, for instance Active Directory or Lightweight Directory Access Protocol (LDAP), Cloud Access Manager can link to password management software to allow users to reset their passwords or unlock their accounts.
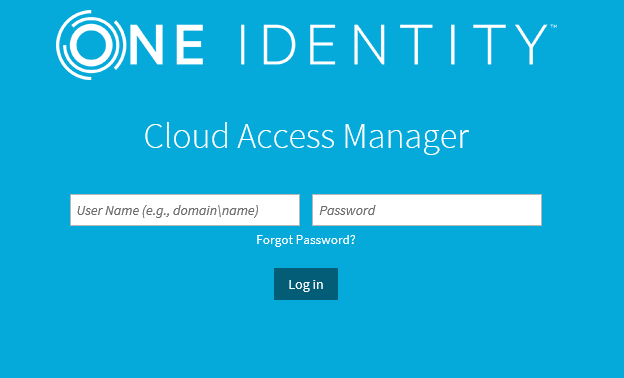
If the link between Cloud Access Manager and the password management software is configured, users will see a Forgot Password? link either before authentication, or if authentication fails. In either situation, clicking the link will redirect the user to the password management application.
If password expiry reminders are enabled, and a user's password is due to expire soon, the following dialog is displayed:
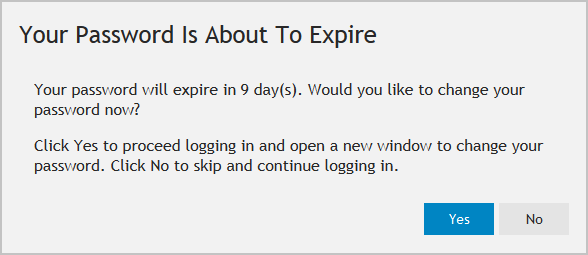
Click Yes to open a new tab in the browser and load the password management application. If a user specific URL is configured, information about the authenticated user is communicated to the password management application.
To configure a password management application
- Log in to the Administration Console, navigate to the Settings page and then to Turn Features On/Off.
- In the Password Management Options section enter the URL in the URL of password management application field.
To configure a user specific URL for when the user's password is about to expire
- Log in to the Administration Console, navigate to the Settings page and then to Turn Features On/Off.
-
In the Password Management Options section enter a URL in the URL of password management application with user information field. The following parameters may be inserted into the URL.
Table 1: Password management URL parameters Parameter Functionality {id}
The unique identifier for the user
{username}
The user part of the user's login name
{domain}
The domain part of the user's login name
{displayName}
The user's display name
{emailAddress}
The user's email address
The following example shows how to pass the domain and user name to Cloud Access Manager; replace password.host with the Domain Name Service (DNS) name of your Password Manager installation:
https://password.host/QPMUser/EntryPoint/?ActionName=ResetPassword&IdentificationDomain={domain}&IdentificationAccount={username}
To configure the user’s password expiry alert
- Log in to the Administration Console, navigate to the Settings page and then to Turn Features On/Off.
-
In the Password Management Options section enter the number of days before the password expiration reminder will be displayed. To prevent users being notified that their password is about to expire, set this value to zero.
NOTE: If you do not enter a user specific URL, but password expiry notifications are enabled, Cloud Access Manager will use the standard password management application URL.