Configuring instant elevation
Available only in Privilege Manager Professional and Professional Evaluation editions.
To grant on-demand administrative privileges to a group of trusted users and audit their actions, use the Instant Elevation Wizard.
Using the Instant Elevation Wizard
Before you configure instant elevation settings, ensure the following components are set up:
- The client is running on the computers you want to apply the settings to;
- The server is configured and running with the port that you have selected allowed for incoming data (the default port is 8003); and
- Client data collection settings are enabled for the selected GPO.
To use the Instant Elevation Wizard to set up, modify, or discard privileges:
- Open the wizard:
- Open the Instant Elevation Wizard from the Setup Tasks section. It will always show the default settings, or
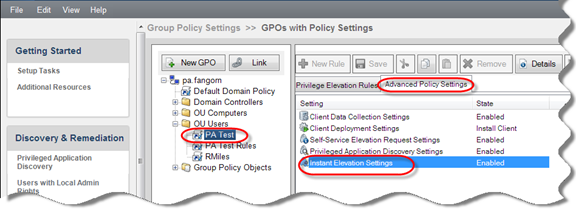
- Double-click Instant Elevation Settings on the Advanced Policy Settings tab of the target GPO. The changes made within the wizard will be saved here.

- Enable the Instant Elevation Settings on the State tab.
- Choose Enabled, otherwise the settings won't apply to the selected GPO.
- Choose Not Configured to enable child GPOs to inherit settings from their parent.
- Use the Groups tab to alter the settings. By default, users of the target GPO will automatically inherit the administrator's settings (BUILTIN\Administrators).
- Complete the advanced options in the Privileges and Integrity tabs.
-
Click Next to use validation logic to target the settings to specific client computers or user accounts within the GPO, or click Finish to save your settings and quit.
If an error message indicates that the target GPO has not been selected:
- Click OK to close the message window.
- Open the GPO tab and select the desired GPO.
-
Click Save on the GPO toolbar to save the new settings.
-
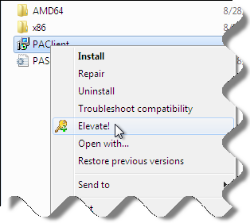
Users can click the
Elevate! button to launch privileged applications without interruptions. The button is available on the context menu of Windows Explorer objects that require elevated privileges to start-up, including: .bat, .cmd, .exe, .js, .lnk, .msc, .msi, .msp, .pl, .ps1 or .vbs (.lnk is for shortcuts).
- Run an Instant Elevation Report to view the processes that have been launched. For more information, see Instant Elevation Report.
Configuring self-service elevation
Using the Self-Service Elevation Request Settings Wizard
Selecting how users access the request form
Customizing self-service request email messages
Using self-service notifications
Available only in Privilege Manager Professional and Professional Evaluation editions.
To enable users to request permissions to use privileged applications, use the Self-Service Elevation Request Settings Wizard. Whenever a user attempts to run an application which requires administrative permissions for which they do not have rights, they will be asked if they would like to send a request to their administrator for permission to run it.
You can select how users access the request form and set up self-service notifications to email you, the help desk, and your manager of each request. Then, you can process the request within the Self-Service Elevation Requests section of the console and email your decision to the user, using the Console Email Configuration screen.
Using the Self-Service Elevation Request Settings Wizard
Before you configure self-service elevation request settings, ensure the following components are set up:
- The client is running on the computers you want to apply the settings to;
- The server is configured and running with the port that you have selected allowed for incoming data (the default port is 8003); and
- Client data collection settings are enabled for the selected GPO.
To use the Self-Service Elevation Request Settings Wizard to set up, modify, or discard privileges:
- Open the wizard:
- Open the Self-Service Elevation Request Settings Wizard from the Setup Tasks section. It will always show the default settings, or
- Double-click Self-Service Elevation Request Settings on the Advanced Policy Settings tab of the target GPO. The changes made within the wizard will be saved here.

- Enable the Self-Service Elevation Requests Settings on the State tab.
- Choose Enabled, otherwise the settings won't apply to the selected GPO.
- Choose Not Configured to enable child GPOs to inherit settings from their parent.
- Use the Settings tab for Selecting how users access the request form.
-
Click Next to use validation logic to target the settings to specific client computers or user accounts within the GPO, or click Finish to save your settings and quit.
If an error message indicates that the target GPO has not been selected:
- Click OK to close the message window.
- Open the GPO tab and select the desired GPO.
-
Click Next to use the Filters tab to filter out Self-Service Request data according to different application specific criteria.
On the Filters tab, select the checkbox to enable application filters.
Enter filter criteria in at least one of the available boxes ( Executable path contains, Product name contains, Publisher name contains, and File description contains).
An application only needs to meet a single filter criteria in order for its Self-Service Request data to be filtered out. A comma delimiter can be used to enter multiple criteria in each filter box.
NOTE: The Privilege Manager client will not transmit any Self-Service Request data for any application that meets at least one of the existing filter criteria.
-
Click Save on the GPO toolbar to save the new settings.
Selecting how users access the request form
Use the Settings tab of the Self-Service Elevation Request Settings Wizard to select how end users access the request form and set up email confirmation and notification settings. You can combine the following options:


