
Uploading external certificates to One Identity Safeguard for Privileged Sessions (SPS)
Upload a certificate generated by an external PKI system to One Identity Safeguard for Privileged Sessions (SPS).
Prerequisites
The certificate to upload. For the TSA X.509 Certificate and Server X.509 Certificate, the private key of the certificate is needed as well. The certificates must meet the following requirements:
-
SPS accepts certificates in PEM format. The DER format is currently not supported.
-
SPS accepts private keys in PEM (RSA), and PUTTY format. Password-protected private keys are also supported.
NOTE: One Identity Safeguard for Privileged Sessions (SPS) accepts passwords that are not longer than 150 characters. The following special characters can be used: !"#$%&'()*+,-./:;<=>?@[\]^-`{|}
For the internal CA certificate of SPS, uploading the private key is not required.
-
For the TSA certificate, the X509v3 Extended Key Usage attribute must be enabled and set to critical. Also, its default value must be set to Time Stamping.
-
For the Server certificate, the X509v3 Extended Key Usage attribute must be enabled and its default value set to TLS Web Server Authentication. Also, the Common Name of the certificate must contain the domain name or the IP address of the SPS host. If the web interface is accessible from multiple interfaces or IP addresses, list every IP address using the Subject Alt Name option.
-
For the certificate used to sign audit trails, the X509v3 Extended Key Usage attribute must be enabled and its default value set to Sign (downloadable) executable code.

One Identity recommends using 2048-bit RSA keys (or stronger).
To upload a certificate generated by an external PKI system to SPS
-
Navigate to Basic Settings > Management > SSL certificates.
-
Click
to upload the new certificate. A pop-up window is displayed.
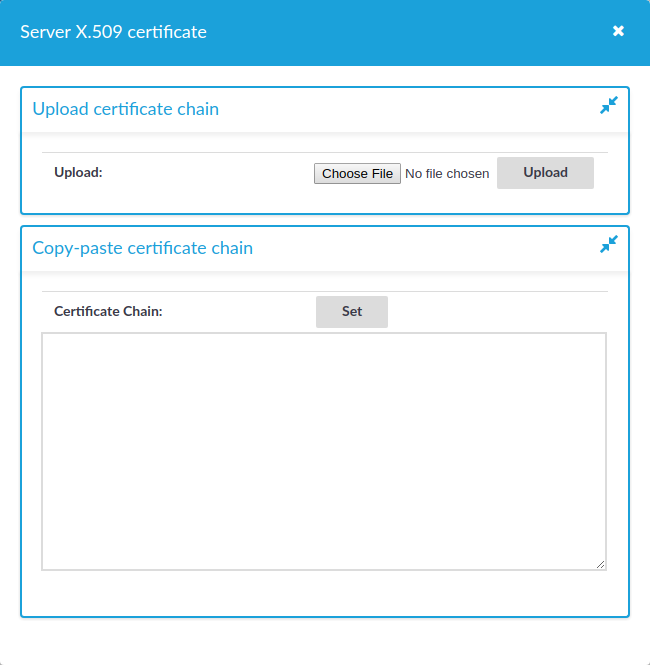
Figure 119: Basic Settings > Management > SSL certificates — Uploading certificates
Select Browse, select the file containing the certificate, and click Upload.
For the Server X.509 Certificate
For the Server X.509 Certificate, you can also upload a certificate chain. For that, copy the certificates after each other in a single file. Alternatively, you can copy and paste the certificates one by one after each other into the Certificate field and click Set. The certificates do not have to be in order, SPS will order them and validate the chain: if a member of the chain is missing, an error message is displayed.
NOTE: Certificate chains are supported only for the Server X.509 Certificate.
-
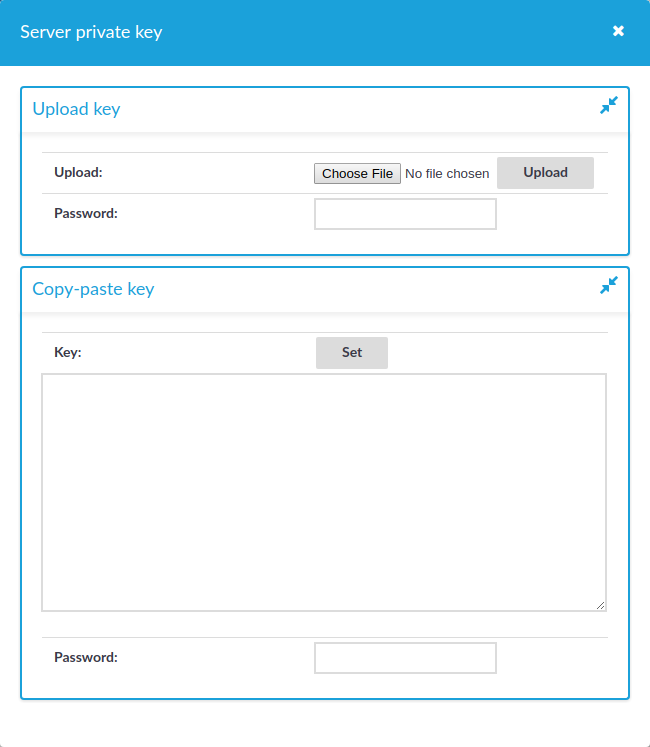
To upload the private key corresponding to the certificate, click
Figure 120: Basic Settings > Management > SSL certificates — Uploading the private key
Select Browse, select the file containing the private key, provide the Password if the key is password-protected, and click Upload. Alternatively, you can also copy-paste the private key into the Key field, provide the Password there, and click Set.
In the case of a certificate chain, the private key has to be the same as the bottom level certificate.
Expected result
The new certificate is uploaded. If you receive the Certificate issuer mismatch error message after importing a certificate, you must import the CA certificate which signed the certificate as well (the private key of the CA certificate is not mandatory).
NOTE: To download previously uploaded certificates, click on the certificate and either download the certificate (or certificate chain) in one single PEM or DER file, or you can download single certificate files separately (if it is a certificate chain).
Generating TSA certificate with Windows Certificate Authority on Windows Server 2008
To generate a TSA certificate with Windows Certificate Authority (CA) that works with One Identity Safeguard for Privileged Sessions (SPS), generate a CSR (certificate signing request) on a computer running OpenSSL and sign it with Windows CA, then import this certificate into SPS for timestamping.
Prerequisites
A valid configuration file for OpenSSL with the following extensions:
[ tsa_cert ]
extendedKeyUsage = critical,timeStamping
|
|
TIP:
You can copy /etc/xcb/openssl-ca.cnf from SPS to the computer that will be used for signing. Rename the file to openssl-temp.cnf. |
The TSA certificate is considered valid, in terms of compatibility with SPS, if the following conditions are met:
-
Must be a valid CA certificate (CA is true).
-
Key Usage: Time Stamping is required. No other key usage is permitted.
-
Extended Key Usage: Must be set to critical.
-
Optional Key Usage: If Key Usage is present, it must be digitalSignature and/or nonRepudiation. Other values are not permitted. Make sure that in Encryption, Allow key exchange without key encryption (key agreement) is selected.
Caution: In Encryption, do NOT select Allow key exchange only with key encryption (key encipherment), because it will result in errors.

The following X509v3 extensions are supported:
-
Hard requirement:
X509v3 Extended Key Usage must be critical, and must only contain Time Stamping.
-
Optional:
X509v3 Key Usage, if present, must be digitalSignature and/or nonRepudiation.
To generate TSA certificate with Windows Certificate Authority on Windows Server 2008
-
Create CSR using the new configuration file: openssl req -set_serial 0 -config openssl-temp.cnf -reqexts tsa_cert -new -newkey rsa:2048 -keyout timestamp.key -out timestamp.csr -nodes
-
Complete the required fields according to your environment:
Generating a 2048 bit RSA private key
........................+++
......................................+++
writing new private key to 'timestamp.key'
-----
You are about to be asked to enter information that will be incorporated
into your certificate request.
What you are about to enter is what is called a Distinguished Name or a DN.
There are quite a few fields but you can leave some blank
For some fields there will be a default value,
If you enter '.', the field will be left blank.
-----
Country Name (2 letter code) [AU]:US
State or Province Name (full name) []:New York
Locality Name (eg, city) []:New York
Organization Name (eg, company) [Internet Widgits Pty Ltd]:Examplecompany IT Security
Organizational Unit Name (eg, section) []:Service Delivery
Common Name (eg, YOUR name) []:scb35-1-i1.tohuvabohu.examplecompany
Email Address []:vlad@examplecompany.com
-
Sign the generated CSR with your Windows CA. Make sure that the CSR file is accessible from your Windows CA server.
-
To issue and sign the new certificate request, open the Microsoft Certification Authority Management Console: Start > Run and run certsrv.msc.
-
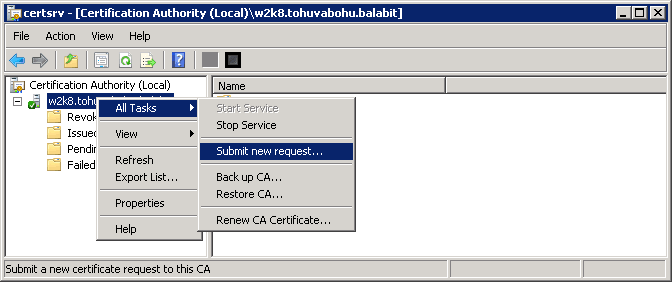
Right-click on the server name and navigate to All Tasks > Submit new request....
Figure 121: Submitting a new request
-
Select the CSR created in the second step.
-
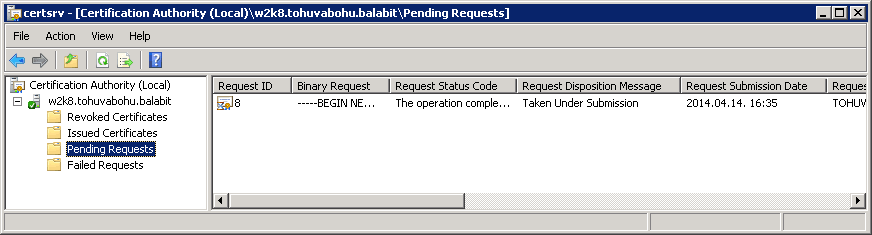
On the left pane, click Pending Requests. The new certificate request is displayed in the right pane.
Figure 122: Issuing a new certificate
-
To issue the new SSL certificate, right-click on the pending certificate request, select “All Tasks” and click on “Issue”.
-
Select "Issued Certificates" and double-click on the certificate issued in the previous step.
-
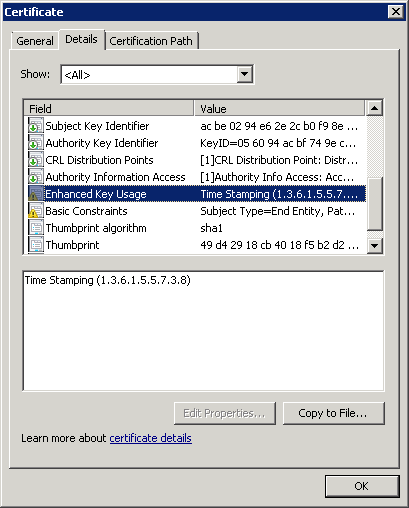
The CA Certificate window opens. Navigate to the Details tab. Ensure that the required Enhanced Key Usage field is visible and contains the Time Stamping value.
Figure 123: Verifying certificate details
-
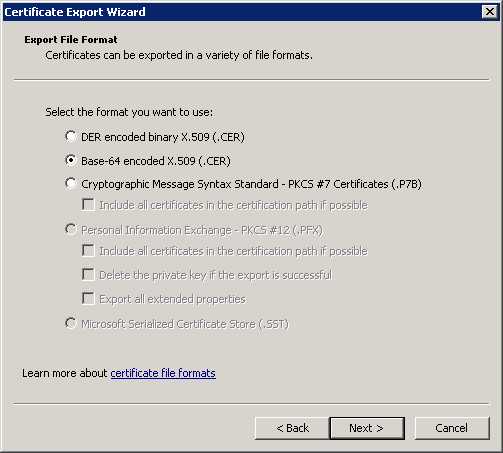
Click Copy to File. The Certificate Export Wizard launches. Click Next.
-
Select the format of the certificate: Base-64 encoded X.509 (.CER). Click Next.
Figure 124: Selecting certificate file format
-
Select location to save the certificate, and save it.
-
The Completing the Certificate Export Wizard screen is displayed. Click Finish.
-
-
In SPS, navigate to Basic Settings > Management > SSL certificates.
-
Click
-
Click
NOTE: If the root CA (the CA X.509 certificate field under Basic Settings > Management > SSL certificates) that is used for other certificates on SPS is different from the CA that was used to sign the TSA certificate, a warning is displayed. In this scenario, ignore this warning.
Generating TSA certificate with Windows Certificate Authority on Windows Server 2012
To generate a TSA certificate with Windows Certificate Authority (CA) that works with One Identity Safeguard for Privileged Sessions (SPS), generate a CSR (certificate signing request) on a computer running OpenSSL and sign it with Windows CA, then import this certificate into SPS for timestamping.
Prerequisites
A valid configuration file for OpenSSL with the following extensions:
[ tsa_cert ]
extendedKeyUsage = critical,timeStamping
|
|
TIP:
You can copy /etc/xcb/openssl-ca.cnf from SPS to the computer that will be used for signing. Rename the file to openssl-temp.cnf. |
The TSA certificate is considered valid, in terms of compatibility with SPS, if the following conditions are met:
-
Must be a valid CA certificate (CA is true).
-
Key Usage: Time Stamping is required. No other key usage is permitted.
-
Extended Key Usage: Must be set to critical.
-
Optional Key Usage: If Key Usage is present, it must be digitalSignature and/or nonRepudiation. Other values are not permitted. Make sure that in Encryption, Allow key exchange without key encryption (key agreement) is selected.
Caution: In Encryption, do NOT select Allow key exchange only with key encryption (key encipherment), because it will result in errors.
The following X509v3 extensions are supported:
-
Hard requirement:
X509v3 Extended Key Usage must be critical, and must only contain Time Stamping.
-
Optional:
X509v3 Key Usage, if present, must be digitalSignature and/or nonRepudiation.
To generate TSA certificate with Windows Certificate Authority on Windows Server 2012
-
Create CSR using the new configuration file: openssl req -set_serial 0 -config openssl-temp.cnf -reqexts tsa_cert -new -newkey rsa:2048 -keyout timestamp.key -out timestamp.csr -nodes
-
Complete the required fields according to your environment:
Generating a 2048 bit RSA private key
........................+++
......................................+++
writing new private key to 'timestamp.key'
-----
You are about to be asked to enter information that will be incorporated
into your certificate request.
What you are about to enter is what is called a Distinguished Name or a DN.
There are quite a few fields but you can leave some blank
For some fields there will be a default value,
If you enter '.', the field will be left blank.
-----
Country Name (2 letter code) [AU]:US
State or Province Name (full name) []:New York
Locality Name (eg, city) []:New York
Organization Name (eg, company) [Internet Widgits Pty Ltd]:Examplecompany IT Security
Organizational Unit Name (eg, section) []:Service Delivery
Common Name (eg, YOUR name) []:scb35-1-i1.tohuvabohu.examplecompany
Email Address []:vlad@examplecompany.com
-
Create and configure a time stamping web server template in the Certificate Authority, and use that to generate the TSA certificate.
-
Start the Certification Authority Microsoft Management Console, and select the CA server.
-
Right-click on Certificate Templates, and choose Manage.
Figure 125: Managing certificate templates
The Certificate Templates Console opens.
-
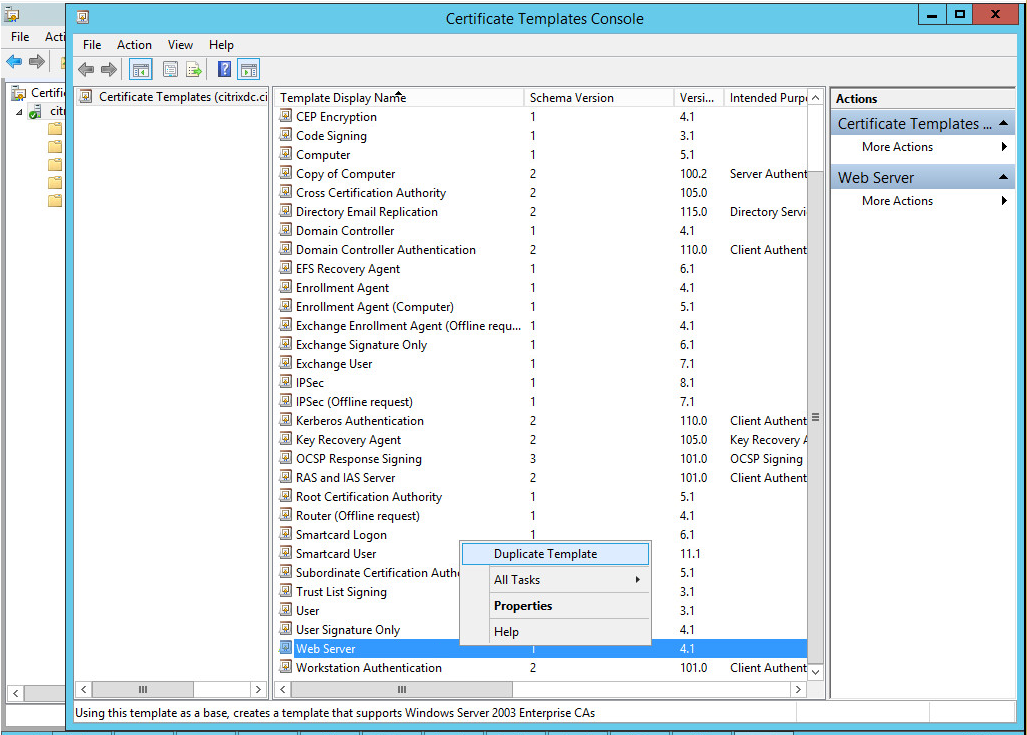
Right-click the Web Server template, and choose Duplicate Template.
Figure 126: Duplicating a Template
The Properties of New Template window is displayed.
-
Make the following changes to the new template:
-
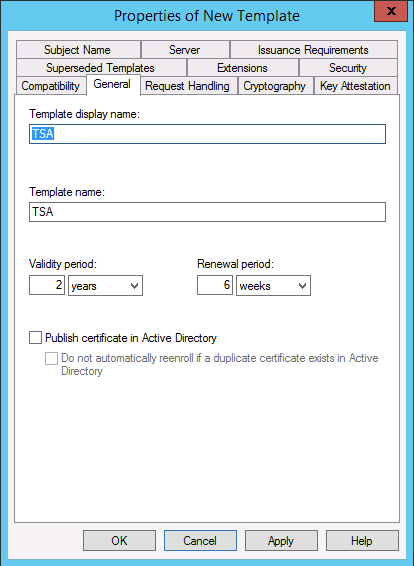
On the General tab, change the Template display name to TSA.
Figure 127: Creating the new template
-
On the Request Handling tab, enable the Allow private key to be exported option.
-
On the Extensions tab, make the following changes:
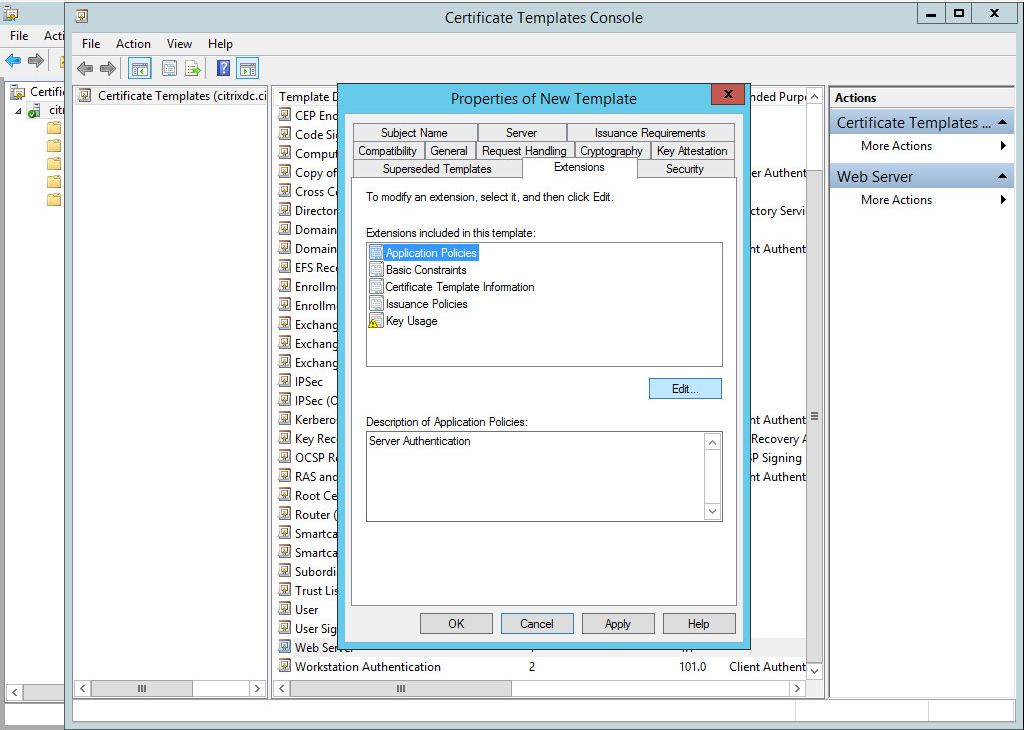
Edit Application Policies
Select Application Policies and click Edit below the list of extensions.
Figure 128: Editing Application Policies
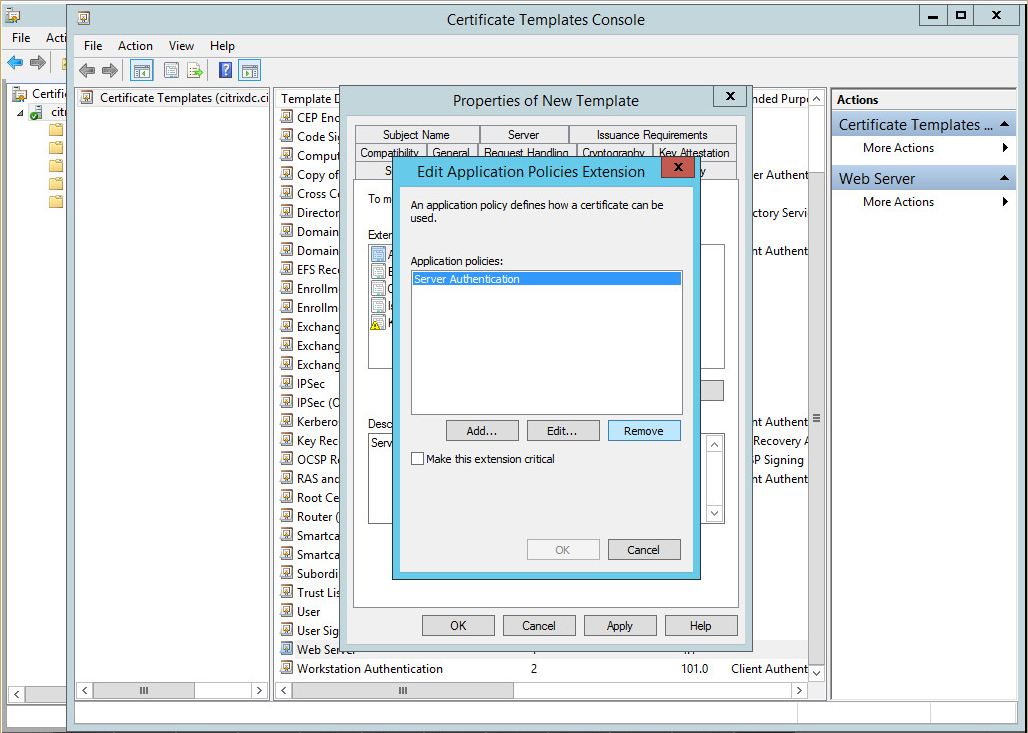
Remove Server Authentication
Select Server Authentication and click Remove.
Figure 129: Removing Server Authentication
Add Time Stamping
Click Add, select Time Stamping and click OK.
Figure 130: Adding Time Stamping
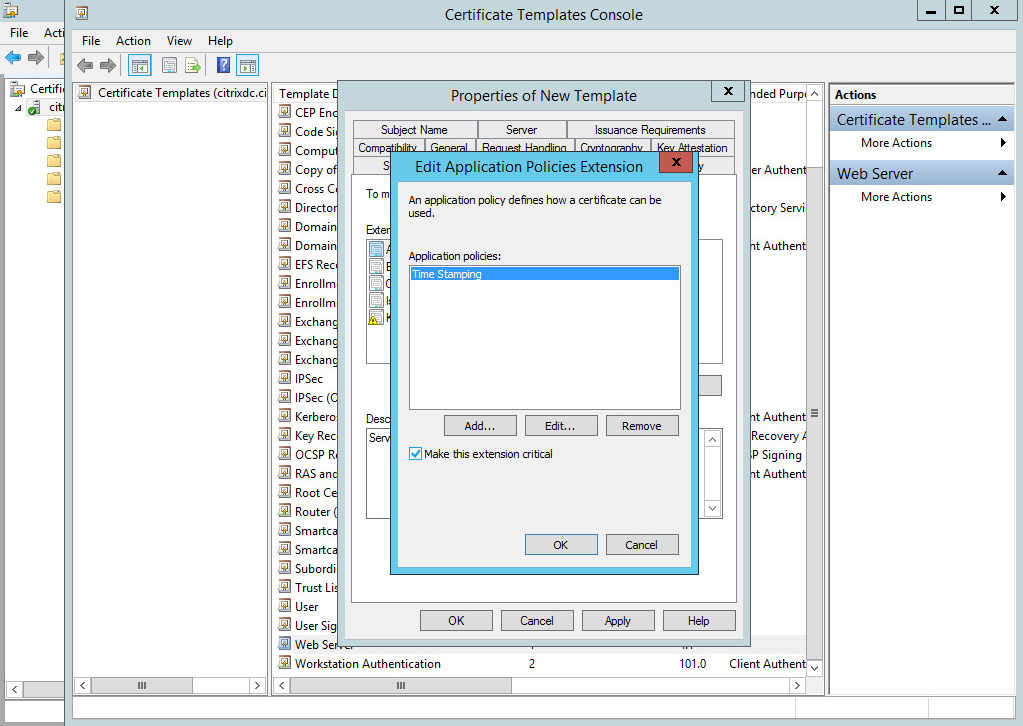
Make Time Stamping critical
Select Time Stamping and enable the Make this extension critical option, then click OK.
Figure 131: Making Time Stamping critical
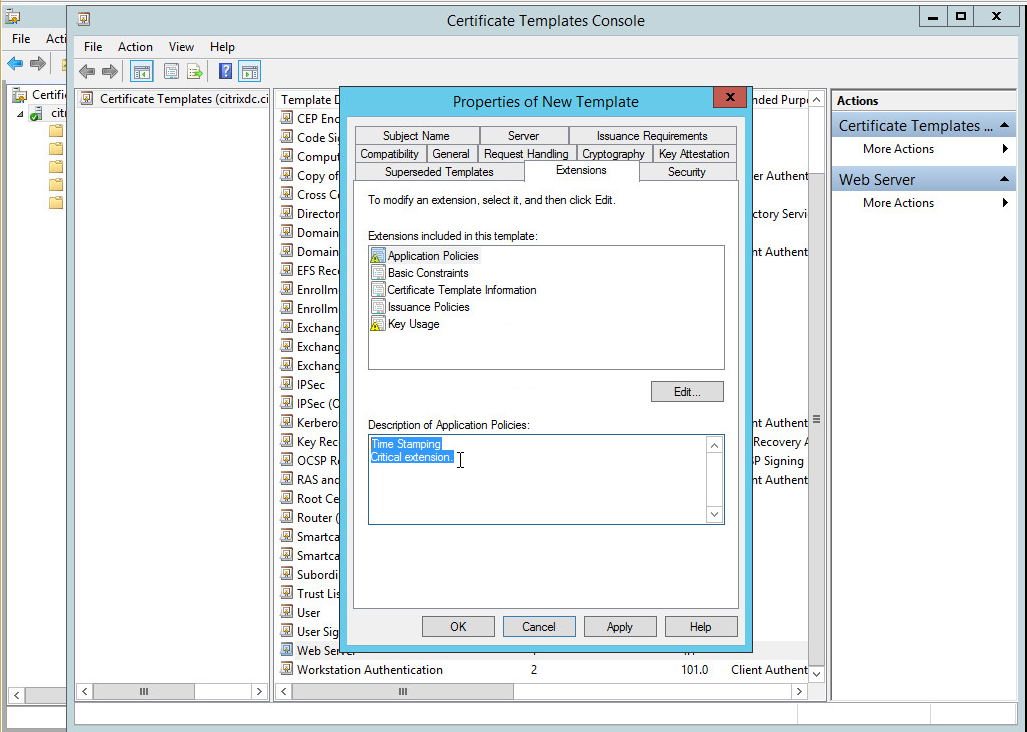
Time Stamping and Critical extension are listed in the Description of Application Policies.
Figure 132: Description of Application Policies
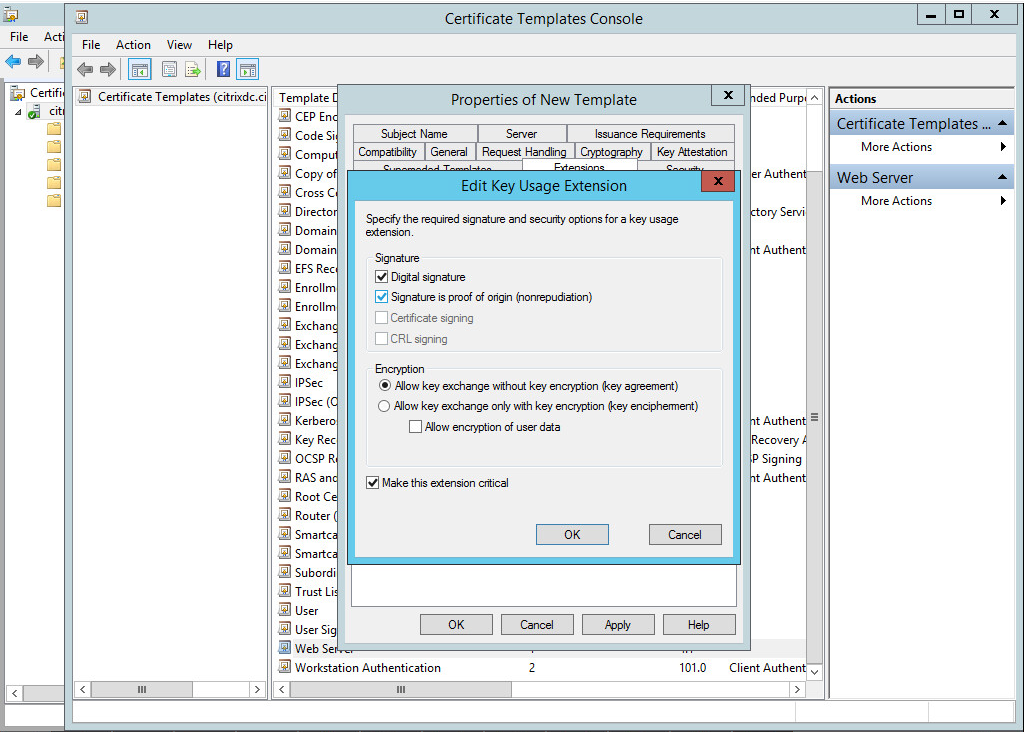
Edit Key Usage
Select Key usage, click Edit. Enable the Signature is proof of origin (nonrepudiation) option.
Select Allow key exchange without key encryption (key agreement).
Click OK.
Figure 133: Editing Key Usage
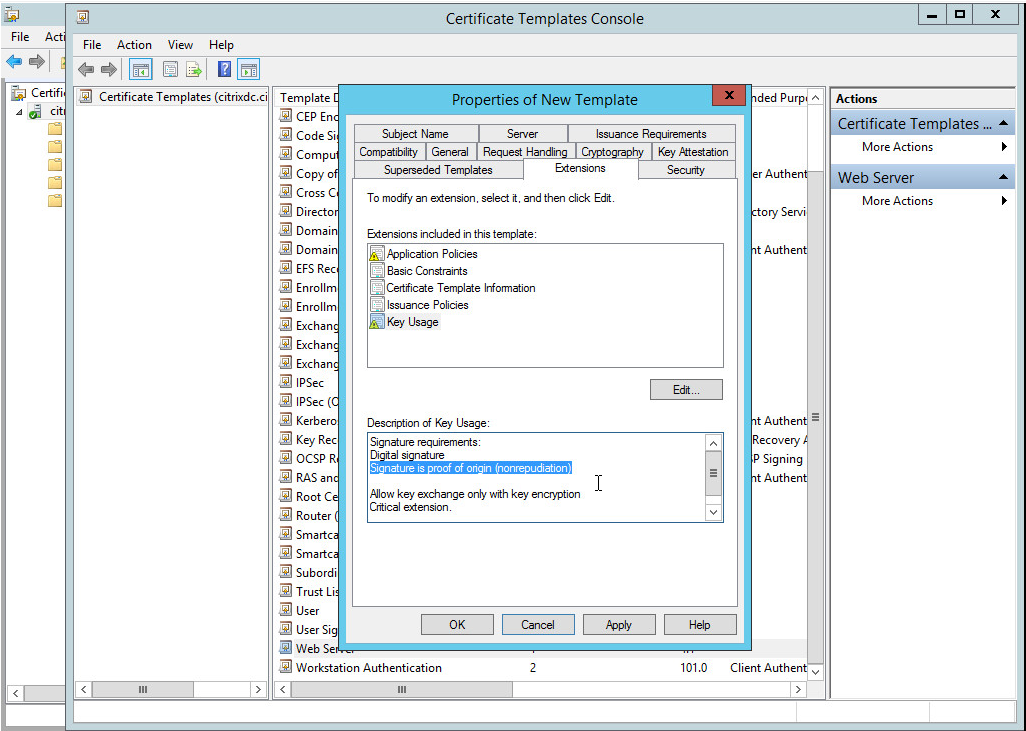
The following are listed in the Description of Key Usage.
Figure 134: Description of Key Usage
-
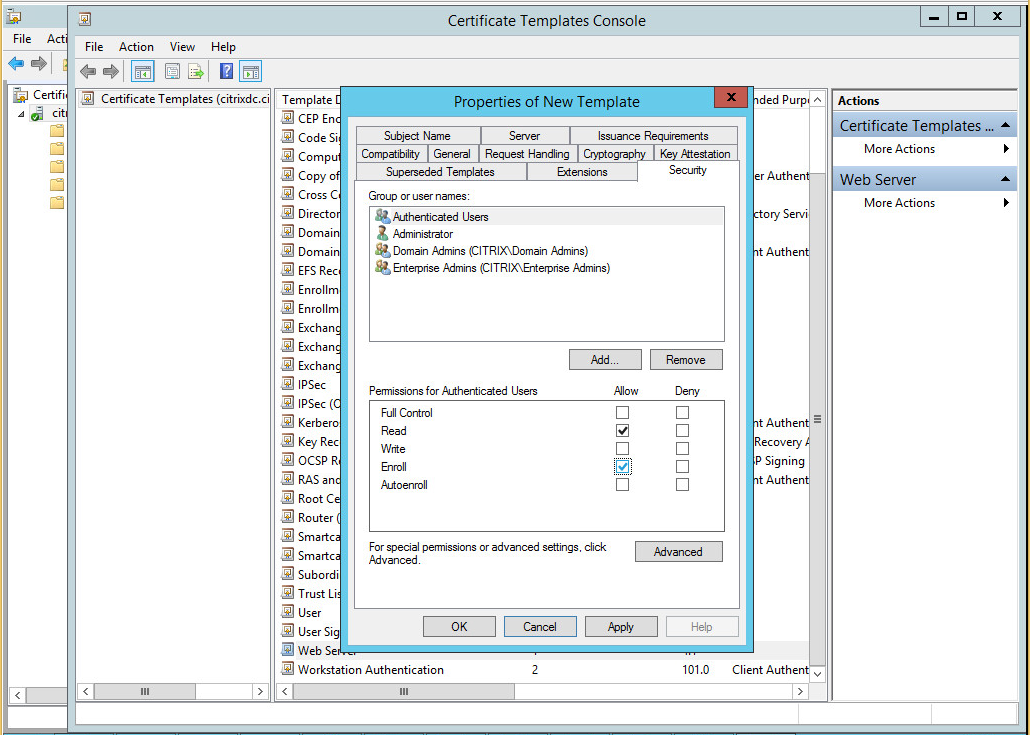
On the Security tab, select Authenticated Users, and set Enroll to Allow.
Figure 135: Configuring permissions for the template
-
-
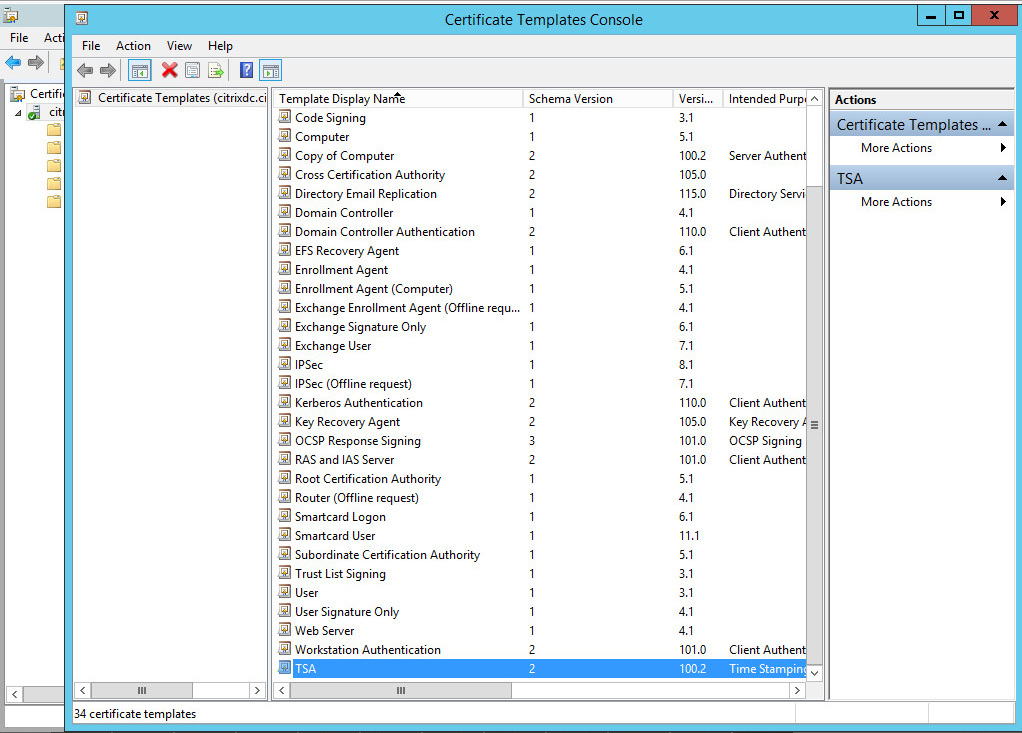
Click Apply. Click OK. The new TSA template is now displayed in the list of templates.
Figure 136: The new TSA template is now displayed in the list of templates
-
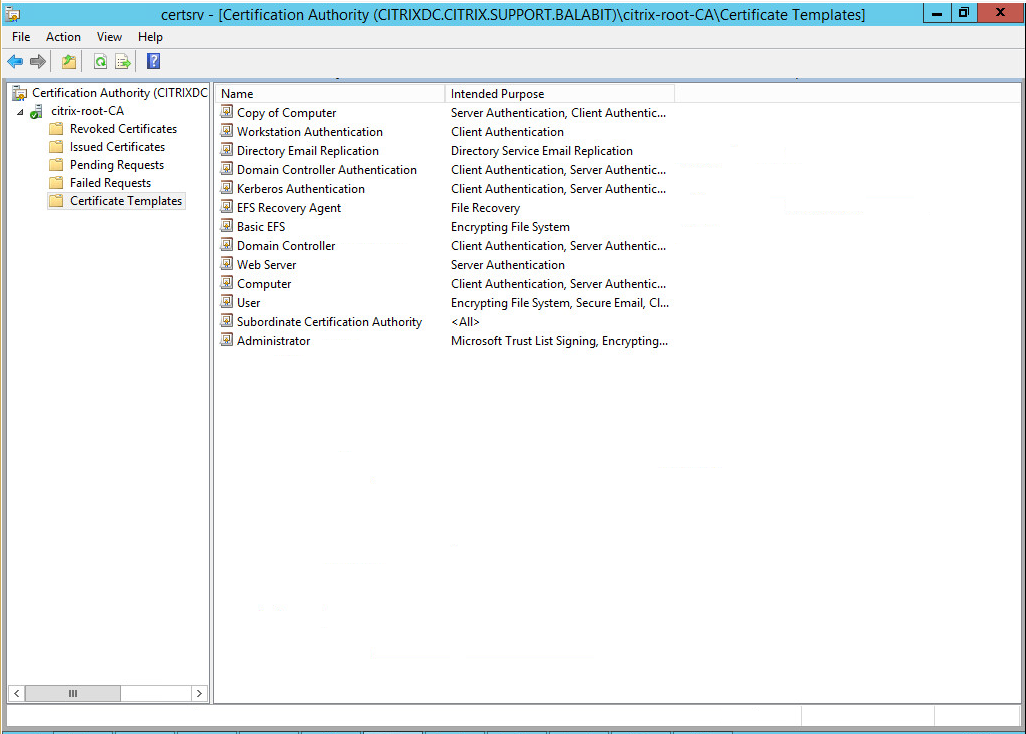
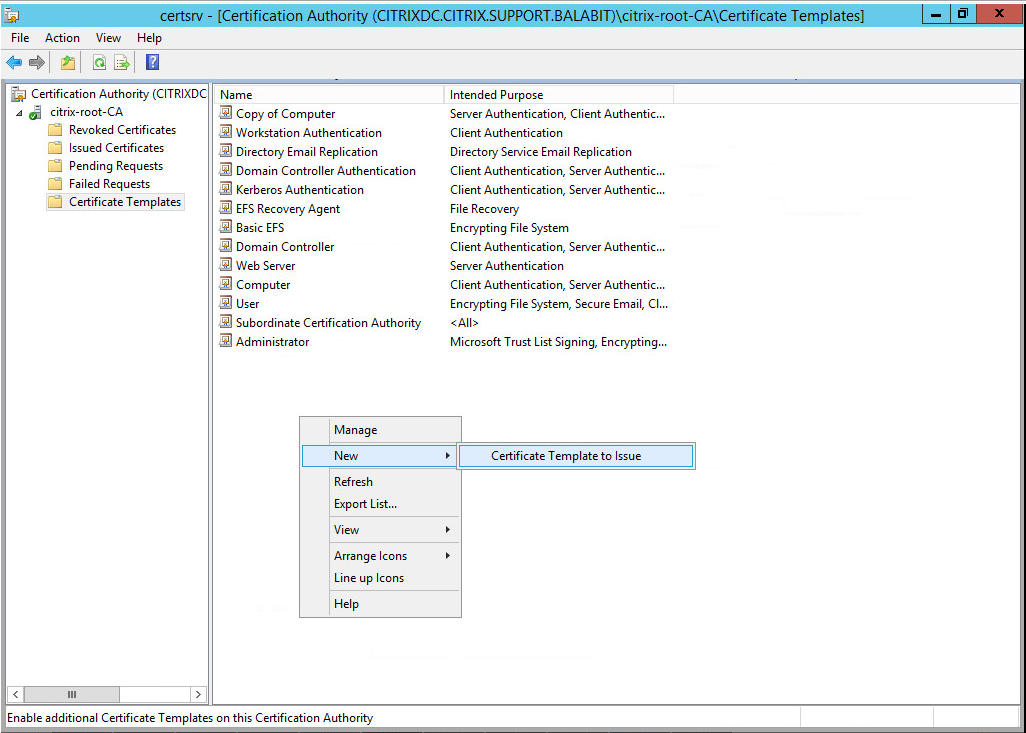
Close this window and return to the Certification Authority main screen, and select the Certificate Templates folder.
Figure 137: Certificate Templates
Right-click under the list, and choose New > Certificate Template to Issue.
Figure 138: Certificate Template to Issue
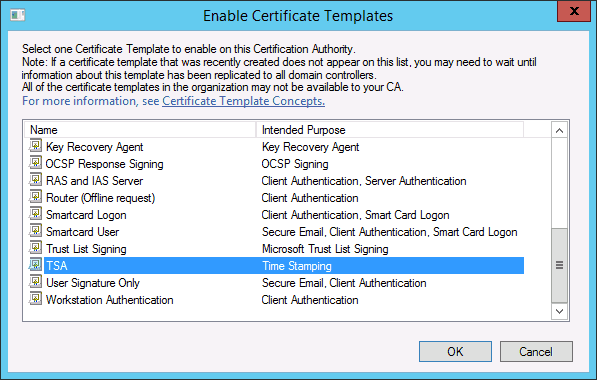
The Enable Certificate Templates window is displayed.
Figure 139: Enable the new template
-
Select the TSA certificate template, and choose OK. Close this window.
-
Open the command line, and issue the following command:
certreq -submit -attrib "CertificateTemplate:TSA" <CSR>
Replace <CSR> with the full path of the CSR created earlier (in the second step).
-
The Certification Authority List is displayed. Select the CA.
-
The Save Certificate window is displayed. Choose an output folder.
The certificate is generated to the specified folder.
-
-
In SPS, navigate to Basic Settings > Management > SSL certificates.
-
Click
-
Click
NOTE: If the root CA (the CA X.509 certificate field under Basic Settings > Management > SSL certificates) that is used for other certificates on SPS is different from the CA that was used to sign the TSA certificate, a warning is displayed. In this scenario, ignore this warning.

General connection settings
Connections determine if a server can be accessed from a particular client. The policies used in the connection definition can restrict the availability of the connection based on the username, time, authentication method, and so on. Channel policies (see Creating and editing channel policies) determine if a particular channel can be used within an already established connection. The policies used in the channel policy can restrict the availability of the channel based on the server and the client IP address, username, and so on. The types of policies available in a connection depend on the protocol (SSH, RDP, and so on) enabled in the connection.
One Identity Safeguard for Privileged Sessions (SPS) compares the connection policies to the parameters of the connection request one-by-one, starting with the first policy in the policy list. The first connection policy completely matching the connection request is applied to the connection.
This section describes how to configure connections, and details the general configuration options and policies that apply to every type of connection that SPS can control: HTTP, ICA, RDP, SSH, Telnet, and VNC. For a detailed list of supported protocol versions, see Supported protocols and client applications.
Protocol-specific configuration options are described in their respective sections: HTTP-specific settings, ICA-specific settings, RDP-specific settings, SSH-specific settings, Telnet-specific settings, and VNC-specific settings.