
Using a configuration synchronization plugin
When synchronizing the central configuration across nodes, you may want to:
-
Keep certain parts in the configuration of individual nodes as-is.
-
Tailor certain parts of the central configuration to specific needs of individual nodes in the cluster (for example, your nodes may access external services at different network addresses).
You can achieve all of these by using a configuration synchronization plugin that contains transformations for the problematic parts. The plugin only runs on nodes that have the Managed Host role.
Customizing certain parts or features of a node using a configuration synchronization plugin has the same limitations as configuring SPS through the REST API. In other words, whatever you can configure through the REST API, you can configure the exact same settings using the plugin. One notable difference between the REST API and the plugin is that using the REST API, you can only read certain types of data (such as keys and passwords), while using the configuration synchronization plugin, you can write these types of data as well.
For details on how to configure SPS using the REST API, see REST API Reference Guide.
Data structures in the plugin are represented as nested JSON objects. For object references, the plugin uses keys.
The plugin works with the following key parameters:
- local_config: The current configuration of a Managed Host node (those parts that can be configured through the REST API).
- merged_config: The configuration of the Central Management node that is about to be synced to the Managed Host node (those parts that can be configured through the REST API), with settings related to networking, local services, management, and the license of SPS whitelisted. These settings are never overwritten by configuration synchronization.
- node_id: The unique ID of the Managed Host node in the cluster (you can retrieve this identifier by querying the /api/cluster/nodes endpoint through the REST API).
- plugin_config: The configuration of the plugin provided as free-form text. Specifying the configuration of the plugin is optional. It enables you to run configuration synchronization on each cluster with different parameters if you have multiple clusters.
Example: Customizing an IP address in a connection policy
For example, an RDP connection policy on a Managed Host node specifies the following client and target addresses:
$ curl ... https://<url-of-Central-Management-node>/api/configuration/rdp/connections/<id-of-the-connection-policy>
{
    "body": {
        "network": {
            "clients": [
                "0.0.0.0/0"
                ],
            "ports": [
                3389
                ],
           "targets": [
               "10.30.255.28/24"
               ]
        },
    },
    ...
}
Let's suppose that on the Central Management node, an RDP connection policy is configured with these details:
$ curl ... https://<url-of-Managed-Node>/api/configuration/rdp/connections/<id-of-the-connection-policy>
{
    "body": {
        "network": {
            "clients": [
                "0.0.0.0/0"
                ],
            "ports": [
                3389
                ],
           "targets": [
               "10.30.255.8/24"
               ]
        },
    },
    ...
}
To ensure that the details of the connection policy on the Managed Host node are kept as-is after configuration synchronization, add the following lines to the plugin main.py file:
$ cat main.py
def merge(local_config: dict, merged_config: dict, node_id: str, plugin_config: str, **kwargs):
    merged_config['rdp']['connections'][<id-of-the-connection-policy>]['network']['targets'][0] = "10.30.255.8/24"
    return merged_config
Due to possible new (as yet undefined) parameters, it is good practice to close the parameter list of the merge function with **kwargs.
In case you need assistance with writing customized transformations, contact our Professional Services Team, and a One Identity Service Delivery Engineer will be able to help you.
|
|
NOTE:
Configuration settings related to networking (Basic Settings > Network), local services (Basic Settings > Local Services), and the license of SPS (Basic Settings > System > License) are not overwritten on the nodes by configuration synchronization even when not using a plugin. For the management of SPS (Basic Settings > Management), the following configuration settings are not overwritten:
|

To use a configuration synchronization plugin
-
Upload a configuration synchronization plugin:
-
Navigate to Basic Settings > Plugins.
-
Browse for the file, and click Upload.
NOTE: It is not possible to upload or delete plugins if SPS is in sealed mode.
-
-
Enable the plugin:
-
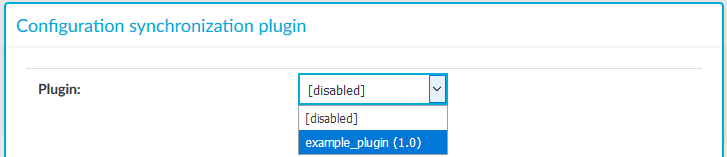
Navigate to Basic Settings > Cluster management > Configuration synchronization plugin.
-
Select the plugin you have uploaded.
Figure 96: Basic Settings > Cluster management — Select configuration synchronization plugin
-
- Optional: Enter the configuration of the plugin in the Configuration free-form text field. Specifying the configuration of the plugin enables you to run configuration synchronization on each cluster with different parameters if you have multiple clusters.
-
Click
.
You can also upload and enable the configuration synchronization plugin through REST. For details, see "Upload and enable a configuration synchronization plugin" in the REST API Reference Guide.
Monitoring the status of nodes in your cluster
The following describes how to monitor the status of nodes in your cluster.
To monitor the status of nodes in your cluster
-
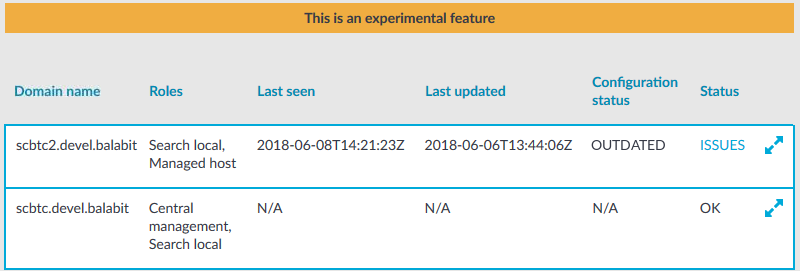
On the web interface of your Central Management node, navigate to Basic Settings > Cluster management. This page displays all nodes of a cluster.
Figure 97: Basic Settings > Cluster management — Monitor status of nodes
The following status information is displayed for each node:
-
Last seen: The last time the node sent status information to the Central Management node, in ISO 8601 format.
-
Last updated: The last time the node's configuration was synchronized, in ISO 8601 format.
- Configuration status: Indicates the status of configuration synchronization. It has the following values:
- UP-TO-DATE: The node has fetched the latest configuration from the Central Management node, and has applied it. It is in sync with the Central Management node.
- PENDING: There has been a configuration change on the Central Management node, and the change has not been synchronized yet to the node.
- OUTDATED: There has been some error on the node and therefore it is running an old configuration.
- NOT FETCHED: The node has not fetched any configuration yet.
- N/A: The node is the Central Management node, so it is not fetching its configuration from any other node.
-
Status: Indicates whether any issues occurred during configuration synchronization. It has the following values:
-
OK: Configuration synchronization was successful, no issues occurred.
-
ISSUES: While synchronizing configuration, some issue(s) occurred. Click ISSUES to find out the details.
-
OFFLINE: Indicates that status information was sent by the node longer than 60 seconds ago.
-
You can monitor the status of your nodes through the REST API, too. For details, see "Query the status of all nodes in the cluster" in the REST API Reference Guide and "Query one particular node" in the REST API Reference Guide.
-
Updating the IP address of a node in a cluster
When you have joined a node to a cluster, you can still change the IP address of the node if it is a Managed Host node.
To update the IP address of a Managed Host node that is already the member of a cluster
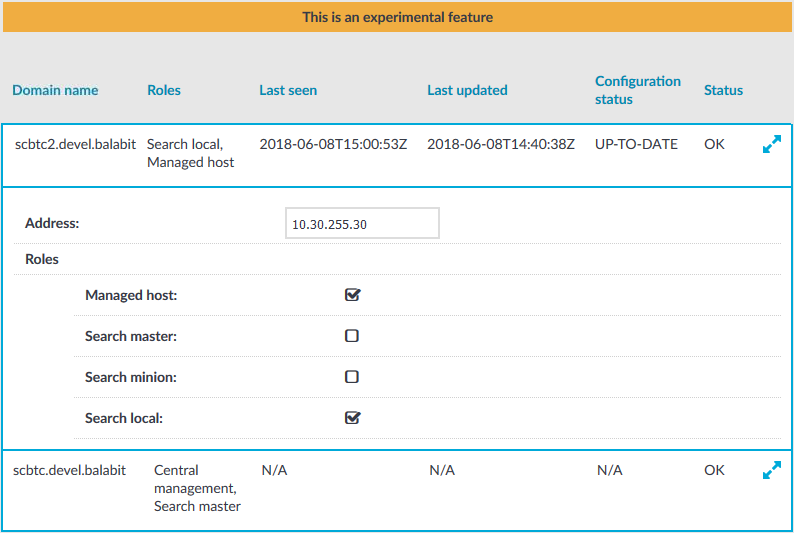
- On the web interface of your Central Management node, navigate to Basic Settings > Cluster management.
- Click
next to the Managed Host node that you want to update.
- In the Address field, update the IP address of the node.
Caution: Ensure that you are making the change for the Managed Host node. Do not change the IP address of the Central Management node.
Figure 98: Basic Settings > Cluster management — Update IP address of node
- Click
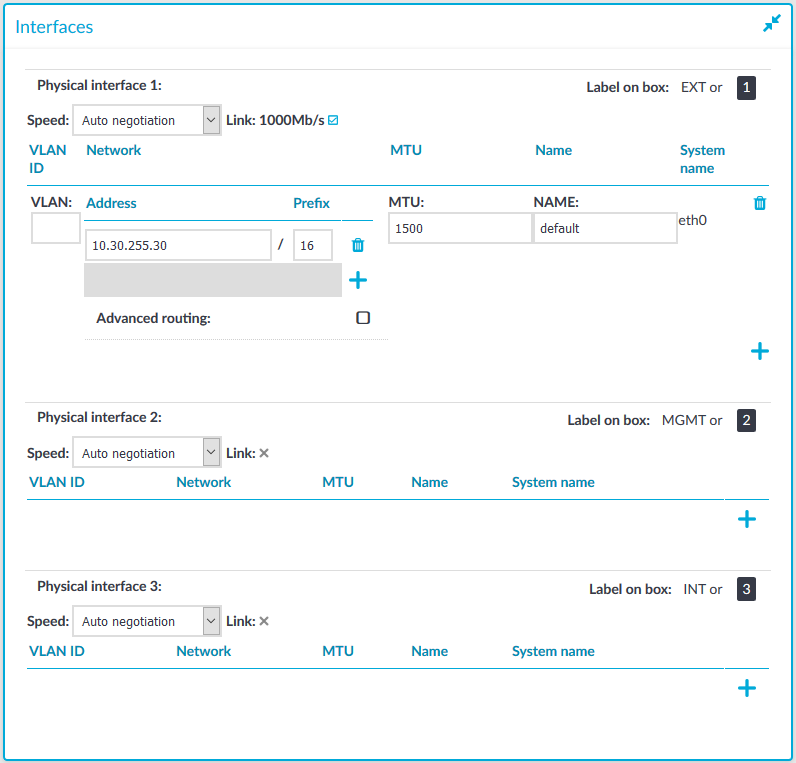
- On the web interface of the node whose IP address you want to update, navigate to Basic Settings > Network > Interfaces.
- In the Address field, update the IP address of the node.
Figure 99: Basic Settings > Network > Interfaces — Update IP address of node
- Click

Managing a cluster with configuration synchronization without central search
You can configure your SPS cluster in the following ways:
-
Configuration synchronization without a central search.
It allows you to perform your configuration settings on your Central Management node. Managed Host nodes periodically fetch and merge the settings into their own (configuration synchronization). Central search is not configured and you can search for sessions on each node, including the Central Management node.
For more information, see Configuration synchronization without a central search.
-
Central search with configuration synchronization.
IMPORTANT: One Identity does not recommend having a central search configuration without configuration synchronization.
It allows you to use a Central Management node with a Search Master role to view session data recorded by the minion nodes of your cluster, as well as manage all the nodes in the cluster from one central location.
For more information, see Central search with configuration synchronization.
The following figure shows a cluster with configuration synchronization without central search.
Figure 100: Configuration synchronization without central search

The figure above is an example of an SPS cluster configured as follows:
- There is a Central Management node.
- There are two Managed Host nodes (Managed Host node 1 and 2).
- The Central Management node is connected to the two Managed Host nodes.
- The Managed Host nodes fetch their configuration from the Central Management node, and merge it into their own configuration.
- The Managed Host nodes send their status information to the Central Management node every 10 seconds.
The Central Management node and the connected Managed Host nodes require different configuration settings as described in the table below:
| Role | Use and configuration settings |
|---|---|
|
Central Management node |
|
|
Managed Host node |
|
For more information on each role, see Cluster roles.