
Creating reports from audit trail content
One Identity Safeguard for Privileged Sessions (SPS) can index the contents of audit trails using its own indexer service or external indexers. Indexing extracts the text from the audit trails and segments it to tokens. A token is a segment of the text that does not contain whitespace: for example words, dates (2009-03-14), MAC or IP addresses, and so on. The indexer returns the extracted tokens to SPS, which builds a comprehensive index from the tokens of the processed audit trails.
Once indexed, the contents of the audit trails can be searched from the web interface. SPS can extract the commands typed and the texts seen by the user in terminal sessions, and text from graphical protocols like RDP, Citrix ICA, and VNC. Window titles are also detected.
SPS has an internal indexer, which runs on the SPS appliance. In addition to the internal indexer, external indexers can run on Linux hosts.
Processing and indexing audit trails requires significant computing resources. If you have to audit lots of connections, or have a large number of custom reports configured, consider using an external indexer to decrease the load on SPS. For sizing recommendations, ask your One Identity partner or contact our Support Team.
SPS also creates statistics of the occurrences of the search keywords, as well as screenshots from the audit trail. These statistics and screenshots can be included in custom reports as subchapters.

|
|
NOTE:
Only audit trails created after the content subchapter has been configured will be processed. It is not possible to create reports from already existing audit trails. |
Prerequisites for the indexer service
If you are indexing the audit trails with the indexer service, make sure to enable indexing for the connections you want to include in the report. Otherwise, reporting on audit trail content will not work. For details, see Configuring the internal indexer.
To configure SPS to create reports from the contents of audit trails
-
Login to the SPS web interface, and navigate to Reporting > Content subchapters.
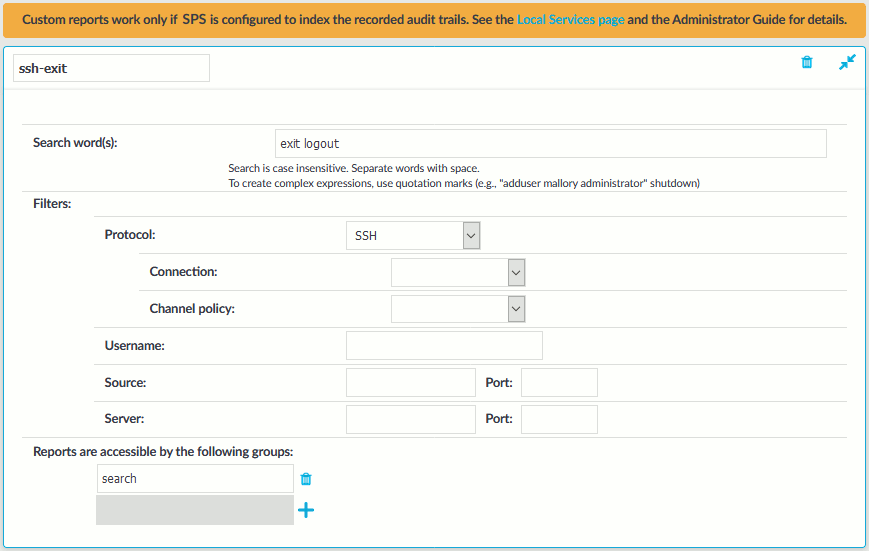
Figure 267: Reporting > Content subchapters — Configuring audit-trail reports
-
Click
and enter a name for the subchapter.
-
Enter the search keywords (or parts of the words) into the Search word(s) field. Note the following points.
-
Your search expression must be shorter than 255 characters.
-
The search is not case sensitive.
-
Wildcards and regular expressions are not supported.
-
To search for an exact phrase or expression, enclose the keywords in double quotes, for example "program files".
-
-
Configure filters to select the audit trails to index. The following filters are available:
-
Protocol: Process only audit trails of the specified traffic type (for example SSH).
-
Connection: Process only audit trails of the specified connection policy.
-
Channel policy: Process only audit trails of the specified channel policy.
-
Username: Process only audit trails where the specified username was used in the connection. Available only for protocols where the username is known (for example SSH).
-
Source: Process only audit trails where the specified client IP address or port was used.
-
Server: Process only audit trails where the specified server IP address or port was used.
NOTE: If you do not configure any filters, every available audit trail will be processed. Audit trails are created only for channels where the Record audit trail option is enabled for the particular channel in the channel policy.
-
-
Click
.
-
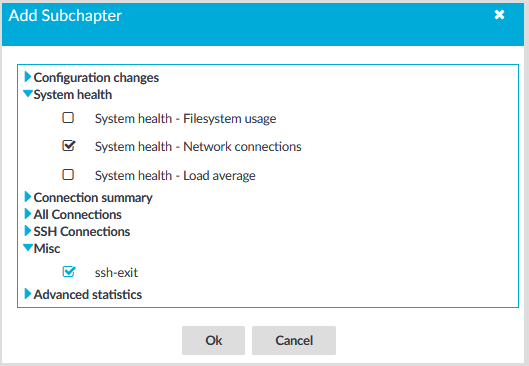
Navigate to Reporting > Configuration, and add the new subchapter to an existing report, or create a new report. Subchapters created from searching the contents of audit trails are listed under Misc. For details, see Configuring custom reports.
Figure 268: Reporting > Configuration > Add Subchapter — Adding subchapters to reports
Creating report subchapters from search queries
|
|
NOTE:
Creating report subchapters from search queries is currently an experimental feature of One Identity Safeguard for Privileged Sessions (SPS), therefore One Identity recommends that only administrators use this feature and only at their own risk. |
You can turn any search query or statistics into a subchapter to add to your reports. This is an easy and flexible way of creating reports to monitor traffic, track certain parameters, or get alerted about particular events. The Search interface allows you to:
- Create search-based report subchapters from search results.
- Create search-based report subchapters from scratch.
Creating search-based report subchapters from search results
|
|
NOTE:
Creating report subchapters from search queries is currently an experimental feature of One Identity Safeguard for Privileged Sessions (SPS), therefore One Identity recommends that only administrators use this feature and only at their own risk. |
The following describes how to create a search-based report subchapter from search results.
To create a search-based report subchapter from search results
- Navigate to Search, and perform a query of your choice.
- Click Search. Search results are displayed.
- Click
. The Create reporting subchapter page is displayed, with the query field populated with your query.
- In the name field, add a name to your report.
- In Report type, select the type that fits your query. You can choose from the following types:
- Sessions list: Displays a list of sessions.
Set the number of sessions to show in the report as required.
- Statistics: Visualizes the distribution of sessions based on the selected metadata.
Select a Statistic presentation for your report, such as Pie chart, List, Bar chart. Select the field (the metadata) to create your statistics on.
- Timeline: Visualizes the distribution of sessions within a day/week/month, depending on the time range chosen for the report under Reporting > Configuration > Generate this report every > Day/Week/Month.
- Sessions list: Displays a list of sessions.
- Click Save.
- Click
. Alternatively, navigate to Reporting > Configuration.
- Configure a custom report from scratch, or add the subchapter to an existing report. For details, see Configuring custom reports.
When adding the subchapter you created, look for it under Search-based subchapters.

Creating search-based report subchapters from scratch
|
|
NOTE:
Creating report subchapters from search queries is currently an experimental feature of One Identity Safeguard for Privileged Sessions (SPS), therefore One Identity recommends that only administrators use this feature and only at their own risk. |
The following describes how to create a search-based report subchapter from scratch.
To create a search-based report subchapter from scratch
-
If you have multiple SPS appliances and they are organized into a cluster where one of the nodes is the Search Master (or Central Search) node, log in to that node.
- Navigate to Reporting > Search subchapters.
- Click
. The Create reporting subchapter page is displayed.
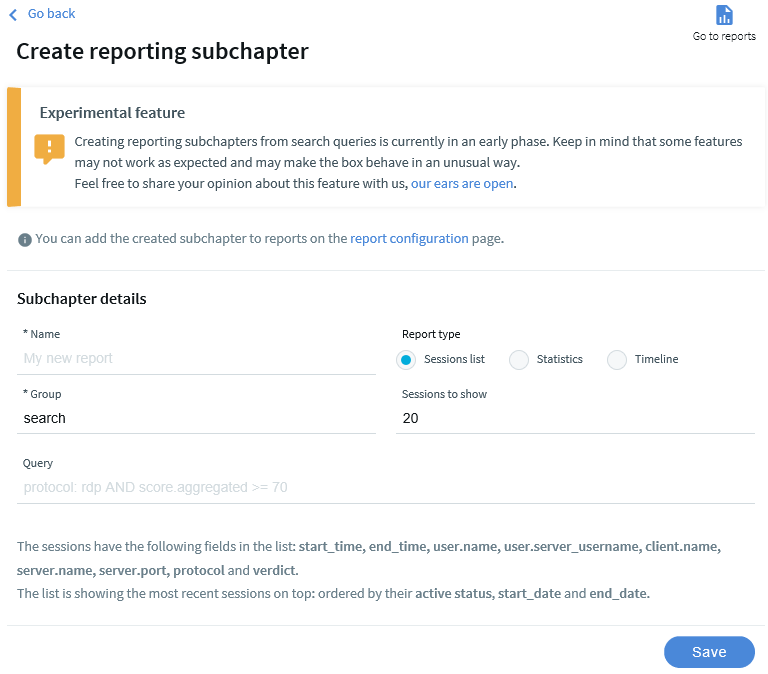
Figure 241: Reporting > Search subchapters — Create reporting subchapter
- In the name field, add a name to your report.
- In the query field, type the query that you want to create a report from.
- In Report type, select the type that fits your query. You can choose from the following types:
- Sessions list: Displays a list of sessions.
Set the number of sessions to show in the report as required.
- Statistics: Visualizes the distribution of sessions based on the selected metadata.
Select a Statistic presentation for your report, such as Pie chart, List, Bar chart. Select the field (the metadata) to create your statistics on.
- Timeline: Visualizes the distribution of sessions within a day/week/month, depending on the time range chosen for the report under Reporting > Configuration > Generate this report every > Day/Week/Month.
- Sessions list: Displays a list of sessions.
- Click Save.
- Click
- Configure a custom report from scratch, or add the subchapter to an existing report. For details, see Configuring custom reports.
When adding the subchapter you created, look for it under Search-based subchapters.