
Performing inband gateway authentication in RDP connections
The following describes how to perform inband gateway authentication in RDP connections.
To perform inband gateway authentication in RDP connections
-
Initiate a connection from a client.
-
The graphical login window is displayed.
-
If the Advanced > Remote Desktop Gateway > Logon Settings > Use my Remote Desktop Gateway credentials for the remote computer option of your Remote Desktop application is enabled, login to the remote server using your usual credentials. One Identity Safeguard for Privileged Sessions (SPS) will use these credentials for the gateway authentication on the Domain Controller as well.
-
If the Advanced > Remote Desktop Gateway > Logon Settings > Use my Remote Desktop Gateway credentials for the remote computer option of your Remote Desktop application is disabled, first you have to authenticate on the SPS gateway. Enter your username and password for the Domain Controller.
If the first authentication is successful, a second login window is displayed. Enter your username and password for the remote server you are trying to access.
-
If SPS is configured to use a Credential Store to login to the target server, enter the following:
-
In the Username field, enter the domain name, the -AUTO suffix, and your username. For example, EXAMPLEDOMAIN-AUTO\Administrator.
NOTE: The -AUTO suffix is the default value of the RDP Control > Settings > Autologon domain suffix option of One Identity Safeguard for Privileged Sessions (SPS). If your SPS administrator has changed this option, use the appropriate suffix instead of -AUTO.
-
Enter your username (only the username, without the domain, for example, Administrator) into the Password field.
-
-
-
If the authentication is successful, the desktop of the remote server is displayed.

Troubleshooting gateway authentication
If a user initiates a connection and then logs in to the One Identity Safeguard for Privileged Sessions (SPS) web interface, it might happen that his connection is not shown on the Gateway Authentication page. SPS checks the following points to determine if a pending connection is listed for a user:
|
|
Caution:
The admin user is a special One Identity Safeguard for Privileged Sessions (SPS) user and not a member of any user groups, nor can it belong to any group. Since usermapping policies are based on user groups, performing gateway authentication with the admin user is likely to result in usermapping errors. |

-
The username used to access the SPS web interface is a member of a group listed in the Gateway authentication > Groups field of the connection policy.
-
If SPS knows from the protocol the username that will be used to access the SPS web interface to perform the gateway authentication, the connection is displayed only to this user.
For SSH connections, SPS can determine the username if:
-
The client specifies the username for the web interface within the protocol using the gu=webusername@server-side-username@server format.
-
The client specifies the username within the protocol using an interactive prompt.
-
If the client does not use any of the above options, SPS uses the remote username. In this case, the username for the web interface must be the same as the remote username, otherwise the connection is not displayed.
-
-
If the Gateway authentication > Require same IP option is enabled, the pending connection is displayed only if the user accesses the SPS web interface from the same IP address as the client in the pending connection.
|
|
NOTE:
The admin user sees every pending connection. |
Configuring four-eyes authorization
When four-eyes authorization is required for a connection, a user (called authorizer) must authorize the connection on One Identity Safeguard for Privileged Sessions (SPS) as well. This authorization is in addition to any authentication or group membership requirements needed for the user to access the remote server. For details about the concepts of four-eyes authorization, see Four-eyes authorization.
Configuring four-eyes authorization
Performing four-eyes authorization on One Identity Safeguard for Privileged Sessions (SPS)
Configuring four-eyes authorization
The following describes how to configure four-eyes authorization.
To require four-eyes authorization for a connection
-
Navigate to the Connections page of the traffic (for example to SSH Control > Connections), and select the connection policy to modify.
-
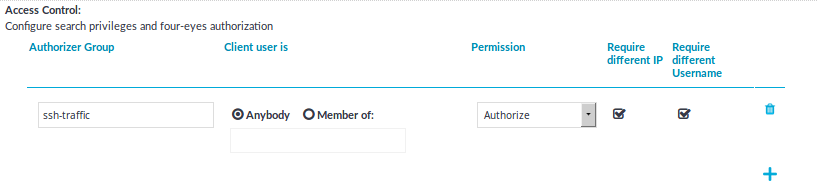
Figure 251: <Protocol name> Control > Connections > Access Control — Configuring four-eyes authorization
Navigate to Access Control and click
.
-
Enter the name of the usergroup whose members are permitted to authorize the sessions of the connection policy into the Authorizer Group field. This group must exist on the AAA > Group Management page. For details on creating and managing usergroups, see Managing user rights and usergroups.
Caution: Usernames, the names of user lists, and the names of usergroups are case sensitive.
-
By default, the authorizer can authorize any session of the connection policy.
If the authorizer is permitted to authorize only the sessions of a certain usergroup, select Client user is > Member of, and enter the name of the userlist whose sessions the authorizer can authorize. If you use four-eyes authorization without gateway authentication, you can specify an LDAP group instead of a userlist.
Caution: Usernames, the names of user lists, and the names of usergroups are case sensitive.
Caution: When using both gateway authentication and four-eyes authorization in a Connection Policy, specify the usergroup of the gateway username. The specified group must be a local or LDAP group.
-
Set the permissions of the usergroup set in the Authorizer Group field.
-
If the Authorizer group can authorize (that is, enable) and audit (that is, monitor in real-time and download the audit trails) the sessions, select Permission > Search&Authorize.
-
If the Authorizer group can only authorize (that is, enable) the sessions, select Permission > Authorize.
NOTE: This option is not valid for HTTP connections.
-
If the Authorizer group can only audit (that is, monitor in real-time and download the audit trails) the sessions, select Permission > Search.
NOTE: If the Client user is > Member of field is set, the auditor can only monitor the sessions of the specified usergroup. However, if Client user is > Member of field is set, the Auditor cannot access the Search page. To avoid this problem, add another Access Control rule for the Authorizer Group without setting the Client user isfield.
The admin user of One Identity Safeguard for Privileged Sessions (SPS) can audit and authorize every connection.
-
-
To ensure that the client and the authorizer use different IP addresses and thus prevent self-authorization, enable Require different IP. If this is enabled, and the client and the authorizer do not have different IP addresses, it disables all actions for the connection and the four-eyes authorization, until they have different IP addresses.
-
To ensure that the client and the authorizer use different usernames and thus prevent self-authorization, enable Require different Username. If this is enabled, and the client and the authorizer do not have different usernames, it disables all actions for the connection and the four-eyes authorization, until they have different usernames.
-
Repeat steps 2-6 to add other authorizers or usergroups if needed.
-
Click
.
-
Navigate to the Channel Policies page of the traffic (for example, to SSH Control > Channel Policies), and select the channel policy used in the connection.
Figure 252: <Protocol name> Control > Channel Policies — Configuring four-eyes authorization in the channel policy
-
Enable the Four-eyes option for the channels which should be accessed only using four-eyes authorization.
NOTE: If a connection uses secondary channels that require four-eyes authorization — for example, a Remote Desktop connection allows a Drawing channel but requires four-eyes authorization for a Disk redirection channel — the connection is locked until the authorizer accepts the channel on the Four-Eyes page of SPS, or the four-eyes request times out. During this time, the client application can become nonresponsive, for example, display the graphical desktop but not react to mouse clicks.
-
Click

-
(Optional) If you want to provide a limited SPS web interface to your users that can be used only for gateway authentication and 4-eyes authorization, set up a dedicated user-only web login address. For details, see Configuring user and administrator login addresses.