Configure SPS to use the ServiceNow plugin
To configure SPS to use ServiceNow multi-factor authentication
-
Download the SPS ServiceNow plugin
SPS customers can download the official plugin from GitHub.
-
Upload the plugin to SPS
Upload the plugin to SPS. For details, see "Using a custom Authentication and Authorization plugin to authenticate on the target hosts" in the Administration Guide.
-
Configure the plugin on SPS
The plugin includes a default configuration file, which is an ini-style configuration file with sections and name=value pairs. You can edit it on the Policies > AA Plugin Configurations page of the SPS web interface.
-
Configure the usermapping settings if needed. SPS must find out which ServiceNow user belongs to the username of the authenticated connection. For that, it can query your LDAP/Microsoft Active Directory server. For details, see [USERMAPPING].
-
Configure other parameters of your plugin as needed for your environment. For details, see SPS ServiceNow plugin parameter reference.
-
Configure a Connection policy and test it
Configure a Connection policy on SPS. In the AA plugin field of the Connection policy, select the SPS ServiceNow plugin you configured in the previous step, then start a session to test it. For details on how a user can perform multi-factor authentication, see Perform multi-factor authentication with the SPS plugin in terminal connections and Perform multi-factor authentication with the SPS plugin in Remote Desktop (RDP) connections.
SPS ServiceNow plugin parameter reference
This section describes the available options of the SPS ServiceNow plugin.
The plugin uses an ini-style configuration file with sections and name=value pairs. This format consists of sections, led by a [section] header and followed by name=value entries. Note that the leading whitespace is removed from values. The values can contain format strings, which refer to other values in the same section. For example, the following section would resolve the %(dir)s value to the value of the dir entry (/var in this case).
[section name]
dirname=%(dir)s/mydirectory
dir=/var
All reference expansions are done on demand. Lines beginning with # or ; are ignored and may be used to provide comments.
You can edit the configuration file from the SPS web interface. The following code snippet is a sample configuration file.
##### ServiceNow specific settings #####
[service_now]
# instance or host of ServiceNow required, instance takes precedence if both defined
instance=YourServiceNowInstanceName
# basic authentication information. Currently only username and password supported
user=
password=

# ServiceNow field in the request to update with the SPS session id
;update_field=close_notes

[service_now_ticket_patterns]
# Option names in this section must have a corresponding section
;incident=INC.*
change=CHG.*
[change]
table=change_request
;123TEXTQUERY321=changes^active=true^assigned_to=f298d2d2c611227b0106c6be7f154bc8^state=-2^number=CHG000091
query="active=true^assigned_to=$username^state=-2^number=$ticket_id"

# This section handles the incident type ServiceNow requests
;[incident]
# The table in which the incidents are stored
;table=incident
# The query you would like to run in order to validate the provided ServiceNow request
# You can build this query if you go to the corresponding table in ServiceNow and choose the Filter option
# Once you have put together your query you have to Run it
# After you ran your query you will be able to Copy the query from the context menu
# In order to insert variable data in to the query you can use the following option which get templated into the query string
# $ticket_id, $username and all of the items of the ConnectionInfo except the passwords
# You have to use $ as delimiter
;query=

###### Common plugin options ######
# To enable or change a parameter, uncomment its line by removing the ';'
# character and replacing the right side of '=' with the desired value.
# If the parameter has the following structure
# ; name=<value>
# then the related option is turned off until you replace '<value>'.
#
# If the parameter has the following structure
# ; name=value
# then the related option is automatically turned on with the default value
# of 'value'.
#
# To handle sensitive data, you can use a local Credential Store to retrieve
# parameters from.
# Enter the name of the local Credential Store (Policies > Credential Store) as
# the value of the 'name' parameter in section [credential_store]. To retrieve a
# parameter from this Credential Store, type the $ character as the value of
# a parameter in this configuration file. To use the $ character as value,
# type $$ instead. For more information, read the "Store sensitive plugin data
# securely" section in the Tutorial document.

[credential_store]
# Name of the local credential store configured in SPS for hosting sensitive
# configuration data. For more information, read the "Store sensitive
# plugin data securely" section in the Tutorial document.
; name=<name-of-credential-store-policy-that-hosts-sensitive-data>

[logging]
# To configure the log level, enter one of the following values:
# 'debug', 'info', 'warning', 'error', 'critical'
; log_level=info
log_level=debug
[https_proxy]
# To set the HTTPS proxy environment for the plugin, configure the following.
; server=<proxy-server-name-or-ip>
; port=3128

[auth]
# To override the prompt when using 2FA/MFA, enter the new prompt below.
; prompt=Press Enter for push notification or type one-time password:

# For better security, you can hide the characters (OTP or password) that the
# user types after the prompt.
# To hide the characters, set 'disable_echo' to 'yes'.
; disable_echo=no

[connection_limit by=client_ip_gateway_user]
# To limit the number of parallel sessions the gateway user can start from a
# given client IP address, configure 'limit'. For an unlimited number of
# sessions, type '0'.
; limit=0

[authentication_cache]
# CAUTION: Do not configure this section unless you know exactly what you are
# doing. For more information, read the "[authentication_cache]" section in the
# Tutorial document.
; hard_timeout=90
; soft_timeout=15
; reuse_limit=0

######[WHITELIST]######
# The [whitelist source=user_list] and [whitelist source=ldap_server_group]
# sections allow configuring authentication whitelists based on a User List
# policy or an LDAP Server policy. These two sections are independent, any of
# the two can be configured and can allow the user to bypass 2FA/MFA
# authentication.

[whitelist source=user_list]
# The [whitelist source=user_list] section allows whitelisting users based on a
# User List policy configured in SPS (Policies > User Lists). To enable this
# whitelist, configure one of the use cases below.
# IMPORTANT: the user names are compared to the User List in a case-sensitive
# manner.

# Use case #1: To allow specific users to connect without providing 2FA/MFA
# credentials, the User List policy should have the following settings:
# Set 'Allow' to 'No user' and list the users in the 'Except' list. Then type
# the name of this User List policy as the value of the 'name' parameter here.
; name=<name-of-user-list-policy>

# Use case #2: To enforce 2FA/MFA authentication for selected users, the User
# List policy should have the following settings: Set 'Allow' to 'All users' and
# list the users in the 'Except' list. Then type the name of this User List
# policy as the value of the 'name' parameter here.
; name=<name-of-user-list-policy>

[whitelist source=ldap_server_group]
# The [whitelist source=ldap_server_group] section allows whitelisting users
# based on LDAP Server group membership, To enable this whitelist, configure one
# of the use cases below.
# IMPORTANT: the user names and groups are compared in LDAP in a
# case-insensitive manner.

# Use case #1: To allow members of specific LDAP/AD group(s) to connect without
# providing 2FA/MFA credentials, type the names of these LDAP/AD groups as
# values of the 'except' parameter and set the 'allow' parameter to 'no_user':
; allow=no_user
; except=<group-1>,<group-2>,...

# Use case #2: To enforce 2FA/MFA authentication only on members of specific
# LDAP/AD groups, type the names of these LDAP/AD groups as values of the
# 'except' parameter and set the 'allow' parameter to 'all_users'.
; allow=all_users
; except=<group-1>,<group-2>,...

######[USERMAPPING]######
# Usually the gateway user and the external 2FA/MFA identity are different.
# Because the authentication is based on the 2FA/MFA identity, to be able to
# authenticate with the gateway user, you will have to map these two to each
# other. The following methods are possible: explicit and LDAP server.
#
# The explicit method has priority over the LDAP server method.
# If there is no [USERMAPPING] and no [username_transform], then the 2FA/MFA
# identity will be the same as the gateway user name.

[usermapping source=explicit]
# To map the gateway user name to an external 2FA/MFA identity, configure the
# following name-value pairs.
# NOTE: Type the user names in lowercase.
; <user-name-1>=<id-1>
; <user-name-2>=<id-2>
testauto=f298d2d2c611227b0106c6be7f154bc8

[usermapping source=ldap_server]
# To map the gateway user name (that is in LDAP/AD and has a non-empty UTF8
# attribute string) to an external 2FA/MFA identity, configure the
# 'user_attribute' parameter the following way:
# It must be an LDAP/AD user attribute that contains the external identity.
# Example: description, cn, mail. For a complete list consult
# https://docs.microsoft.com/en-gb/windows/desktop/ADSchema/c-user.
# IMPORTANT: you must configure the name of the LDAP/AD server policy in
# the [ldap_server] section.
; user_attribute=description

[username_transform]
# If the 2FA/MFA service requires the use of domain name in the external
# 2FA/MFA identity, configure the 'append_domain' parameter. This will append
# the domain name after the external 2FA/MFA identity with a '@' character.
# For example, if 'append_domain' is set to 'foobar.com', then '@foobar.com'
# will be appended to the external identity.
# If you have configured [USERMAPPING], the [username_transform] process will
# run after the [usermapping] process.
; append_domain=<domain-without-at-sign>

[ldap_server]
# Required if you have configured [whitelist source=ldap_server_group] or
# [usermapping source=ldap_server].
# The name of the LDAP server policy (Policies > LDAP Servers).
; name=<name-of-LDAP-server-policy>

[question_1]
# IMPORTANT: To configure this optional section, contact our Support Team.
# To request additional information from the user (for example, ticket number)
# define one or more [question_] section (for example, [question_1],
# [question_2]). The user input will be stored under the value of 'key' in the
# 'questions' section of the session cookie.
; prompt=<prompt-to-show-to-the-user>
; key=<target-key-for-the-answer>

# For better security, you can hide the characters that the user types after the
# prompt. To hide the characters, set 'disable_echo' to 'yes'.
; disable_echo=yes
This section contains the options related to your ServiceNow account.
     [service_now]
        instance={instance}
        user={user}
        password={password}
     [service_now_ticket_patterns]
instance
| Type: |
string |
| Required: |
yes |
| Default: |
N/A |
Description: ServiceNow instance used in the communication with the ServiceNow server.
user
| Type: |
string |
| Required: |
yes |
| Default: |
N/A |
Description: The user name, which is used to access ServiceNow.
password
| Type: |
string |
| Required: |
yes |
| Default: |
N/A |
|

|
Caution:
This parameter contains sensitive data. Make sure to store this data in your local Credential Store. Type the $ value for this parameter in production.
For details, see Store sensitive plugin data securely.
Only enter a value different than $ for this parameter in the configuration for testing purposes in a secure, non-production environment. |
Description: The password related to the user name, which is used to access ServiceNow.
SPS uses the options defined in the [service_now_ticket_patterns] section of the plugin to perform a query on the ServiceNow server. During authentication, SPS prompts the user for a valid ServiceNow ticket ID, and if the result of the query defined in the [service_now_ticket_patterns] section and the ticket ID entered by the user match, SPS permits the user access to the information system.
You can define more than one ServiceNow ticket patterns for different ServiceNow task types, for example, one for an incident (INC), one for a change request (CHG), and another one for a problem (PRB), and so on. Every defined ServiceNow ticket pattern must have a corresponding section, that is, if you define a ServiceNow ticket pattern, for example, for an incident (INC), you must also define a corresponding the ticket pattern section for the incident (INC), which also includes the table and query options.
  [service_now_ticket_patterns]
	[ServiceNow task type]=[task_type_].*
	table=
	query=
ServiceNow task type
| Type: |
string |
| Required: |
yes |
| Default: |
N/A |
Description: Specifies the ServiceNow task type, for example, incident (INC), change request (CHG), problem (PRB), or any other custom defined task type in ServiceNow. SPS uses the task type you define for the ticket pattern to filter in ServiceNow and list all the relevant task types. For example, for an incident task type, enter incident=INC.* as the [ServiceNow task type]=[task_type].* section and during authorization, SPS filters all the tasks beginning with INC in ServiceNow.
table
| Type: |
string |
| Required: |
yes |
| Default: |
N/A |
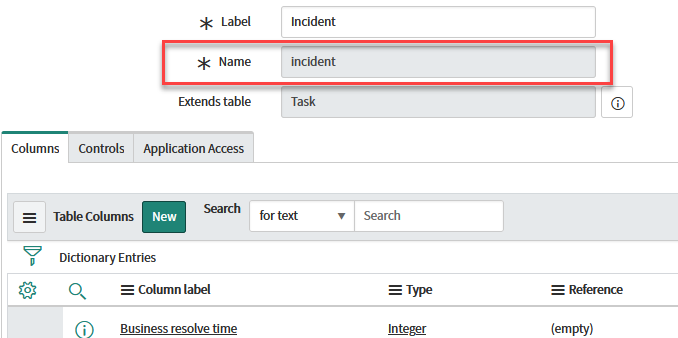
Description: The table in ServiceNow where your ServiceNow task type is stored in the database. For example, for an incident task type, specify the table in which incidents are stored. To do this, in ServiceNow find the table, which includes the required task type as shown in the example below:
-
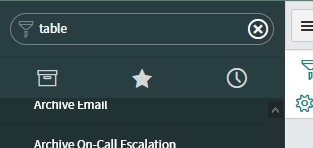
In ServiceNow, filter for tables, and select Tables.
Figure 2: Filter for tables
-
From the list of Tables, narrow your search to find the required task type, then click the task type.
Figure 3: Example filtering on the Incident task type

-
Copy the Name field, which in this example is incident, and paste it in the table= section of your ServiceNow plugin.
Figure 4: Copy Name field
query
| Type: |
string |
| Required: |
yes |
| Default: |
N/A |
Description: The query SPS runs in ServiceNow to validate the ServiceNow ticket ID.
-
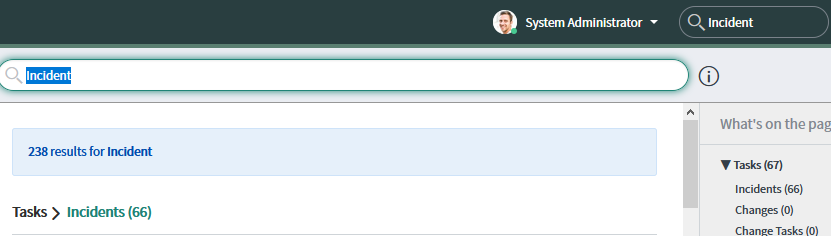
In ServiceNow, filter for the required task type view. For example, for an incident task type, enter Incident or INC*.
Figure 5: Filter for task type view
-
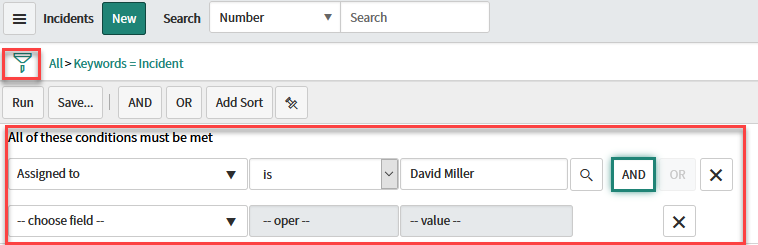
Create a filter by adding as many conditions as required.
Figure 6: Add conditions to your filter
- When your filter is ready, run your filter.
-
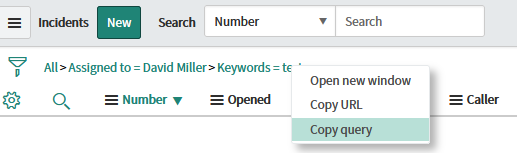
Copy the filter you defined. Right-click the last element of your filter, and select Copy query.
Figure 7: Copy your filter
- Paste the filter you copied in the query= section of your ServiceNow plugin.
