Chat now with support
Chat with Support

One Identity Safeguard for Privileged Sessions 7.3 - Administration Guide

Preface Introduction The concepts of One Identity Safeguard for Privileged Sessions (SPS)
The philosophy of One Identity Safeguard for Privileged Sessions (SPS) Policies Credential Stores Plugin framework Indexing Supported protocols and client applications Modes of operation Connecting to a server through One Identity Safeguard for Privileged Sessions (SPS) Archive and backup concepts Maximizing the scope of auditing IPv6 in One Identity Safeguard for Privileged Sessions (SPS) SSH host keys Authenticating clients using public-key authentication in SSH The gateway authentication process Four-eyes authorization Network interfaces High Availability support in One Identity Safeguard for Privileged Sessions (SPS) Versions and releases of One Identity Safeguard for Privileged Sessions (SPS) Accessing and configuring One Identity Safeguard for Privileged Sessions (SPS)
Cloud deployment considerations The Welcome Wizard and the first login Basic settings
Supported web browsers The structure of the web interface Network settings Configuring date and time System logging, SNMP and e-mail alerts Configuring system monitoring on SPS Data and configuration backups Archiving Cleaning up audit data Using plugins Forwarding data to third-party systems Starling integration
User management and access control
Login settings Managing One Identity Safeguard for Privileged Sessions (SPS) users locally Setting password policies for local users Managing local user groups Managing One Identity Safeguard for Privileged Sessions (SPS) users from an LDAP database Authenticating users to a RADIUS server Authenticating users with X.509 certificates Authenticating users with SAML2 Managing user rights and usergroups Creating rules for restricting access to search audit data Displaying the privileges of users and user groups Listing and searching configuration changes
Managing One Identity Safeguard for Privileged Sessions (SPS)
Controlling One Identity Safeguard for Privileged Sessions (SPS): reboot, shutdown Managing One Identity Safeguard for Privileged Sessions (SPS) clusters Managing a High Availability One Identity Safeguard for Privileged Sessions (SPS) cluster Upgrading One Identity Safeguard for Privileged Sessions (SPS) Managing the One Identity Safeguard for Privileged Sessions (SPS) license Accessing the One Identity Safeguard for Privileged Sessions (SPS) console Sealed mode Out-of-band management of One Identity Safeguard for Privileged Sessions (SPS) Managing the certificates used on One Identity Safeguard for Privileged Sessions (SPS)
General connection settings HTTP-specific settings ICA-specific settings MSSQL-specific settings RDP-specific settings SSH-specific settings Using Sudo with SPS Telnet-specific settings VMware Horizon View connections VNC-specific settings Indexing audit trails Using the Search interface Advanced authentication and authorization techniques Reports The One Identity Safeguard for Privileged Sessions (SPS) REST API One Identity Safeguard for Privileged Sessions (SPS) scenarios Troubleshooting One Identity Safeguard for Privileged Sessions (SPS)
Network troubleshooting Gathering data about system problems Viewing logs on One Identity Safeguard for Privileged Sessions (SPS) Changing log verbosity level of One Identity Safeguard for Privileged Sessions (SPS) Collecting logs and system information for error reporting Collecting logs and system information of the boot process for error reporting Support hotfixes Status history and statistics Troubleshooting a One Identity Safeguard for Privileged Sessions (SPS) cluster Understanding One Identity Safeguard for Privileged Sessions (SPS) RAID status Restoring One Identity Safeguard for Privileged Sessions (SPS) configuration and data VNC is not working with TLS Configuring the IPMI from the BIOS after losing IPMI password Incomplete TSA response received Using UPN usernames in audited SSH connections
Using SPS with SPP Configuring external devices Using SCP with agent-forwarding Security checklist for configuring One Identity Safeguard for Privileged Sessions (SPS) Jumplists for in-product help Configuring SPS to use an LDAP backend Glossary

Linking SPS to SPP

You can link your One Identity Safeguard for Privileged Sessions (SPS) deployment to your One Identity Safeguard for Privileged Passwords (SPP) deployment.

IMPORTANT: Once performed, you cannot unlink the SPS and SPP deployments.

If the primary IP address of your SPS deployment or SPP deployment changes, you must repeat this procedure to relink the clusters. To repeat the procedure to relink the clusters, navigate to Basic Settings > Cluster management and click Relink SPP cluster.

Prerequisites

Before you start linking your SPS deployment to your SPP deployment, consider the following:

  • Your SPS deployment must be in an SPS cluster, set as a Central management node. Even if your SPS deployment consists of a single, standalone node, you must assign the Central management role to its own single-node cluster. For details, see Managing One Identity Safeguard for Privileged Sessions (SPS) clusters.

    Configuration synchronization must be enabled between the nodes of the SPS cluster. This is required so that SPP entitlements work properly for each SPS node.

    NOTE: If you have multiple standalone SPS appliances, consider joining them to a cluster before linking SPP. In general, One Identity recommends creating a cluster if the nodes can use a common configuration, or later you might want to centrally search the data of every node. Creating a cluster from the SPS nodes after linking SPP is problematic and should be avoided.

  • You will need the primary IP address or the hostname of your SPP deployment that SPS can use to access SPP. Only IPv4 addresses are supported.

  • You will need the username and password to an SPP account with "Appliance" and "Operations" permissions.

  • Verify that your SPS policies do not contain the safeguard_default string in their names. During the linking process, SPS automatically creates and configures several policies and plugins. The name of these policies usually contains the string safeguard_default. Existing policies with such names will be overwritten.

  • The SPP and SPS nodes must be able to communicate on the TCP 8649 port. If needed, update your firewall policies.

    NOTE: When updating your firewall policies to enable the connection between SPS and SPP nodes, consider the following:

    • Connecting SPS nodes to SPS nodes: Make sure that between all the SPS nodes, the 500 and 4500 UDP ports are opened bidirectionally. This is required so that every node can initiate and accept connections from every other node through the mentioned ports.

    • Connecting SPP nodes to SPP nodes: For more information, see Enrolling replicas into a cluster in the One Identity Safeguard for Privileged Passwords Administration Guide.

    • Connecting SPS nodes to SPP nodes: Make sure that between all the SPS and SPP nodes, the 8649 TCP port is opened bidirectionally. This is required so that every node can initiate and accept connections from every other node through the mentioned port. If there are M SPP and N SPS nodes in your setup, then create M × N × 2 firewall rules to link the SPS nodes to the SPP nodes.

  • During the linking process, SPS must be able to access SPP using HTTPS on the TCP 443 port. This is required only once during the linking process. If needed, update your firewall policies.

To link your SPS deployment to SPP

  1. (Optional) Create a configuration backup of SPS. For details, see Creating configuration backups.

  2. (Optional) Create a configuration backup of SPP. For details, see the Safeguard for Privileged Passwords Administration Guide, Backup and Retention settings.

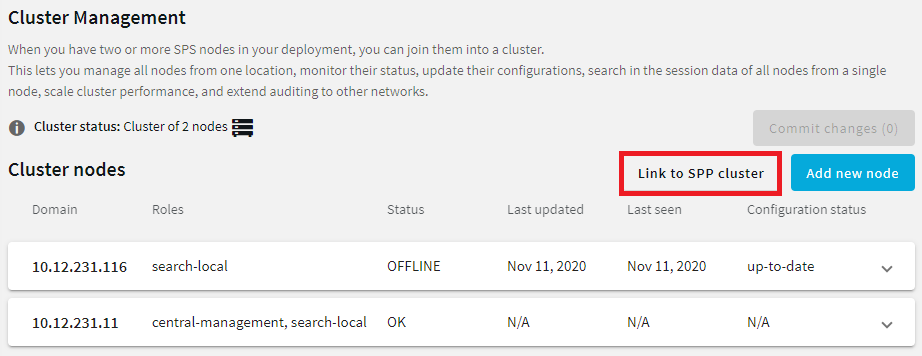
  3. Login to the Central management node of your SPS cluster. This node has Central management listed in the Basic Settings > Cluster management > Roles column.

  4. Navigate to Basic Settings > Cluster management, and click Link to SPP Cluster.

    Figure 390: Basic Settings > Cluster management — Linking SPS to SPP

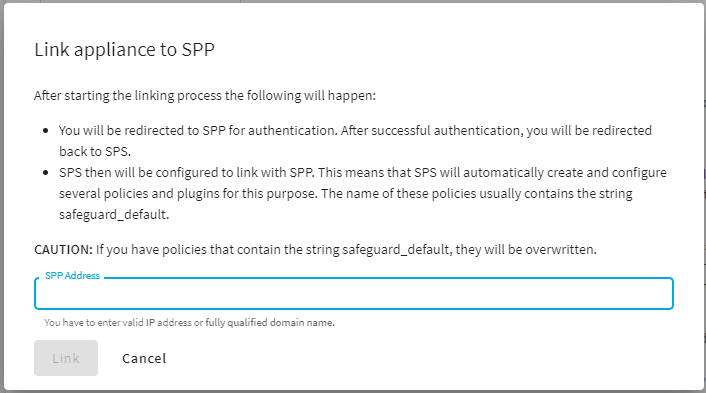
    The Link Appliance to SPP dialog then appears.

    Figure 391: Basic Settings > Cluster management > Link to SPP Cluster — The Link Appliance to SPP dialog

  5. Enter the primary IP address of SPP in the SPP Address field.

    NOTE: Only IPv4 addresses are supported.

  6. Click Link. Wait until you are redirected to SPP.

  7. Login to SPP. Wait until you are redirected to SPS.

  8. Wait until SPS creates and configures the policies and plugins required for the joint operation of SPS and SPP. This step can usually take up to a minute.

  9. You will receive a message:

    • If the linking is unsuccessful, this message displays: Request failed.

      If this happens, check the credentials and the IP address that you provided.

      For details on resolving errors, see SPP to SPS link issues and SPP to SPS link error resolution.

    • If the linking is successful, this message displays: SPS successfully linked to SPP.

      SPP automatically closes any open access requests.

  10. Log out from the SPS web interface.

Caution:

If the primary IP address of your SPS or SPP changes, you must repeat the linking procedure to relink the clusters. Use the Relink SPP cluster button to do so.

Switching seamlessly between SPS and SPP

You can seamlessly switch between the SPS and SPP web interfaces using the icon located next to the user menu. Seamless switching uses a federated login method, which enables you to switch between SPS and SPP appliances without having to reenter your credentials.

Prerequisites
  • SPP is joined to SPS, for more information, see Linking SPS to SPP.

  • On SPP, when you create an external federation, unselect the Require User to Always Authenticate check box. If you select the Require User to Always Authenticate check box, you will always be required to enter your credentials on the external provider. For more information on SPP external federation settings, see External Federation settings in the One Identity Safeguard for Privileged Passwords Administration Guide.

To set up seamless switching between SPS and SPP

  1. Complete the steps listed in Authenticating users with SAML2 login method.

    In Script name, enter the Login Provider ID of SPP.

    NOTE: The Login Provider ID is case sensitive.

  2. If you are editing the same SAML2 login method that you are currently using, after editing the method, log out and log in again for the changes to take effect.

  3. Select the icon, and after that select the logo of SPP under Linked Products.

    You have now switched to the SPP appliance.

Troubleshooting the SPS to SPP link

Topics:

SPP to SPS link error resolution

Common linking error resolutions follow which may occur when linking One Identity Safeguard for Privileged Passwords (SPP) to One Identity Safeguard for Privileged Sessions (SPS).

Typo in SPP's address, the address is not reachable
  • Error: The browser reports errors when SPS redirects to SPP's login page, for example, This site can’t be reached. The exact error message depends on the browser.

  • Resolution: Click the Back button of the browser and enter the correct address into the SPP Address field.

Typo in SPP's address, the address is alive, but not an SPP
  • Error: After clicking the Join button, a web site other than SPP's Login interface is displayed.

  • Resolution: Click the Back button of the browser and enter the correct address into the SPP Address field.

SPP's HTTPS certificate does not match its IP address or hostnam
  • Error message: Error joining to SPP: SPS has failed to join to SPP. For more information, see the error details. (JoinFailed)

  • Raw error:

    {
      "response": "Error sending request: SSLError: HTTPSConnectionPool(host='examplespp.company', port=443): Max retries exceeded with url: /service/core/v3/Cluster/SessionModules (Caused by SSLError(CertificateError(\"hostname 'examplespp.company' doesn't match '192.0.2.123'\",),))",
      "status": null,
      "url": "https://examplespp.company/service/core/v3/Cluster/SessionModules"
    }
  • Resolution:

    • If SPP's certificate contains SPP's IPv4 address in the Common Name or subjectAltName field, then enter that IP address when linking SPS to SPP.

    • If SPP's certificate contains only its DNS name in the Common Name or subjectAltName field, then use that hostname when linking SPS to SPP.

    • Otherwise, set up an SSL server certificate for SPP which matches its IP address in the certificate's Common Name or subjectAltNamefields (see SSL Certificates in the Safeguard Administration Guide) and retry linking. Wait about five minutes to let the timeout of the failed link request expire before starting a new link request after a failed incomplete one. (Alternatively, see Reversing the SPP to SPS join in the Safeguard Administration Guide.)

Typo in SPP credentials
  • Error: Login to the SPP web interface fails.

  • Raw error:

    {
            "error": "invalid_request",
            "error_description": "Access denied.",
            "success": false
        }
  • Resolution: Make sure that the correct username and password are entered in the SPP username: and SPP password: prompts.
SPP user has insufficient permission
  • Error message: Error joining to SPP: SPS has failed to join to SPP. For more information, see the error details. (JoinFailed)

     Authorization is required for this request.
    
           Code: 60108
           URL: https://192.0.2.123/service/core/v3/Cluster/SessionModules
           Status: 403
  • Resolution: When SPS redirects to SPP's Login interface, then login as an SPP user has "Appliance" and "Operations" permissions.
SPS is already linked to SPP
  • Error message: Error joining to SPP: SPS has failed to join to SPP. For more information, see the error details. (JoinFailed)

    The session connection has a missing, invalid, or non-unique
    value [ NodeId ].
    
           Code: 60657
           URL: https://192.0.2.123/service/core/v3/Cluster/SessionModules
           Status: 400
  • Resolution: See Reversing the SPP to SPS join in the Safeguard Administration Guide.
Linking takes too long (more than five minutes)
  • ERROR: Request to https://192.0.2.123/service/a2a/v2/PsmValidation failed, response (HTTP 403):

        {
            "Code": 60108,
            "Message": "Authorization is required for this request.",
            "InnerError": null
        }
  • Resolution: Make sure that SPS is not overloaded and try linking again.
Related Documents

The document was helpful.

Select Rating

I easily found the information I needed.

Select Rating